
Designing a captivating and functional blog page is crucial for any business website. It serves as a platform to engage with your audience, showcase your expertise, and establish a strong online presence. While WordPress offers default blog layouts, they might not always align with your business niche or branding requirements. That's where Elementor, a powerful drag-and-drop WordPress Page Builder, comes into play. With Elementor, you can effortlessly create a custom blog page that perfectly complements your business niche and enhances user experience.
In this blog post, we will delve into the art of creating a custom blog page in WordPress using Elementor. Whether you are a seasoned web designer looking to enhance your skills or a business owner seeking to establish an impressive online presence, this guide will equip you with the knowledge you need to unlock the full potential of your WordPress blog.
We will explore the key benefits of using Elementor to design your blog page in WordPress, from its vast template library and intuitive interface to its seamless integration with WordPress. We will also discuss the importance of a well-structured and visually appealing blog page, as well as the elements you should consider including to optimize user experience and engagement.
So, if you're ready to take your WordPress blog to the next level, Let's get started!
What Is A Custom Blog Page?
A Custom Blog Page Template refers to a uniquely designed and personalized section of a website that displays a collection of blog posts. Unlike a standard blog page with a generic layout, a custom blog page allows businesses to tailor the design, structure, and appearance of their blog section according to their specific brand identity and target audience.
In today's digital landscape, a blog has become an indispensable tool for businesses across all niches. It serves as a platform to publish informative and engaging content related to the industry, products, or services offered by the business. There are several compelling reasons why having a blog is crucial for the success of any business:
- Establishing Authority: A well-crafted blog provides an opportunity for businesses to showcase their expertise and knowledge within their niche. By consistently delivering high-quality, insightful content, businesses can position themselves as thought leaders, earning the trust and respect of their audience.
- Driving Traffic: Blogs are an effective way to attract organic traffic to a website. By regularly publishing valuable content optimized for search engines, businesses can increase their online visibility and drive targeted traffic to their website. It is then possible to convert this traffic into leads and customers.
- Enhancing Brand Awareness: Through a blog, businesses can communicate their brand values, unique selling propositions, and brand personality. By consistently creating and sharing relevant content, businesses can increase their brand visibility and build a loyal following.
- Engaging with the Audience: Blogs provide a platform for businesses to engage with their audience on a more personal level. By encouraging comments, sharing content on social media, and fostering discussions, businesses can establish a sense of community and build meaningful relationships with their readers.
- Boosting SEO Efforts: Search engines love fresh, relevant content, and a blog provides businesses with a constant stream of new content to optimize for search engine rankings. By incorporating targeted keywords, internal linking, and other SEO best practices, businesses can improve their website's visibility in search engine results.
- Generating Leads and Conversions: Blogs offer opportunities for businesses to capture leads and convert them into customers. By strategically placing call-to-action buttons, lead magnets, or newsletter sign-up forms within blog posts, businesses can effectively nurture leads and guide them through the sales funnel.
Overall, a custom blog page allows businesses to create a unique and visually appealing space on their website to showcase their expertise, engage with their audience, and drive traffic and conversions. Regardless of the business niche, a well-maintained and thoughtfully curated blog can be a powerful asset for establishing authority, increasing brand awareness, and driving business growth in the digital era.
Elements Of Any Blog Page In WordPress
A well-designed and user-friendly blog page consists of various elements that enhance the overall user experience and provide valuable information and resources to the readers. Along with compelling content, here are some essential elements that should be present on a blog page in WordPress:
- Breadcrumbs: Breadcrumbs are a navigation aid that helps users understand their current location within a website's hierarchy. They provide a trail of links, typically displayed near the top of the page, showing the path from the homepage to the current blog post. Breadcrumbs make it easier for users to navigate back to previous pages and improve the overall user experience.
- Table of Contents: A table of contents is particularly useful for longer blog posts or articles that cover multiple subtopics. It provides a structured overview of the content, allowing readers to quickly navigate to specific sections of interest. This feature enhances readability and ensures that readers can find the information they seek without scrolling through the entire post.
-
Title, Featured Image, Body Content: The title serves as the headline of the blog post and should be attention-grabbing and relevant. A compelling featured image adds visual appeal and can entice readers to click and explore the post further. The body content is the heart of the blog post, providing valuable information, insights, or entertainment. In addition to being well-structured, engaging, and easy to read, it should also be easy to use.
You can enhance your website’s visual appeal by using gradient effects in WordPress to create smooth color transitions in backgrounds, buttons, and text.
- Related Posts/Recommended Articles: Including a section that suggests related posts or recommended articles encourages readers to explore more content on your blog. This helps increase the time spent on your website, reduces bounce rates, and exposes readers to additional valuable information or relevant products/services.
- Social Sharing Buttons: Integrating social sharing buttons allows readers to easily share your blog post on their favorite social media platforms. This can significantly expand the reach of your content, attract new readers, and drive more traffic to your blog. Make sure to include prominent buttons for popular social media networks to encourage maximum sharing.
- Sidebar with Various Widgets: The Custom WordPress Sidebar is a versatile section of the blog page that can be customized with various widgets to enhance functionality and user experience. Some common widgets include a search bar, blog categories, recent posts, featured products or offers, subscription forms, popular tags, and more. Carefully selecting and arranging these widgets can help readers navigate your blog and discover additional content or relevant products/services.
- Author Profile: Adding an author profile section at the end of each blog post helps establish credibility and a personal connection with readers. It typically includes the author's name, bio, photo, and links to their social media profiles or website. This allows readers to learn more about the author and potentially engage with them further.
- Comment Section: Enabling a comment section encourages reader engagement, fosters discussions, and allows for direct feedback on your blog posts. It's essential to moderate and respond to comments promptly to maintain a positive and interactive community on your blog.
In addition to these elements, other optional features can be considered depending on the specific goals and requirements of your blog. These may include email subscription forms, a featured video section, a newsletter sign-up box, a search bar, popular posts, or testimonials.
Overall, a well-designed blog page in WordPress incorporates these elements strategically to create an immersive and user-friendly experience for readers. By combining informative and engaging content with intuitive navigation and interactive features, your blog can become a powerful tool for driving traffic, building a loyal readership, and achieving your business objectives.
How To Create A Custom Blog Page In WordPress?
Creating a custom blog page in WordPress using Elementor allows you to unleash your creativity and design a visually stunning and user-friendly blog that aligns perfectly with your brand. In this step-by-step guide, we will explore how to create a custom blog page in WordPress using Elementor while incorporating the key elements we discussed earlier.
Step 1: Install And Activate Elementor Plugin
To create a custom blog page in WordPress with Elementor, the first step is to install and activate the Elementor plugin. Elementor is a powerful page builder that allows you to design and customize your website's layout visually, without any coding knowledge.
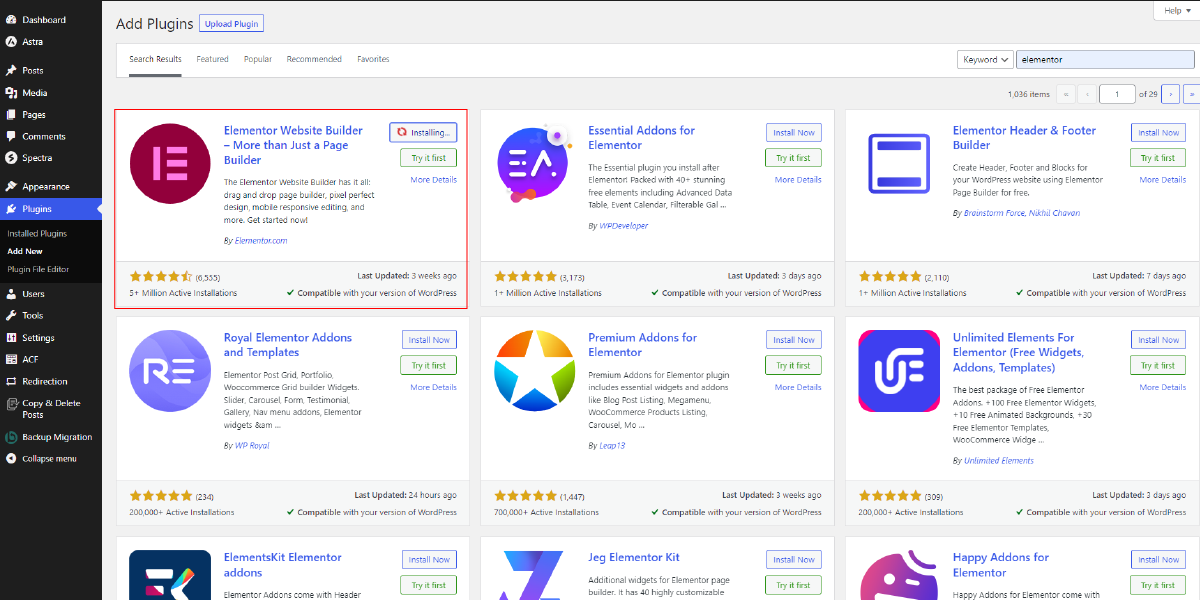
Start by logging into your WordPress dashboard and selecting "Plugins". Select "Add New" and search for "Elementor" in the search bar. Once you have found the Elementor plugin, click "Install Now.". Once you click that, WordPress will download and install the plugin.
After the installation is complete, click on the "Activate" button to activate the Elementor plugin. Once activated, you will notice a new option called "Elementor" in the WordPress dashboard sidebar.
Now you have successfully installed and activated the Elementor plugin, you can proceed to create your custom blog page in WordPress using this powerful tool.

Step 2: Set Up A Custom Blog Page Template
After installing and activating the Elementor plugin in WordPress, the first step to creating a custom blog page is to access the "Templates" section in the Elementor menu. This can be done by navigating to the WordPress dashboard and clicking on "Templates" followed by "Theme Builder."

Upon reaching the Theme Builder interface, you will be presented with the option to add a new template. Click on "Add New" to begin creating your custom blog page template.
In the template type selection, you need to choose the appropriate option based on your requirements. Since the focus here is on creating a blog page template that displays multiple posts, select the "Archive" option. This will allow you to design a template specifically tailored to showcase your blog posts effectively.

With the "Archive" template selected, you can proceed to customize and design your blog page using Elementor's intuitive drag-and-drop interface and a wide range of available widgets and elements. This will enable you to craft a visually appealing and user-friendly blog page that aligns with your website's branding and style.
Step 3: Design The Blog Page Layout
After setting up a custom template of a blog page in WordPress using Elementor, the next step is to design the blog page layout. To begin, you need to open the Elementor template builder interface. Once opened, you will have access to a wide range of options to create a visually appealing and functional layout.
To start designing the blog page, you can choose a suitable template or design from the Elementor template library. Alternatively, you can opt to design the layout from scratch by clicking on the "Add New Section" button. This gives you the freedom to customize every aspect of the page according to your preferences.
Using the intuitive drag-and-drop feature, you can easily add and arrange elements on the canvas. Elementor provides a variety of widgets that you can utilize to enhance your blog page. These widgets include the title, featured image, body content, related posts, social sharing buttons, and much more.

Once you have added the necessary elements, you can further customize their appearance. The Elementor panel, located on the left side of the interface, offers extensive options for adjusting typography, colors, and spacing. This allows you to match the design of your blog page with the overall theme and branding of your website.
Step 4: Adding All Essential Elements
Once you have designed the layout for your custom blog page using Elementor in WordPress, there are several essential elements you can add to enhance its functionality and user experience.
To start, you can include breadcrumbs on your blog page to help users navigate through your website easily. There are dedicated breadcrumbs plugins available, but you can also use the popular Yoast SEO plugin, which offers breadcrumb functionality. Install and activate the Yoast SEO plugin from the WordPress dashboard. After activation, navigate to "SEO" > "Search Appearance" > "Breadcrumbs." Enable the breadcrumbs option and customize the display according to your preference.
Another valuable addition is a table of contents within your blog posts. This feature allows readers to jump directly to different sections of a lengthy article. You can use plugins like "Table of Contents Plus" or other similar options available in the WordPress repository. Install and activate the chosen plugin, and it will automatically generate a table of contents based on the headings within your blog post.
To make your blog page more interactive, you can add a sidebar with various widgets. In the Elementor template builder, click on the "Add New Section" button. Choose the "Sidebar" widget from the Elementor panel and customize its appearance and width. Once the sidebar is added, you can populate it with widgets such as a search bar, blog categories, recent posts, featured products or offers, subscription forms, popular tags, and more. Simply drag and drop the desired elements from the Elementor panel's "Widgets" section into the sidebar section.
To provide an author profile at the end of each blog post, you can utilize plugins like "Simple Author Box" or similar options from the WordPress repository. Install and activate the plugin, and then go to "Settings" > "Simple Author Box" to customize the appearance and content of the author box. This plugin ensures that the author's profile is automatically displayed on each blog post, giving credit to the writer.
WordPress has a built-in comment system that allows readers to engage and leave comments on your blog posts. To enable comments, go to the WordPress dashboard and navigate to "Settings" > "Discussion." Ensure that the "Allow people to post comments on new articles" option is checked. You can further customize the comment settings based on your preferences, such as moderating comments before they appear on your blog or enabling comment notifications.
By adding these essential elements to your custom blog page, you enhance its functionality, improve user experience, and encourage reader engagement. These elements provide easy navigation, better content organization, additional information about the authors, and the ability for readers to leave their thoughts and comments on your blog posts.
Congratulations! You have now created a custom blog page in WordPress using Elementor and incorporated various essential elements discussed above. Remember to save and publish the template for it to take effect on your blog page.
To assign the newly created template to your blog page, go to "Pages" in the WordPress dashboard and edit the page where you want the blog to appear. Locate the "Page Attributes" section and choose the template you created from the "Template" drop-down menu. Update the page to apply the changes.
By following these steps, you can design a visually appealing blog page with Elementor breadcrumbs, a table of contents, a title, a featured image, body content, related posts, social sharing buttons, a sidebar with various widgets, author profiles, and a comment section, all created using Elementor in WordPress. This allows you to have full control over the design and functionality of your blog, ensuring a seamless user experience and driving engagement with your content.
Conclusion
In conclusion, leveraging WordPress Elementor themes when creating a custom blog page offers an even greater opportunity to design a unique and visually appealing platform to showcase your content. By understanding the elements that make up a blog page, such as the header, featured image, post content, and sidebar, you can create a personalized layout that reflects your brand and engages your audience.

With the intuitive drag-and-drop functionality of Elementor, you have full control over the design and placement of these elements. By following the step-by-step guide provided, you can easily create a custom blog page and enhance it further by adding essential elements like breadcrumbs, a table of contents, author profiles, and comments. Take advantage of the flexibility and creativity that Elementor offers, and create a captivating blog page in WordPress that will leave a lasting impression on your readers.

