
Email marketing remains a powerful tool for engaging with your audience and driving conversions, and one of the most effective ways to grow your email list is by using a newsletter popup on your website. If you’re a WordPress user, Elementor offers a fantastic solution for creating eye-catching and effective newsletter popups.
This blog will guide you through the process of embedding the Elementor newsletter popup on your website to supercharge your email marketing efforts. Whether you’re a seasoned digital marketer or just starting out, this comprehensive guide will provide you with the knowledge and step-by-step instructions you need to leverage the power of Elementor to grow your email list and boost your conversion rates.
We will cover everything you need to know, from the basics of creating a compelling newsletter popup design to advanced strategies for optimizing your popup’s performance. You’ll discover the key elements that make a popup effective, learn how to integrate it seamlessly with your website, and explore best practices for maximizing its impact on your email marketing campaigns.
With the right approach and a little creativity, you can turn your website visitors into loyal subscribers, nurturing them into valuable customers. So, if you’re ready to take your email marketing game to the next level, keep reading, and let’s dive into the world of Elementor newsletter popups to unlock their full potential.
What Is A Newsletter Popup?
A newsletter popup is a website element that appears in a small window or overlay on a webpage to capture the attention of visitors and encourage them to subscribe to your email newsletter. It typically displays a subscription form where users can enter their email addresses and sometimes other information, such as their names or preferences. The primary goal of a newsletter popup is to grow your email subscriber list, which is a vital asset for digital marketing and communication efforts.
Newsletter popups are a common and effective strategy for building and nurturing your audience. They are used by businesses, bloggers, e-commerce websites, and various organizations to keep their audience engaged, informed, and connected. When implemented thoughtfully and strategically, newsletter popups in Elementor can have a significant positive impact on your email marketing efforts.
How Elementor Helps You Add Newsletter Popups To Your Website
Elementor is a popular WordPress page builder plugin that empowers users to design and customize their websites with ease. Elementor’s intuitive drag-and-drop interface makes it accessible to both beginners and experienced web designers. When it comes to adding newsletter popups to your website, Elementor offers several advantages:
- User-Friendly Popup Builder: Elementor features a built-in popup builder that simplifies the process of creating and customizing newsletter popups. You can design popups visually, without any coding knowledge, by selecting from a range of templates and widgets. This means you have complete control over the appearance and functionality of your popups.
- Integration with Email Marketing Services: Elementor seamlessly integrates with popular email marketing services like Mailchimp, AWeber, and ConvertKit, allowing you to connect your popup directly to your email list. This integration automates the subscription process, ensuring that new subscribers are added to your mailing list without manual data entry.
- Advanced Targeting and Triggers: Elementor provides advanced targeting and trigger options for your popups. You can choose when and where your popups appear, such as on specific pages, after a certain amount of time, or when users are about to exit your site. This precision helps in delivering popups to the right audience at the right moment.
- Customizable Design: With Elementor, you can create eye-catching and on-brand newsletter popups. Customize the layout, colors, typography, and images to match your website’s design and maintain a cohesive look and feel. You can also add engaging elements like buttons, images, and videos to make your popups more appealing.
- A/B Testing: Elementor allows you to perform A/B testing on your popups. This means you can create multiple versions of your popups with different designs or messaging and see which one performs better. A/B testing helps you optimize your popups for higher conversion rates.
Benefits of Using Elementor Newsletter Popups
Now that we’ve covered how Elementor can help you add newsletter popups to your website let’s explore the numerous benefits of utilizing this feature:
- Increased Email Subscribers: The primary objective of a newsletter popup is to grow your email list, and Elementor excels in this regard. With its user-friendly interface and customizable designs, you can create compelling popups that entice visitors to subscribe, leading to a steady influx of new subscribers.
- Engagement and Conversion: Newsletter popups act as attention-grabbing calls to action. They encourage visitors to take a specific action—subscribing to your newsletter. When executed effectively, Elementor popups can significantly boost your website’s conversion rates, helping you convert casual visitors into engaged subscribers.
- Personalization: Elementor allows you to personalize your popups based on user behavior, such as showing different popups to first-time visitors versus returning visitors. Personalization increases relevance, making it more likely that visitors will interact with your popup and subscribe.
- Data-Driven Decisions: Elementor’s A/B testing capabilities empower you to make data-driven decisions. By experimenting with different popup designs and content, you can identify what resonates best with your audience and refine your approach accordingly.
- Reduced Bounce Rates: Well-designed and strategically timed popups can help reduce bounce rates by keeping visitors engaged with your website. Instead of leaving immediately, they have the opportunity to subscribe and stay connected with your brand.
- Integration with Marketing Automation: Elementor’s integration with email marketing services streamlines your marketing efforts. New subscribers are automatically added to your email list, saving you time and ensuring that you can nurture your leads effectively.
- Enhanced User Experience: Elementor allows you to create popups that enhance, rather than disrupt, the user experience. With control over timing and display rules, you can ensure that popups are shown at the right moments and do not irritate visitors.
- Brand Consistency: It is essential to maintain a consistent brand image in order to build trust. Elementor’s design customization options let you create popups that align perfectly with your website’s branding, reinforcing your brand identity.
By leveraging Elementor’s capabilities, you can maximize the impact of your newsletter popups and enhance your digital marketing strategy.
How To Embed The Elementor Newsletter Popup On Your Website?
Embedding an Elementor Newsletter Popup on your website is a relatively straightforward process, whether you’re using premade templates offered by Elementor Pro or building one from scratch. Follow this detailed step-by-step guide to get started.
Step 1: Install And Activate Elementor Pro

The first crucial step in embedding the Elementor Newsletter Popup on your website is to install and activate the Elementor Pro plugin if you haven’t already done so. Elementor Pro is the premium version of the Elementor page builder plugin, and it offers a wide array of advanced features, including a dedicated popup builder with templates and extensive customization options.
To get started, log in to your WordPress admin dashboard and navigate to the “Plugins” section. In the plugin repository, click “Add New,” then search for “Elementor” Once you locate it, click on the “Install Now” button, and after installation is complete, click “Activate.” Then Click on upgrade to pro. It will redirect you to the pricing plan, select one that suits your needs.
Activating Elementor Pro unlocks its full potential, giving you access to an intuitive visual editor that simplifies the creation of captivating newsletter popups. You’ll be able to select from a variety of pre-designed templates or build your popup from scratch, tailor it to match your website’s branding and configure display settings and triggers to optimize user engagement. With Elementor Pro in place, you’re ready to dive into designing and embedding your Newsletter Popup effectively.
Step 2: Create A New Popup

After installing and activating Elementor Pro, the next step in embedding the Elementor Newsletter Popup on your website involves creating a new popup. To begin, access your WordPress dashboard and locate the “Templates” option, which can be found just below Elementor. Click on the “Popup” tab within this section to be redirected to the Elementor popup builder.

Within the Elementor popup builder interface, you will have the option to initiate the creation of a new popup. To do this, click on the “Add New Popup” button. Upon doing so, you’ll be prompted to specify the template type as “popup” and provide a name for your popup.

With the initial setup completed, click on the “Create Template” button to proceed. Elementor Pro Page Builder offers a diverse selection of premade Newsletter Popup templates that are designed to cater to various preferences and website styles. You can conveniently browse and select the template that best aligns with your website’s design and overall objectives.
To incorporate your chosen template into your popup editor, locate and click the “Insert” option associated with the template you wish to use. This action will seamlessly add the selected template to your popup editor, allowing you to further customize and tailor it to suit your brand’s unique identity and marketing goals. By following these steps, you’ll be well on your way to creating an engaging and effective Elementor Newsletter Popup for your website.
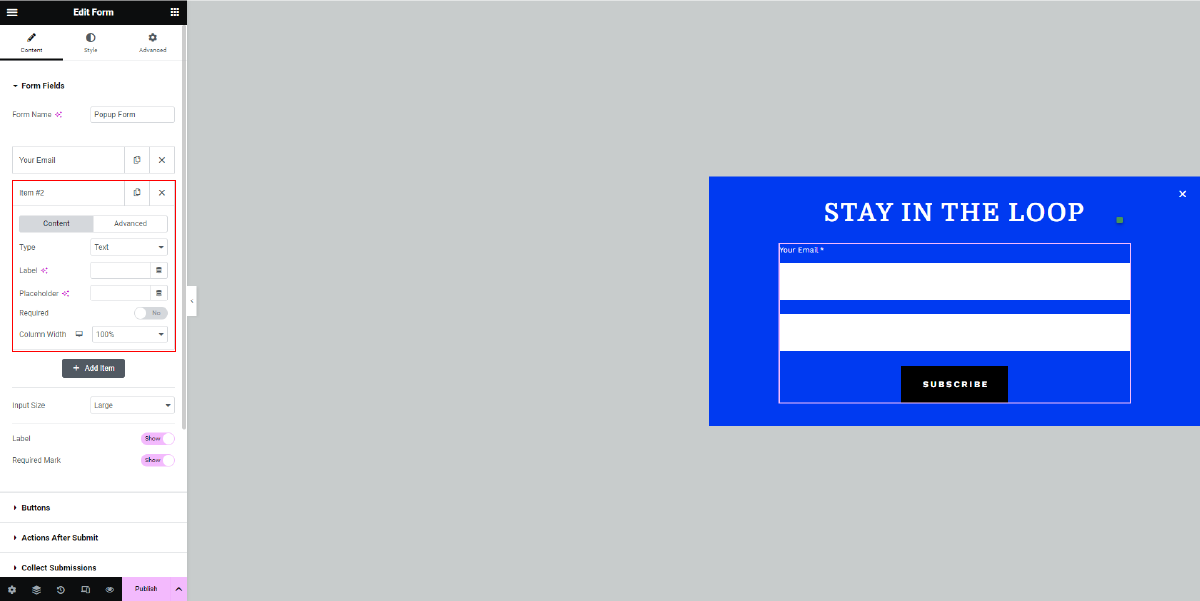
Step 3: Customize The Popup Design

Customizing the design of your Elementor newsletter popup is a pivotal step in ensuring that it seamlessly integrates with your website’s branding and appeals to your target audience. Even if you’re starting with a premade template, Elementor provides you with a user-friendly, drag-and-drop interface that empowers you to make extensive design modifications.
To begin the customization process, click on the elements you wish to modify, whether it’s the text or images within the popup. Once selected, you’ll find a panel on the left that offers a myriad of options for tweaking these elements. Here, you can effortlessly change text, swap images, adjust colors, and modify fonts to align with your website’s distinctive style.
For collecting vital information such as email addresses, Elementor has already integrated a form into your popup. This form serves as a direct gateway to growing your subscriber list. You can tailor it to your specific needs by customizing the form fields and labels. This level of flexibility ensures that you gather the precise information required for your email marketing campaigns.
Within the content section, you’ll find settings for Form Fields, Buttons, Actions After Submit, Collect Submissions, the email address to which you want submissions directed, Steps Settings, and Additional Options. These settings allow you to fine-tune the form’s functionality to your liking, making it as user-friendly and informative as possible.
In addition to content customization, Elementor also provides control over the layout of your newsletter popup. You can adjust container width, height, items, and direction to ensure that it harmonizes seamlessly with the overall layout of your website.
When it comes to style, Elementor offers a wide range of customization options. You can modify the background, add a background overlay, adjust borders, and even incorporate shape dividers to create a visually engaging and cohesive design that captivates your visitors.
For those who want to take their design customization to the next level, the advanced section offers settings for layout, motion effects, transformation options, responsive design, attributes, and the ability to add custom CSS. This level of control allows you to craft a newsletter popup that not only captures attention but also aligns perfectly with your website’s unique aesthetics.
Step 4: Configure Popup Settings

After creating and customizing the popup design in Elementor, the next crucial step is to configure the popup settings. This step allows you to determine when and where the popup should appear on your website, enhancing its effectiveness and optimizing the user experience.
To initiate this process, click on the “Publish” button, which will guide you to the popup settings panel. Here, you will find a range of options to tailor the popup’s behavior:
- Conditions: In the Conditions section, you can specify where your popup template should be displayed on your site. For instance, you can select “Entire Site” to ensure the template appears consistently across all pages, or you can choose specific pages or sections for targeted visibility.
- Triggers: Triggers dictate the actions that prompt the popup to open. Elementor provides various trigger options, such as “On Page Load” (when the page loads), “On Scroll” (when users scroll down), “On Scroll To Element” (when users reach a particular page section), “On Click” (when users click a designated element), “After Inactivity” (after a set period of user inactivity), and “On-Page Exit Intent” (when users are about to leave the page). Selecting the most appropriate trigger for your popup ensures it engages visitors effectively.
- Advanced Rules: This section allows you to set specific requirements for the popup to open. You can configure rules like “Show after X page views,” “Show after X sessions,” “Show up to X times” (limiting how often the popup is shown to the same user), “When arriving from a specific URL” (displaying the popup for visitors arriving from a particular source), “Show when arriving from” (setting conditions based on referral sources), “Hide for logged-in users” (preventing the popup from appearing for logged-in users), Show on devices” (specifying the devices where the popup should appear), Show on browsers” (restricting the popup to specific browsers, and even scheduling the date and time for popup display.
Once you’ve configured these settings to align with your website’s goals and user behavior, make sure to click “Save” to preserve your configurations. Properly configuring these settings ensures your Elementor newsletter popup engages visitors at the right moments and on the right pages, ultimately enhancing your email marketing efforts and user experience.
Step 5: Integrate With Your Email Marketing Service
After configuring the popup’s display settings in Elementor, the next crucial steps involve integrating it with your email marketing service and setting up a clear confirmation message. These elements are pivotal in ensuring a seamless user experience and nurturing your newly acquired subscribers effectively.
If you’re utilizing an email marketing service like Mailchimp or AWeber, you can seamlessly integrate it with your Elementor popup. To do this, proceed to the “Actions After Submit” section within the Elementor popup builder. Here, you will choose “Add Action” and select your preferred email marketing service. Follow the prompts provided to establish a connection between your website and your email marketing account. This integration automates the process of adding new subscribers to your email list, saving you time and reducing the risk of manual errors.
In addition to integration, it’s essential to pay attention to the design and messaging of your popup’s submission process. Ensure that the submit button stands out visually, encouraging visitors to click and subscribe. You can customize the button’s design within the popup builder to make it more appealing.
Furthermore, crafting a clear and engaging confirmation message is crucial. Modify the confirmation message to thank users for subscribing and inform them about what they can expect from your newsletter. In Elementor’s “Additional Options” section, you will find options to add custom messages for different scenarios, including a Success Message (for successful subscriptions), Form Error (for submission errors), Server Error (for technical issues), and Invalid Form (for incorrect form entries). Tailoring these messages ensures a positive user experience and sets the right expectations for your subscribers.
By integrating your email marketing service and refining the confirmation message, you enhance the effectiveness of your Elementor newsletter popup. This integration streamlines your email marketing efforts, while clear messaging fosters a sense of trust and transparency with your subscribers. As a result, you can expect higher engagement rates and a more successful email marketing campaign.
Step 6: Review And Publish

Before publishing your Elementor newsletter popup, it’s crucial to review it meticulously to ensure everything aligns with your design and functionality expectations. Take a moment to check the layout, colors, typography, and the placement of elements within the popup. Verify that the trigger conditions and display rules are set correctly to engage your audience effectively.
Once you’ve thoroughly reviewed and are satisfied with your newsletter popup, it’s time to take the final step. Click the “Publish” button to make your popup live on your website. This action will set your carefully crafted popup in motion, actively working to capture email subscribers and boost your email marketing efforts.
After embedding the Elementor Newsletter Popup on your website, it’s crucial to monitor and optimize its performance continuously. Tracking key metrics like conversion rate, bounce rate, and subscriber growth is essential. By regularly reviewing these metrics, you can gain valuable insights into how well your popup is performing. Analyze user behavior and adjust your popup’s design, timing, and targeting accordingly.
A/B testing can help refine your approach, allowing you to identify what resonates best with your audience. This ongoing monitoring and optimization process will ensure that your Elementor Newsletter Popup continues to contribute effectively to your email marketing efforts and overall website goals.
By following these steps, you can successfully embed an Elementor Newsletter Popup on your website.
Conclusion
In conclusion, we’ve embarked on an insightful journey exploring the world of Elementor Newsletter Popups and their pivotal role in boosting your email marketing efforts, all within the seamless framework of WordPress Elementor themes. We’ve covered the fundamentals, from understanding what newsletter popups are to the invaluable benefits of leveraging Elementor’s capabilities in adding them to your website.
With the power of Elementor, you can effortlessly design and customize eye-catching popups, seamlessly integrate them with your email marketing services, and fine-tune their behavior to engage your audience effectively. These pop ups serve as dynamic tools to capture more subscribers, reduce bounce rates, and ultimately drive higher conversions.
As you venture into embedding Elementor Newsletter Popups on your website, remember that the journey doesn’t end there. Continuous monitoring and optimization are key. Keep a close eye on crucial metrics and be ready to adapt your strategies based on user behavior.
By incorporating Elementor Newsletter Popups thoughtfully and strategically, you’ll not only enhance your email marketing efforts but also forge stronger connections with your audience, ultimately leading to greater brand success and customer loyalty. So, start your journey today, and let Elementor empower your email marketing success story. Happy pop-up designing!
The WordPress theme bundle, paired with Premium Elementor Themes, seamlessly integrates with Elementor’s Newsletter Popup. This synergy allows for easy customization and deployment of captivating popups, enhancing user engagement and subscriber acquisition. This dynamic combination empowers website owners to create compelling, conversion-focused experiences, driving meaningful interactions with their audience.

