If you’re looking for an easy way to manage the tracking codes for your website, Google Tag Manager is the perfect tool for you. By allowing you to manage all of your website’s tracking codes in one place, it can save you a lot of time and hassle. However, if you’re unfamiliar with the process, setting up Google Tag Manager can initially seem daunting.
Thankfully, if you’re using WordPress as a CMS, the process of setting up Google Tag Manager in WordPress can be relatively straightforward. With just a few simple steps, you can install Google Tag Manager on your WordPress site and easily manage your tracking codes.
In this blog post, we’ll guide you through the 4 simple steps you need to take to install Google Tag Manager in WordPress. We’ll cover everything from creating a Google Tag Manager account, installing the Google Tag Manager plugin on your WordPress site, and setting up your tracking codes in the Google Tag Manager interface.
Whether you’re a seasoned WordPress user or you’re just getting started with the platform, this guide will give you all the information you need to get started with Google Tag Manager. By the end of this post, you’ll be ready to start using Google Tag Manager in WordPress to manage your tracking codes and gain valuable insights into your website’s performance.
So, if you’re ready to take the first step towards simplifying your website tracking process, let’s dive in and learn how to install Google Tag Manager in WordPress!
What Exactly Is Google Tag Manager?
Google Tag Manager (GTM) is a free web-based tool provided by Google that allows website owners and marketers to add and manage various tracking tags and pixels on their website without requiring them to modify the website’s code.
In simpler terms, GTM allows you to add various tags to your website without having to touch the code of your website. These tags are snippets of code provided by third-party tools and services like Google Analytics, Facebook Pixel, AdWords Conversion Tracking, and many others. These tags are used to collect data about how users interact with your website, track conversions, and measure the success of your online campaigns.
Using GTM, you can easily add, edit, and remove tags without having to involve your web developer. The tool has an intuitive interface that allows you to set up tags, triggers, and variables without any coding knowledge. Tags can be customized to fire only on specific pages, events, or user interactions. This allows you to collect specific data that is relevant to your business. There are many benefits of using google tag manager in WordPress websites.
Key Components of Google Tag Manager
- Tags: These are snippets of code or tracking pixels from various marketing and analytics tools. Tags can include Google Analytics, Facebook Pixel, AdWords conversion tracking, and more.
- Triggers: Triggers determine when and where tags are fired or executed on the website. Triggers can be based on page views, clicks, form submissions, specific URLs, or other user interactions.
- Variables: Variables hold data that can be used to configure and control tags and triggers. They can capture information like page URLs, click text, form values, or custom data layers.
Benefits Of Adding Google Tag Manager In WordPress
When it comes to WordPress websites, GTM can offer several benefits, including:
- Easy tag management: GTM makes it easy to add and manage tags on your WordPress website, without requiring any technical skills or coding knowledge.
- Enhanced analytics: With GTM, you can track various metrics related to user behaviour, such as page views, clicks, and conversions, and use this data to make informed decisions about your website’s content and design.
- Improved website speed: By using GTM to manage your tags, you can reduce the number of external scripts and codes that your website has to load, which can improve your website’s speed and user experience.
- Better targeting and personalization: GTM allows you to create custom triggers that can be used to target specific groups of users with personalized content and offers, improving the relevance and effectiveness of your marketing campaigns.
- Integration with third-party tools: GTM can integrate with a wide range of third-party tools, such as Google Analytics, AdWords, and Facebook Pixel, to provide a more comprehensive and integrated view of your website’s performance.
Overall, adding GTM to your WordPress website can help you streamline your marketing and analytics efforts, improve user engagement and experience, and gain valuable insights into your website’s performance.
But is it a daunting task to install a google tag manager in WordPress?
The answer is “No”, it is a very straightforward process. Let’s check it out in detail.
How To Install A Google Tag Manager In WordPress?
Installing Google Tag Manager in WordPress websites involves two steps: setting up a Google Tag Manager account and then adding the Google Tag Manager code to your WordPress site. In order to do so, follow these steps.
Step 1: Create A Google Tag Manager Account

To create a Google Tag Manager account, you need to have a Google account. If you already have a Google account, you can go to the Google Tag Manager website and sign in using your Google account credentials. If you don’t have a Google account, you can create one by going to the Google Sign Up page and following the instructions. Once you have a Google account, you can proceed with creating a Google Tag Manager account.
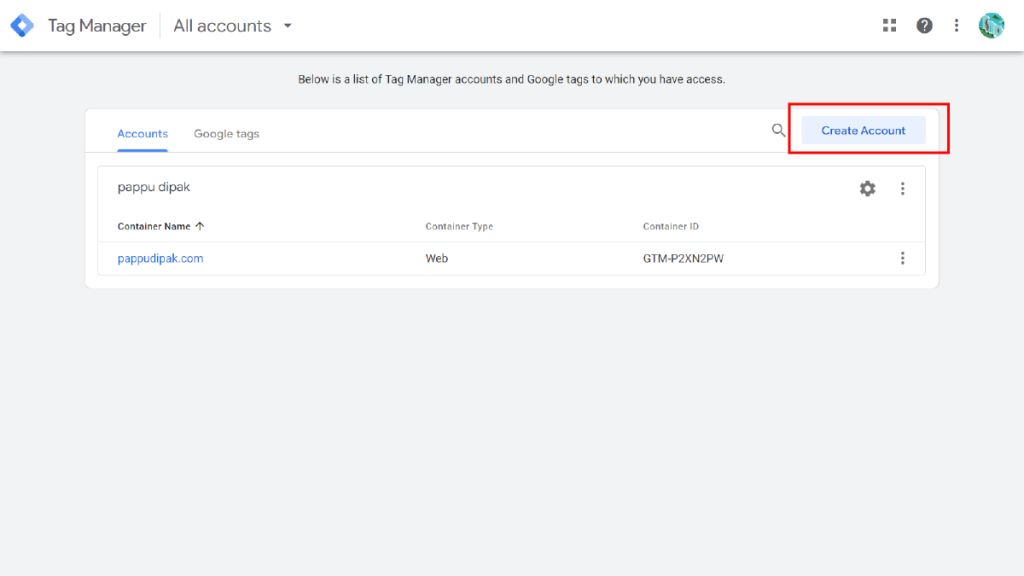
Once you have logged in, you will be taken to the Google Tag Manager dashboard. From here, you can create a new account by clicking on the “Create Account” button. On the next screen, you will be asked to provide a name for your account. Enter a name that will help you identify the account easily. You can then select the country from which you are located. Later on, click on the check box where you will be asked whether you are ready to share data anonymously with Google and others.
After you have entered this information, you will need to select a container to hold your tracking codes. A container is a JavaScript code snippet that is inserted into the header or footer of your website’s pages, which allows Google Tag Manager to track visitor behaviour on your site. You can choose to create a new container or use an existing one if you have already set one up.
Next, you will be asked to choose your target platform. Since you are installing Google Tag Manager in WordPress websites, you will need to select “Web” as your platform. You will then be prompted to choose the type of container you want to create. There are two options: “Web Container” and “AMP Container.” For the purposes of installing Google Tag Manager in WordPress websites, you should select the “Web Container” option.
Finally, you will need to accept the terms of service and click on the “Create” button. Once you have created your Google Tag Manager account and container, you will be provided with the container code snippet that you will need to insert into your WordPress site’s header or footer. You can find instructions on how to do this in the Google Tag Manager dashboard, or you can consult the documentation for your WordPress theme or whole WordPress Theme Bundle or WordPress plugin. This is the next step of this process.
Step 2: Add The Code To Your WordPress Website

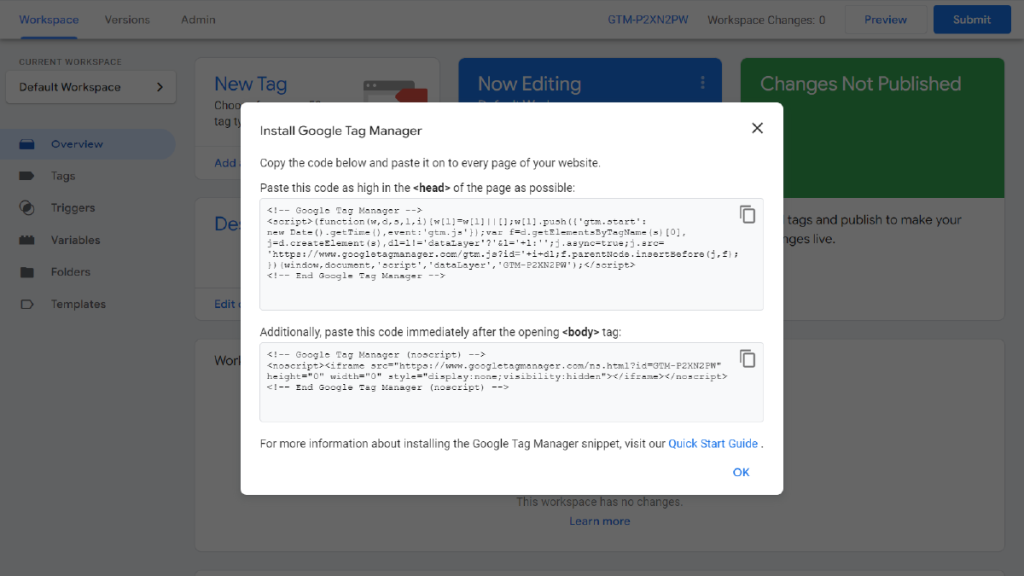
The second step in this process is adding the Google Tag Manager container code to your WordPress site. The container code is a small piece of JavaScript code that is provided by Google Tag Manager. It contains a unique ID that is used to identify your Google Tag Manager account. To add this code to your WordPress site, you will need to access the code editor for your website.
To add the container code to the head section of your WordPress site, you will need to find the header.php file in your theme’s folder. If You are using WordPress Elementor Themes by WP Elemento then it will be easy for you to find this file. This file contains the code that is used to generate the header section of your website. You will need to locate the <head></head> tags in this file and paste the container code just above them. This will ensure that the container code is loaded before any other scripts or stylesheets on your site.
The container code that needs to be added to the head section of your WordPress site looks something like this:
<!– Google Tag Manager –>
<script>(function(w,d,s,l,i){w[l]=w[l]||[];w[l].push({‘gtm.start’:
new Date().getTime(),event:’gtm.js’});var f=d.getElementsByTagName(s)[0],
j=d.createElement(s),dl=l!=’dataLayer’?’&l=’+l:”;j.async=true;j.src=
‘https://www.googletagmanager.com/gtm.js?id=’+i+dl;f.parentNode.insertBefore(j,f);
})(window,document,’script’,’dataLayer’,’GTM-XXXXXXX’);</script>
<!– End Google Tag Manager –>
The container code also needs to be added to the body section of your WordPress site. To do this, you will need to find the footer.php file in your theme’s folder. This file contains the code that is used to generate the footer section of your website. You will need to locate the <body></body> tags in this file and paste the container code just above them. This will ensure that the container code is loaded as early as possible in the page-loading process.
The container code that needs to be added to the body section of your WordPress site looks something like this:
<!– Google Tag Manager (noscript) –>
<noscript><iframe src=”https://www.googletagmanager.com/ns.html?id=GTM-XXXXXXX”
height=”0″ width=”0″ style=”display:none;visibility:hidden”></iframe></noscript>
<!– End Google Tag Manager (noscript) –>
Once you have added the container code to the head and body sections of your WordPress site, you will need to save the changes and refresh your website to ensure that the container code is properly loaded. You can then proceed to the next step in the process of installing Google Tag Manager in WordPress.
Step 3: Create A Tag In Google Tag Manager

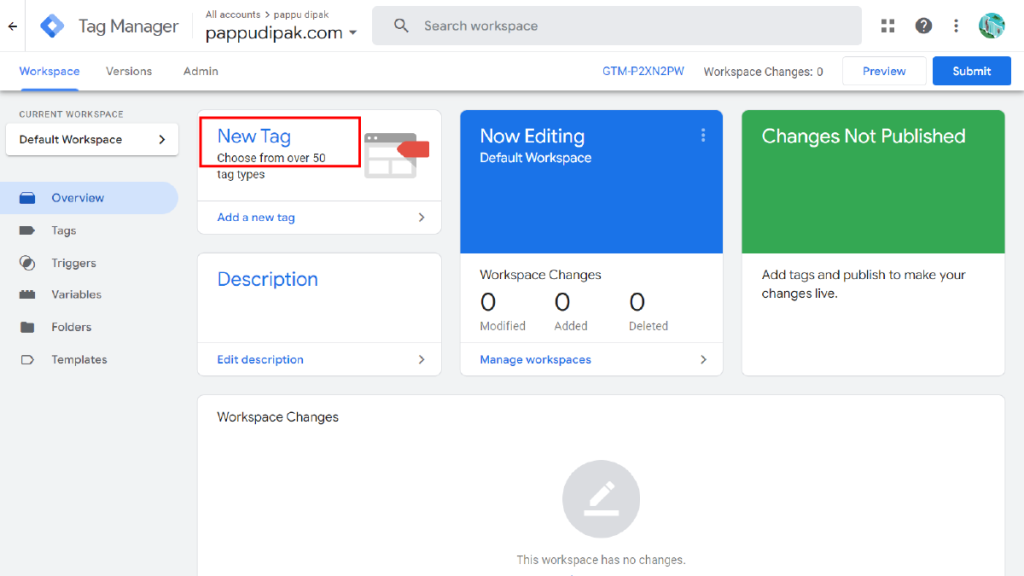
After installing the Google Tag Manager in WordPress websites, the next step is to create a new tag in the Google Tag Manager. A tag is a snippet of code that sends data to a third-party tool, such as Google Analytics or Facebook Pixel, allowing you to track user behaviour on your website. The process of creating a new tag involves defining the tag type, configuring its settings, and linking it to a trigger. Add Google Analytics to WordPress Elementor site, which help you track important metrics like pageviews, bounce rate, and average session duration.
To create a new tag in Google Tag Manager in WordPress, start by logging into your GTM account and selecting the container that you created in the previous step. Next, click on the “Tags” menu item in the left-hand sidebar, and then click the “New” button in the upper right-hand corner of the screen. You will then be prompted to choose a tag type from the list of available options, including Google Analytics, Facebook Pixel, LinkedIn Insight, Quora Pixel, and many more.
Once you have selected the tag type that you want to create, you will need to configure its settings. This typically involves entering your tracking ID or pixel ID, which can be obtained from the corresponding third-party tool, and specifying any additional settings that are required. For example, if you are creating a Google Analytics tag, you will need to specify which website property you want to track, while if you are creating a Facebook Pixel tag, you may need to specify which conversion events you want to track.
After you have configured the settings for your new tag, you will need to link it to a trigger. A trigger is a set of conditions that determine when the tag should fire, such as when a user clicks on a specific button or visits a particular page. To link your tag to a trigger, click on the “Triggers” menu item in the left-hand sidebar, and then click the “New” button. From there, you can choose from a variety of trigger types, such as Pageview, Click, or Form Submission, and configure their settings as needed.
Once you have linked your new tag to a trigger, you can save and publish your changes to Google Tag Manager. Your new tag will now be active on your website, allowing you to track user behaviour and gather valuable insights into how your website is performing.
Step 4: Verify The Installation
The fourth step in the installation of Google Tag Manager in WordPress is to verify the installation and ensure that all the tags are set up correctly. This step is crucial because it confirms that the tracking codes have been installed correctly and that the tags are working as intended. This step also helps to ensure that the website is properly tracking all the necessary data.
To verify the installation, the first thing to do is to open the Google Tag Manager interface and navigate to the “Tags” section. In this section, you will see a list of all the tags that have been set up. Check to see if all the tags are showing as “fired” or “live.” If any of the tags are showing as “not fired,” it means that there is an issue with the setup, and the tag is not working correctly. You will need to troubleshoot the tag to resolve the issue.
There are several ways to verify the installation, including using Pixel Helper, Tag Assistant, or other Chrome extensions. Pixel Helper is a tool developed by Facebook that helps in verifying the installation of Facebook Pixel on a website. This tool can also be used to verify other tags, including Google Analytics, AdWords, and Google Tag Manager with Elementor. Once installed, Pixel Helper scans the website and detects all the tags implemented on it. It then displays information about the tags, including their status and any errors detected. This information helps in identifying and fixing any issues with the tags.
Tag Assistant is another tool developed by Google that verifies the installation of Google tags on a website. This tool works by scanning the website and checking for any issues with the tags. It then displays information about the tags, including their status, errors detected, and recommendations for fixing the issues. This information is useful in ensuring that all tags are correctly implemented and working as intended.
Other Chrome extensions can also be used to verify the installation of tags on a website. These extensions work similarly to Pixel Helper and Tag Assistant, by scanning the website and checking for any issues with the tags. They then display information about the tags, including their status, errors detected, and recommendations for fixing the issues. These extensions are useful in ensuring that all tags are correctly implemented and working as intended. By verifying the installation, website owners can ensure that all tags are correctly implemented and working as intended, leading to accurate data collection and analysis.
Conclusion
In conclusion, installing Google Tag Manager in WordPress can seem daunting, but by following these four simple steps, the process becomes manageable. By first creating a Google Tag Manager account, then installing the plugin on WordPress, setting up tags, and finally verifying the installation, website owners can ensure that their website is accurately tracking and analyzing data.
With Google Tag Manager, website owners can easily implement and manage various tags, including Google Analytics, Facebook Pixel, and AdWords, leading to better data collection and analysis. Implementing Google Tag Manager can significantly improve website performance and enhance digital marketing efforts. So, go ahead and follow these simple steps to install GA4 with Tag Manager in WordPress and start reaping the benefits of accurate data tracking and analysis.


