In the dynamic landscape of web design, staying ahead of the curve is essential to leave a lasting impression on your website visitors. Parallax scrolling, a technique that creates an illusion of depth and motion, has become a powerful tool to enhance user engagement and elevate the overall aesthetics of websites.
Imagine captivating your audience as they scroll through your webpage, with background images moving at a different pace than the foreground elements. This creates an immersive and visually appealing experience that can effectively communicate your brand’s story, showcase products, or add magic to your online presence.
But incorporating parallax effects goes beyond just aesthetics. It’s about infusing life into your content, making it more interactive and memorable. As users become more accustomed to sophisticated digital experiences, providing them with engaging and captivating visuals is no longer an option, but a necessity.
This comprehensive guide will delve into the world of parallax effects for WordPress websites. We’ll explore the parallax effect, and discuss its potential benefits for your site. Whether you’re looking to add an extra layer of creativity to your projects or to enhance your site’s visual appeal, this guide will equip you with the knowledge and insights you need.
Get ready to transform your WordPress website into a captivating visual journey with parallax effects. Let’s get started.
What Is The Parallax Effect In Website Design?
The Parallax Effect in website design is a visual technique where background images move at a different speed than the foreground content as the user scrolls down the page. This creates an illusion of depth and motion, resulting in a captivating and immersive user experience. The effect gives the impression that different elements are on separate planes, enhancing the overall aesthetic appeal of the website.
Elementor, a popular WordPress page builder, provides tools and features that allow users to easily create the Parallax Effect in their website designs. With Elementor’s intuitive interface, you can apply parallax scrolling to various elements on your web pages, such as images, text, and sections. By adjusting settings like scroll speed and direction, you can control the intensity of the parallax effect to match your design goals.
This feature not only adds a visually stunning dimension to your website but also enhances storytelling and engagement. When used thoughtfully, the Parallax Effect can effectively guide users’ attention, highlight key content, and create a memorable browsing experience. Elementor’s user-friendly approach makes it accessible to both seasoned designers and those new to web development, allowing them to incorporate this dynamic design element without complex coding. Now let’s check out some of the benefits of the Parallax Effects in website design.
Benefits Of Using The Parallax Effect In Website Design
The Parallax Effect has gained immense popularity in website design due to its ability to create visually engaging and immersive user experiences. Here are the detailed benefits of using the Parallax Effect in website design:
- Enhanced User Engagement: The Parallax Effect captures users’ attention by offering a unique scrolling experience. As visitors interact with your website, the layered visual elements create an illusion of depth and motion, encouraging them to explore further and spend more time on your site.
- Storytelling and Brand Identity: Parallax scrolling provides an innovative way to narrate your brand’s story. By strategically arranging elements that unfold as users scroll, you can guide them through a seamless narrative journey, effectively conveying your brand’s identity, mission, and values.
- Visual Interest and Aesthetics: Parallax effects add a touch of elegance and sophistication to your website’s design. Dynamic backgrounds and foreground elements moving at different speeds create an engaging visual contrast, making your site stand out and leaving a memorable impression on visitors.
- Improved User Experience: When executed thoughtfully, the Parallax Effect enhances user experience by making navigation intuitive and interactive. Users are more likely to explore various sections of your site as they scroll, increasing the chances of discovering valuable content.
- Showcasing Products and Services: Businesses can leverage parallax to present their products or services in a more captivating manner. By incorporating subtle animations and transitions, you can demonstrate product features, benefits, and use cases, leading to higher conversion rates.
- Reduced Bounce Rates: Websites with compelling visuals and engaging interactions tend to have lower bounce rates. Parallax scrolling encourages users to explore multiple sections of your site, reducing the likelihood of them leaving after viewing just one page.
- Mobile Responsiveness: As mobile browsing continues to grow, it’s crucial for websites to adapt. Parallax designs can be responsive and optimized for various screen sizes, ensuring that users on smartphones and tablets have a seamless experience as well.
- Call-to-Action Emphasis: Parallax can be used strategically to draw attention to important CTA buttons. By placing CTAs against a dynamic background, you can make them more noticeable and encourage user interaction.
- Memorable Impressions: The unique and interactive nature of parallax scrolling leaves a lasting impression on visitors. Users are more likely to remember your website and revisit it in the future, contributing to brand recall and loyalty.
- Competitive Differentiation: With the proliferation of websites, standing out is challenging. Utilizing the Parallax Effect sets your site apart from the crowd, demonstrating your commitment to delivering an innovative and modern online experience.
Incorporating the Parallax Effect into your website design requires careful consideration of its purpose, appropriate elements, and performance optimization. When executed effectively, this technique has the potential to transform your website into a captivating visual journey that resonates with your audience and achieves your desired goals.
Types Of Parallax Effects In Website Design
Parallax effects have revolutionized website design, adding depth and interactivity that captivates visitors. There are two primary types of parallax effects that designers can employ to create a dynamic and immersive online experience.
Scrolling-Based Parallax Effects
Scrolling-Based Parallax Effects leverage the user’s scrolling behavior to create an illusion of depth and motion on a webpage. These effects involve various elements moving at different speeds, thus producing a dynamic and visually engaging experience.
- Parallax Background Scroll: One of the most common types, this effect involves the background of a website moving at a slower rate than the foreground as the user scrolls. This creates a sense of depth and dimension, giving the illusion that the background is far away. This effect can be used to emphasize visuals, create storytelling experiences, and enhance the overall aesthetics of the site.
- Parallax Vertical Scroll: In this effect, elements on the web page move vertically at different speeds, creating a layered effect as users scroll. This can be used to build dynamic transitions between sections, adding visual interest and guiding users through the content in a captivating way.
- Parallax Horizontal Scroll: Similar to vertical scroll, this effect involves elements moving horizontally at different rates. It can be particularly effective for showcasing wide images or panoramic views, creating an immersive experience as users scroll from side to side.
- Parallax Transparency Effect: Adding an extra layer of complexity, this effect involves altering the transparency of elements as they scroll. This can create a sense of fading or blending between sections, resulting in seamless transitions and a polished visual flow.
- Parallax Blur Effect: Blurring elements as they move can add a sense of motion and depth. This effect is often used to draw attention to the focused content while gently blurring the surrounding elements, providing a cinematic and engaging feel.
- Parallax Rotate Effect: This effect introduces an element of rotation to selected objects as users scroll. It can create a dynamic and interactive feel, making users feel like they’re actively engaging with the content as they navigate through the site.
- Parallax Scale Effect: Scaling elements at different rates while scrolling can be used to emphasize changes in perspective and size. This effect adds a layer of dynamism, making the user experience more engaging and memorable.
Mouse-Based Parallax Effects
Mouse-Based Parallax Effects respond to the movement of the mouse cursor, offering interactive and engaging design elements.
- Parallax Mouse Track: This effect responds to the movement of the mouse cursor. Elements shift or follow the cursor’s movement, creating an interactive and playful experience. It’s often used for adding a touch of whimsy and interaction to the website.
- Parallax 3D Tilt: Leveraging the user’s mouse movement, this effect creates a sense of three-dimensionality by tilting elements based on the cursor’s position. This adds depth and a sense of interactivity, making users feel like they’re exploring the content from different angles.
Incorporating these parallax effects into your website design can elevate the user experience, enhance storytelling, and leave a lasting impression on your visitors.
How To Add Parallax Effects?
There are various methods to incorporate captivating parallax effects into a WordPress website, ranging from manual coding to utilizing third-party plugins. Among these options, the simplest and most user-friendly approach is by leveraging the power of the Elementor page builder. Elementor offers an intuitive and visually driven method to create parallax effects that enhance the overall user experience of your website. Let’s delve into the detailed steps of how to effortlessly integrate these effects into your WordPress site using Elementor.
Step 1: Install And Activate Elementor Plugin
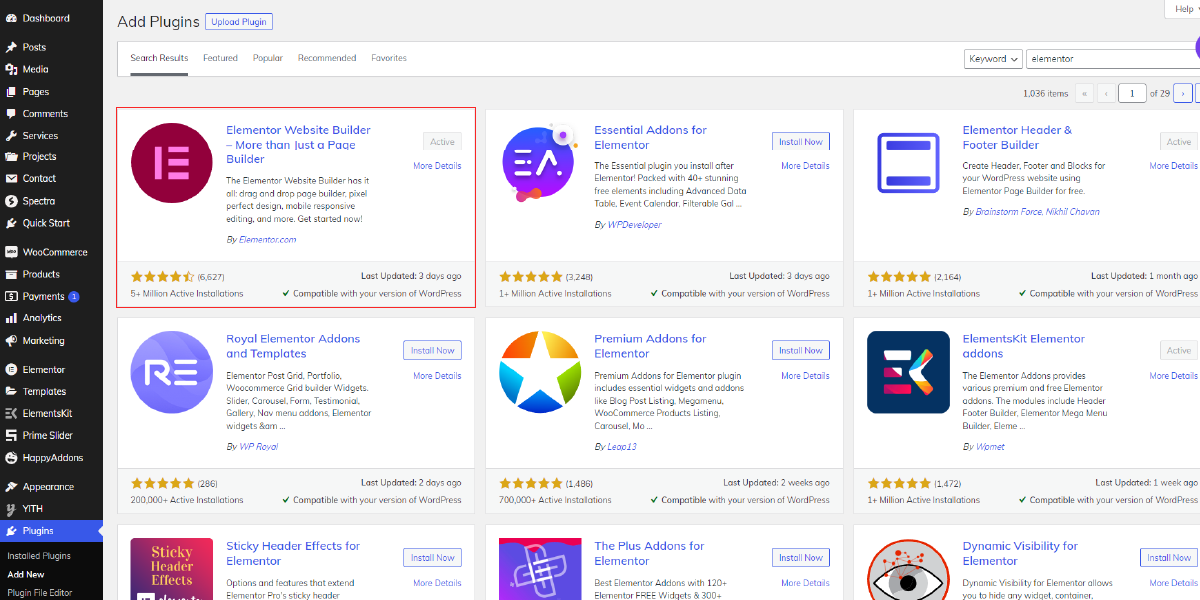
To begin your foray into the captivating world of parallax effects within your WordPress website, the first crucial stride involves the installation and activation of the Elementor plugin. With this essential tool in hand, the process of crafting visually engaging and dynamic pages becomes remarkably intuitive.
Before anything else, make sure you’ve secured the Elementor plugin. This indispensable addition to your WordPress arsenal resides within the WordPress plugin repository. Akin to any other plugin, obtaining it demands a few clicks: a quick search, a mere touch of the “Install” button, and voilà – the wheels are set in motion.
Upon successfully installing Elementor, the next pivotal step entails its activation. A simple toggle switch sets the gears turning, enabling the remarkable potential that lies within. It’s here that your WordPress website gains access to a world of design finesse, and particularly, the ability to seamlessly infuse parallax effects into your elements.
Elementor, as a powerful catalyst for creativity, arms you with an assortment of tools and features that make the process of incorporating parallax effects a breeze. Its user-friendly interface and array of customizable options empower you to orchestrate captivating visual narratives, captivating your audience with the depth and dimensionality that parallax effects bring to your website elements.
Step 2: Create And Edit A Page With Elementor
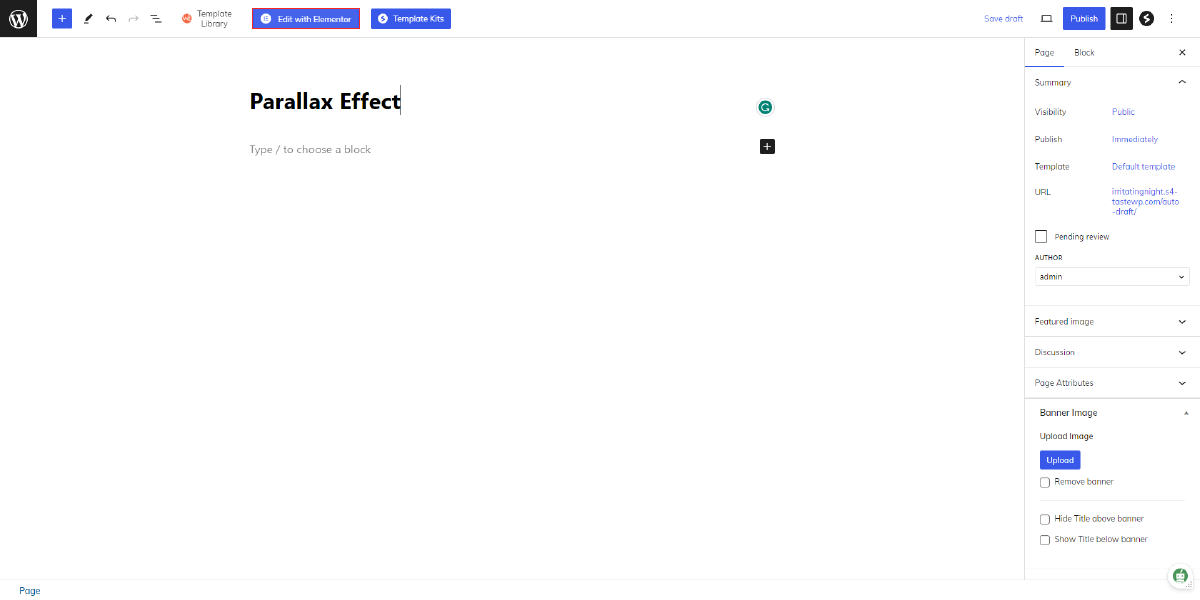
After successfully activating the Elementor plugin within your WordPress website, you can seamlessly incorporate captivating parallax effects into various elements, elevating the visual appeal and interactivity of your pages. To begin this process, navigate to the specific page where you intend to introduce these engaging effects. Whether you opt to craft a fresh page from scratch or enhance an already existing one, the process remains straightforward.
Upon reaching the designated page, the next pivotal step involves tapping into the potential of Elementor’s dynamic features. By clicking on the “Edit with Elementor” button, you will be seamlessly ushered into the intuitive and user-friendly realm of the Elementor page builder interface. This platform empowers you with an array of tools and options to seamlessly manipulate the design and content of your page.
With the Elementor editor now at your disposal, you can easily identify and select the elements you wish to imbue with parallax effects.
Step 3: Add A Section
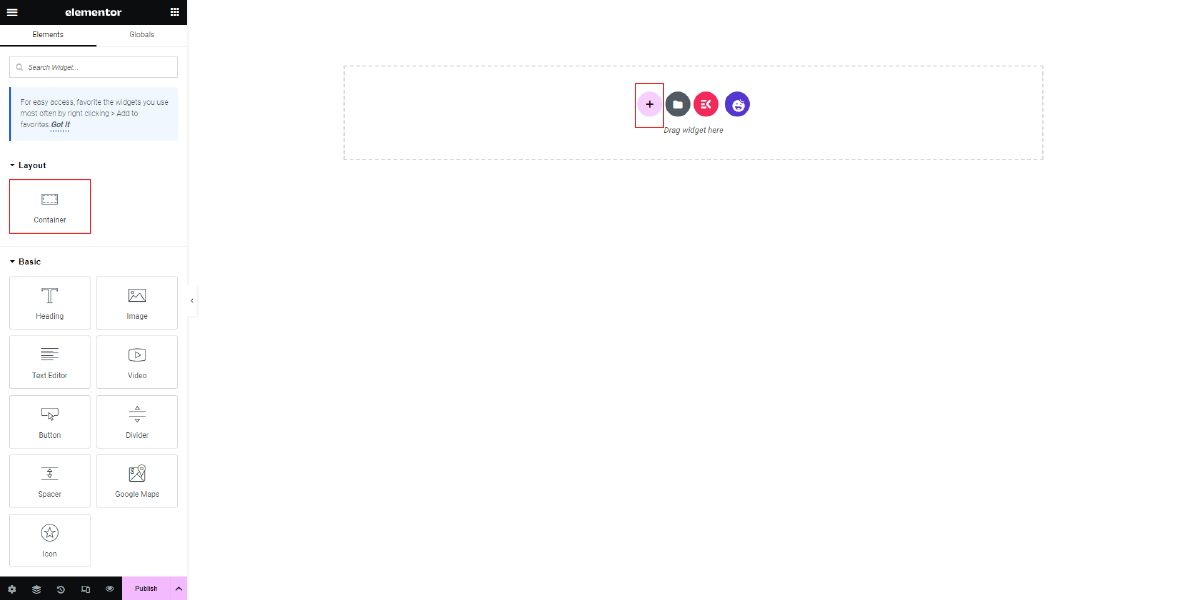
After entering the Elementor page builder interface, the next step to enhance your WordPress website with captivating Parallax Effects involves adding a new section to your page. This is easily accomplished by locating and clicking the “+ Add New Section” button provided within the Elementor interface. The purpose of this section is to serve as a container where you can house the various elements you intend to infuse with the engaging parallax effect.
Once the new section is in place, you can proceed to the exciting task of inserting widgets and content elements. These elements encompass a wide array of possibilities, ranging from images and text to buttons and other interactive components, all of which are poised to come to life with the magic of parallax animation. To incorporate these elements, you simply utilize the intuitive drag-and-drop functionality provided by Elementor. Arrange these widgets on the canvas according to your artistic vision, giving careful consideration to their placement and sequence to achieve the desired visual impact.
Step 4: Enable Parallax Effect
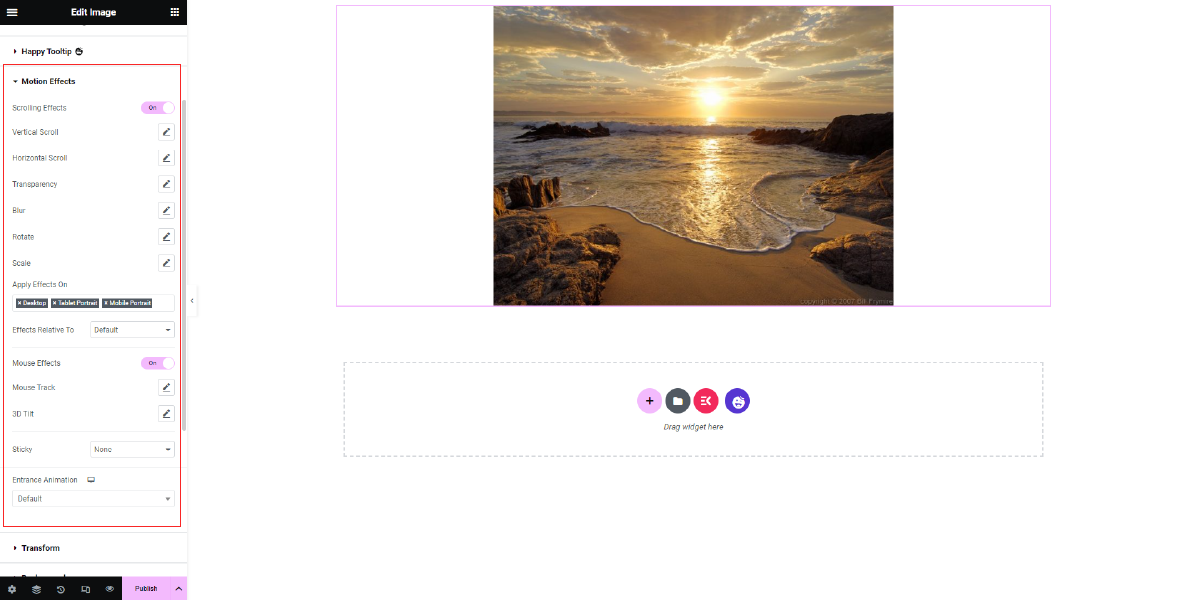
Once you’ve placed the elements on your WordPress website page, the next exciting step is to breathe life into them with captivating Parallax Effects. These effects add a sense of depth and movement to your page, making it more engaging for your visitors. To enable these effects, follow these straightforward steps.
First, make sure your widgets are exactly where you want them to be on the page. Once everything’s set, it’s time to activate the Parallax Effect. Identify the widget you want to apply this effect to and click on it. On the left-hand side of your screen, within the Elementor panel, you’ll spot a tab labeled “Advanced.” This tab houses the more intricate settings for the widget you’ve selected.
Now, your journey into the world of Parallax Effects truly begins. Clicking on the “Advanced” tab unveils a treasure trove of settings, and within these lies the “Motion Effects” option. Clicking on this option unfurls a range of settings dedicated to making your element dance with parallax magic.
At this point, you’ll come across a switch that holds the key to your Parallax Effect dreams. Toggle this switch to the “on” position, and voilà – you’ve just awakened the parallax within your element! But that’s not all; the world of motion effects is at your fingertips.
Remember those mesmerizing scrolling-based parallax effects? They’re all here, waiting for you to experiment and enhance your website’s visual allure. Here are some options you’ll find:
- Vertical Scroll: Control the up-and-down movement of your element as users scroll, adding an extra layer of dynamism.
- Horizontal Scroll: Similarly, you can make your element move left and right with scrolling, capturing attention from all angles.
- Transparency Effect: Play with opacity to craft an element that appears and disappears like a spectre, drawing visitors in.
- Blur Effect: Blur and sharpen your element as it reacts to scrolling, imparting a touch of cinematic charm.
- Scale Effect: Experiment with scaling, making your element grow or shrink as users journey through your content.
And if that’s not enough, there are even more options under the Mouse-Based Parallax Effects:
- Mouse Track: Allow your element to follow the cursor’s movement, keeping visitors engaged in a delightful dance.
- 3D Tilt: Add a mesmerizing 3D tilt to your element as the cursor moves, creating a captivating interactive experience.
But hold on, the customization journey doesn’t end there. With these effects, you’re the director. Adjust the direction and intensity of the parallax effect until it aligns with your creative vision, enhancing the overall impact and user experience of your website.
Step 5: Preview & Publish
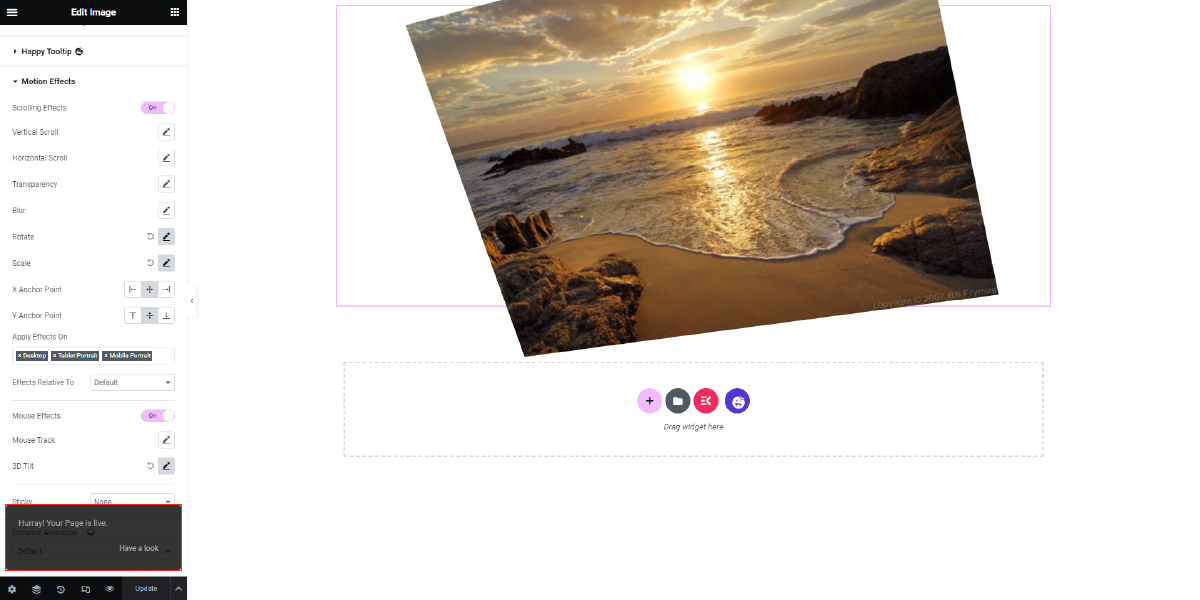
After you’ve set up the parallax settings for your elements on your WordPress website, the next step is to preview how it all looks and works. This preview helps you see exactly how the parallax effect will appear to your visitors. You get a chance to fine-tune and tweak the settings if needed, ensuring you get the exact outcome you’re aiming for.
During this preview, you can play around with various settings – like the speed and direction of the parallax movement – to get the best visual effect. Imagine it as adjusting the volume on your music player until it sounds just right. Once you’re content with how the parallax effect enhances your webpage’s appearance, it’s time to share it with the world.
Click that “Publish” button! As soon as you do, the magic happens. When people visit your website, they’ll be able to see and experience the captivating parallax scrolling effect as they interact with the elements you’ve designated. It’s like giving them a memorable and interactive journey through your web content. This engaging touch adds a dash of sophistication and creativity to your site, making it more appealing and unforgettable.
Conclusion
In conclusion, mastering the art of parallax effects in your WordPress website design can truly elevate your online presence. From understanding the concept of parallax effects and its various types to delving into the benefits it offers, this guide has provided a comprehensive journey. Specifically focusing on the practical aspect, we explored how to seamlessly integrate parallax effects using Elementor – a powerful tool for WordPress users, along with some fantastic WordPress Elementor themes.
By following the steps outlined here, you now possess the skills to add depth and dynamism to your website elements, captivating visitors with engaging scrolling experiences. Remember, the parallax effect isn’t just a visual treat; it’s a strategic tool that can enhance user engagement, highlight key content, and ultimately leave a lasting impact. So go ahead, unleash your creativity, and embark on a journey to craft captivating websites that stand out in the digital realm.
The WordPress theme bundle, paired with Premium Elementor Themes, brings a perfect blend of style and functionality to websites. With seamless integration of Parallax Effects, it adds a captivating 3D depth as users scroll, enhancing the overall user experience. This dynamic combination empowers users to create visually stunning and engaging websites effortlessly.


