Captivating website design plays a pivotal role in attracting and engaging users, it’s crucial to stay ahead of the curve. As a website owner or designer, you understand the significance of creating visually appealing and cohesive designs that leave a lasting impression on visitors. While there are numerous tools and platforms available to assist in this endeavor, one tool that stands out from the rest is Elementor.
Elementor, a popular WordPress Page Builder plugin for WordPress, has gained a massive following for its intuitive drag-and-drop interface and extensive customization options. Among its many features, Elementor’s Global Fonts and Colors functionality has become a game-changer for web designers seeking to streamline their design process and create harmonious websites effortlessly.
In this blog post, we will delve into the unparalleled power of Elementor Global Fonts and Colors and explore how it can elevate your website design to new heights.
We will walk you through Global Fonts and Colors, key benefits, and practical applications of Elementor’s Global Fonts and Colors feature. From maintaining brand consistency and improving user experience to saving time and effort in design iterations, we will explore how this powerful tool can transform your website creation process.
So, let’s dive in and unlock the immense potential that Elementor offers to take your website design to the next level!
What Are Elementor Global Fonts And Colors?
Elementor Global Fonts and Colors is a powerful feature within the Elementor page builder plugin for WordPress. It allows you to define and manage typography and color schemes across your entire website from a central location, making it easy to maintain consistency and create a cohesive visual identity.
With Global Fonts, you can select and customize fonts that will be applied globally to your website. This means that once you define a font style for headings, subheadings, paragraphs, and other text elements, those styles will be automatically applied to all instances of those elements throughout your website. Instead of manually adjusting font styles on each page or section, Global Fonts enables you to update the font settings in one place, saving you time and effort.
Similarly, Global Colors in Elementor allow you to define a set of colors that will be used consistently across your website. You can create color palettes and assign specific colors to different elements such as backgrounds, text, buttons, links, and more. By establishing a consistent color scheme, you ensure that your website maintains a professional and visually appealing look throughout.
Key Benefits Of Elementor Global Fonts And Colors
Elementor Global Fonts and Colors offer several key benefits that can greatly enhance your website design. Let’s explore them in detail:
- Consistency and Cohesion: One of the primary advantages of using Elementor Global Fonts and Colors is the ability to achieve consistency and cohesion throughout your website. By defining font styles and color schemes at a global level, you ensure that all elements across different pages and sections adhere to the same visual language. This consistency creates a harmonious user experience and strengthens your brand identity.
- Time and Effort Savings: Without Global Fonts and Colors, making design changes across your entire website can be a tedious and time-consuming task. By utilizing this feature, you can save significant time and effort. Instead of manually updating individual elements, you can modify the global settings, and the changes will automatically propagate throughout your website. This efficiency is particularly valuable when working on larger websites with numerous pages and sections.
- Flexibility and Adaptability: Global Fonts and Colors empower you to experiment with different design choices and make adjustments effortlessly. If you want to test a new font or color scheme, you can modify the global settings and instantly see the impact across your entire website. This flexibility allows you to iterate and refine your design choices without the need for extensive manual adjustments.
- Brand Consistency: For businesses and organizations, maintaining brand consistency is crucial for building trust and recognition. Elementor Global Fonts and Colors enable you to establish and uphold consistent brand guidelines. You can define and apply the exact fonts and colors that align with your brand identity, ensuring that your website represents your brand accurately and professionally.
- Collaboration and Teamwork: In collaborative web design projects, where multiple team members are involved, Global Fonts and Colors foster efficient teamwork. Designers, developers, and content creators can work together seamlessly, knowing that any changes made to the global settings will be reflected consistently across the entire site. This streamlines the design process, reduces communication gaps, and improves overall project management.
- Design Scalability: As your website evolves and expands, managing design elements can become challenging. Elementor Global Fonts and Colors offer scalability by providing a centralized approach to design. Whether you’re adding new pages or sections, the global settings ensure that the new elements automatically inherit the defined fonts and colors, maintaining the overall design integrity.
- Accessibility and User Experience: Font styles and colors play a significant role in the accessibility and user experience of a website. With Elementor Global Fonts and Colors, you can ensure that your chosen fonts are legible, and your color schemes meet accessibility standards. Consistent and well-chosen typography and colors enhance readability, usability, and inclusivity for all users.
By leveraging these capabilities, you can enhance user experience, reinforce your brand identity, and establish a professional online presence.
How To Set Up Elementor Global Fonts And Colors?
Setting up Elementor Global Fonts and Colors is a straightforward process that allows you to define and manage typography and color schemes across your entire website. By following a few simple steps, you can establish a cohesive design system that saves time and ensures consistency. Let’s dive into the detailed process of setting up Elementor Global Fonts and Colors.
Step 1: Install And Activate Elementor

The first step in setting up Elementor Global Fonts and Colors is to install and activate the Elementor plugin on your WordPress website. If you haven’t installed Elementor yet, don’t worry; the process is straightforward.
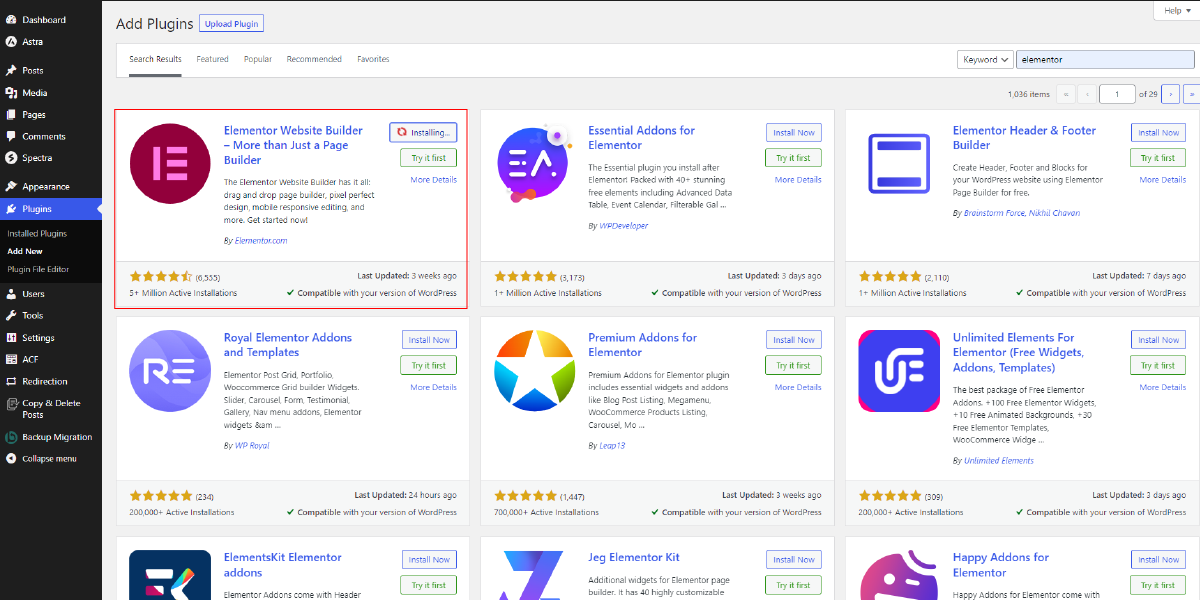
To get started, log in to your WordPress dashboard and navigate to the “Plugins” section. Once there, click on “Add New” to access the plugin installation page. In the search bar, type “Elementor” and hit the Enter key.
WordPress will display a list of search results, and you should see the Elementor plugin at the top. Look for the Elementor page builder plugin by Elementor.com and click on the “Install Now” button next to it.
WordPress will take a few moments to install the plugin. Once the installation is complete, the “Install Now” button will change to “Activate.” Click on the “Activate” button to activate the Elementor plugin on your website.
Step 2: Add A New Page Or Edit An Existing One

Once Elementor is activated, you gain access to its powerful page-building capabilities. To create a new page or edit an existing one using Elementor, simply navigate to the “Pages” section in your WordPress dashboard. There, you will find a list of all your website’s pages. Select the specific page you want to work on by clicking on its title.
If you wish to create a new page from scratch, you can do so by clicking on the “Add New” button located near the top of the page. This will take you to the page editor where you can begin designing your new page using Elementor.
On the other hand, if you want to edit an existing page, locate it in the list of pages and click on its title. This will open the page editor for that particular page.

Once you’re inside the page editor, you will see two options: “Edit with Elementor” and “Edit with WordPress Editor.” To utilize the full potential of Elementor and take advantage of its Global Fonts and Colors feature, click on the “Edit with Elementor” button.
By selecting “Edit with Elementor,” you enter the Elementor interface, which provides a visual, drag-and-drop editor that simplifies the process of creating and customizing your page. You can add various elements, sections, and widgets to your page, rearrange them, and adjust their settings.
Step 3: Access Elementor Global Fonts And Colors Settings

Once you have created a new page in Elementor and are ready to access the Global Fonts and Colors settings, the first step is to navigate to the Elementor editor. Within the editor, you will notice a convenient control panel positioned on the left side of the screen. This control panel serves as your gateway to various customization options and settings.

To access the Global Fonts and Colors settings, specifically, you need to locate the “Site Settings” tab within the control panel. This tab is designed to provide you with a range of options related to your website’s overall design and appearance.
Once you click on the “Site Settings” tab, a menu will unfold, revealing several setting options available to you. You will find a setting called “Design System” among these options. The Design System setting is the gateway to accessing and managing the Global Fonts and Colors in Elementor.

By selecting the “Design System” option, you will gain entry into the Global Fonts and Colors settings. Here, you will have the ability to define and customize the fonts and colors that will be applied globally throughout your website. From selecting font styles for various text elements to establishing a consistent color palette, the Design System setting empowers you to create a cohesive visual identity for your website.
Step 4: Define Global Fonts & Global Colors
Once you have accessed the Elementor Global Fonts and Colors settings, the next step is to define your Global Fonts and Global Colors. Under the “Design System” tab, you will see two options: “Global Fonts” and “Global Colors.” Let’s explore how to set them up individually.
Global Fonts:

Click on “Global Fonts” to begin defining your Global Fonts. There are two sections in this section: “System Fonts” and “Custom Fonts”.
In the “System Fonts” section, you can set the font for primary, secondary, text, and accents. These options provide you with a selection of system fonts that are commonly available across various devices and browsers.
On the other hand, the “Custom Fonts” section allows you to add and use your custom fonts. You can upload font files or use font services like Google Fonts to import custom fonts. Once added, you can style and configure these custom fonts to match your design preferences.
To modify the settings of a font style, click on the pencil icon next to the primary, secondary, text, or accents. This will open a panel where you can make various adjustments, including font family, size, weight, transform (uppercase, lowercase, capitalize), style (normal, italic, oblique), decoration (underline, overline, line through), line height, line spacing, and word spacing. Repeat this process for each font style you want to define globally, and once you are satisfied, click on the “Update” button to save your changes.
Global Colors:

Similarly, click on “Global Colors” to define your Global Colors. Here, you will find sections for primary, secondary, text, and accents, along with an option to add custom colors.
Within each section, you can select colors from a color picker or enter specific color codes to define your color palette. The primary color is often associated with important elements like headings or CTA buttons, while the secondary color can be used for supporting elements or accents.
If you have specific brand colors or custom colors that you want to use, you can add them under the “Custom Colors” section. Simply click on the “Add Custom Color” button, choose your color, and give it a name for easy reference.
Once you have selected or added the desired colors for each section, click on the “Update” button to save your global color settings.
Step 5: Apply Global Fonts And Colors To Page Elements

After defining your Global Fonts and Colors, it’s time to apply them to specific elements on your page. To do this, simply drag and drop the desired Elementor widget onto your page or select an existing widget.
Once the widget is added, click on it to access its settings in the left panel. In the Style tab of the widget settings, you’ll find options to customize fonts, colors, and backgrounds.
To apply a global font style, click on the typography option (e.g., heading, paragraph) and select the corresponding global font style you defined earlier. This allows you to maintain consistency throughout your website by using the same font style across various elements.
For example, if you define a global font style for headings as “Montserrat,” you can easily apply it to a heading widget on your page. By selecting the “Montserrat” font style from the dropdown menu, the heading text will automatically adopt the specified font. This eliminates the need to manually adjust the font style for each heading element individually, ensuring a consistent visual appearance.

Similarly, you can apply global colors to page elements. In the Style tab, you’ll find color options such as text color, background color, border color, etc. To use a global color, click on the color picker or input field and select the desired global color you defined earlier.
For instance, if you establish a global color scheme with primary and secondary colors, you can easily apply these colors to various elements. Whether it’s the text color of a paragraph, the background color of a section, or the border color of a button, you can choose the appropriate global color from the options. This ensures that your chosen colors remain consistent throughout the website, enhancing its overall visual coherence.
Applying global fonts and colors to page elements not only saves time and effort but also provides the flexibility to make design changes efficiently. If you decide to update the font style or color scheme across your website, you can modify the global settings, and the changes will automatically propagate to all elements using those global settings. This centralized control allows for quick and seamless updates, maintaining a cohesive design system.
Furthermore, this approach allows for easy experimentation and customization. If you want to make specific adjustments to a widget’s font size, letter spacing, or color intensity, you can still do so within the widget’s settings. By combining the power of global settings with localized modifications, you can strike the right balance between consistency and tailored design.
By leveraging Elementor’s ability to apply global fonts and colors to page elements, you ensure a unified and polished design across your entire website. Consistency in typography and color schemes enhances user experience, establishes brand identity, and creates a visually appealing website. With just a few clicks, you can apply your predefined global styles to specific elements, saving time and effort while maintaining a professional and cohesive aesthetic.
Conclusion
In conclusion, Elementor Global Fonts and Colors are a game-changer when it comes to website design. We explored what Global Fonts and Colors are, the key benefits they offer, and how to set them up in Elementor.
By defining and managing typography and color schemes from a central location, you can achieve consistency, save time, and create a cohesive visual identity throughout your website. The flexibility, scalability, and collaboration they enable make them invaluable tools for designers and businesses alike. With the power of Elementor Global Fonts and Colors integrated into WordPress Elementor themes, you have the tools to elevate your website design and leave a lasting impression on your visitors.


