Are you a restaurant owner looking to expand your reach and streamline your operations? Setting up online food ordering on your WordPress website can be a game-changer. As more diners turn to the internet for convenient meal options, having a robust online ordering system is essential for staying competitive and enhancing customer satisfaction. In this blog, we’ll walk you through the process of setting up online food ordering for restaurants in WordPress. From selecting the right plugins to integrating payment gateways and customizing your menu, you’ll learn everything you need to know to create a seamless online ordering experience. Whether you’re a small bistro, a food truck, or a multi-location eatery, this guide will help you leverage WordPress to boost your sales and improve customer engagement. So, let's get started!
Benefits Of Adding Online Food Ordering For Restaurants
Adding online food ordering to a restaurant offers numerous benefits, providing both customers and restaurant owners with greater convenience and flexibility. These benefits are listed below in more detail:
- Increased Revenue and Reach Online food ordering opens doors to new revenue streams by allowing restaurants to reach a broader customer base. With a well-implemented system, customers can place orders from virtually anywhere, at any time, breaking the geographical and time-based limitations of traditional dine-in service. This expanded reach can significantly boost sales, especially during off-peak hours when in-person traffic is low.
- Enhanced Customer Experience Customers appreciate the convenience and flexibility of online ordering. They can browse the menu at their own pace, customize their orders, and avoid the wait times associated with in-person dining. An intuitive and user-friendly online ordering system can lead to a more satisfying customer experience, encouraging repeat business and positive word-of-mouth recommendations.
- Streamlined Operations An online food ordering system helps restaurants streamline their operations by reducing the need for manual order-taking and minimizing the chances of miscommunication. Orders are automatically entered into the system, ensuring accuracy and efficiency. This reduces the workload on staff and allows them to focus on food preparation and customer service, leading to smoother operations and reduced stress during peak hours.
- Improved Marketing and Customer Insights With online food ordering, restaurants can gather valuable data about customer preferences and behaviors. This data can be used to tailor marketing efforts, such as personalized promotions, discounts, and loyalty programs, to increase customer engagement. Additionally, online ordering platforms often allow for easy integration with social media and email marketing campaigns, providing restaurants with powerful tools to attract and retain customers.
- Increased Efficiency and Cost Savings By automating the order-taking process, online food ordering systems can reduce labor costs and increase efficiency. This automation not only reduces the potential for human error but also allows for better inventory management and order tracking. The result is a more cost-effective and efficient restaurant operation.
- Adaptability and Scalability As restaurants evolve, an online food ordering system can adapt to changing needs. Whether expanding the menu, offering new services like delivery or catering, or opening additional locations, the flexibility of an online system allows for easy scalability. This adaptability is crucial in today's fast-paced restaurant industry, where customer demands and trends can change rapidly.
Overall, adding online food ordering to a restaurant provides a comprehensive solution for enhancing customer experience, streamlining operations, and driving revenue growth. With these benefits, it's clear why so many restaurants are adopting this technology to stay competitive in the digital age.
Steps To Set Up Online Food Ordering For Restaurants
Setting up online food ordering for restaurants with WooCommerce and the Food Store – Online Food Delivery & Pickup plugin involves several detailed steps. Each step builds upon the previous one, creating a seamless and efficient online ordering experience for your customers. Here's a comprehensive guide to help you set up online food ordering for restaurants.
Step 1: Prepare Your WordPress Environment
To set up online food ordering for restaurants, you must first ensure your WordPress environment is optimized for e-commerce functionality. This involves several critical steps: choosing a reliable hosting service, installing WordPress, and selecting a WordPress Elementor theme that aligns with your restaurant's branding and functionality requirements.
- Choose a Reliable Hosting Service

Selecting a reliable hosting service is crucial for ensuring your online food ordering system operates smoothly. Your hosting provider should offer robust support for e-commerce, with ample bandwidth and storage to handle high-quality images, customer interactions, and traffic spikes during peak hours. Popular WordPress hosting providers known for their reliability and performance include Bluehost, SiteGround, and WP Engine. Consider factors like server uptime, customer support, and security features when making your choice. If you are building your website with the Elementor than you can also go for the Elementor Hosting as your reliable hosting provider.
- Install WordPress

Once you've chosen your hosting service, the next step is to install WordPress on your domain. This process is typically straightforward, as most hosting providers offer automated WordPress installation tools. Follow the hosting provider's instructions, which usually involve a few clicks to set up WordPress on your website. During this step, ensure that your WordPress installation is up-to-date and secure.
- Select and Install a WordPress Theme

With WordPress installed, you need to choose a theme that suits your restaurant's branding and supports WooCommerce, the e-commerce plugin you'll use for online food ordering. Themes designed specifically for restaurants, like the Food Delivery WordPress Theme by WP Elemento, are ideal because they offer flexibility, attractive design elements, and seamless integration with WooCommerce. After selecting your theme, install and activate it from the WordPress dashboard. This sets the visual foundation for your online food ordering system and ensures a cohesive user experience. By following these steps, you can prepare your WordPress environment for online food ordering, setting the stage for a successful e-commerce experience.
Step 2: Install And Set Up WooCommerce

Setting up online food ordering for restaurants with Elementor WooCommerce Builder involves several essential steps that provide the foundation for a seamless e-commerce experience. WooCommerce, a powerful WordPress plugin, enables you to create an online store with flexible customization options tailored to your restaurant's needs. Let's break down the steps to install and set up WooCommerce for online food ordering.
- Install WooCommerce

In order to get started, you must first install the WooCommerce plugin on your WordPress website. From the WordPress dashboard, navigate to "Plugins" and select "Add New." In the search bar, type "WooCommerce," and when the plugin appears, click "Install Now." The installation process takes a few moments, and once completed, you can activate the plugin by clicking "Activate."
- Run WooCommerce Setup Wizard
WooCommerce offers a setup wizard to help you configure your online store's basic settings. After activating the plugin, you'll be prompted to start the setup wizard. Follow the on-screen instructions to enter key information, including your store's location, currency, and tax settings. Since you're setting up online food ordering for restaurants, choose the "Food & Drink" category to ensure appropriate configurations for your business type.
- Set Up Payment Gateways

Next, configure payment gateways to enable secure online transactions. In WooCommerce settings, go to "Payments" to set up your preferred Woocommerce payment methods. Popular choices include PayPal, Stripe, and Square. To activate a gateway, click on it and follow the instructions to add your API keys, credentials, and other required information. This step ensures that customers can pay for their orders online, enhancing convenience.
- Configure Shipping and Delivery Options

For food delivery, it's crucial to set up appropriate shipping methods. Go to "Settings" > "Shipping" in WooCommerce to configure your shipping preferences. You can create custom shipping zones based on delivery areas, set flat rate shipping for simplicity, or establish flexible shipping options depending on distance or order size. If you offer pickup, set up a separate shipping method to distinguish it from delivery. By following these steps, you'll have WooCommerce installed and configured, laying the groundwork for your restaurant's online food ordering system. The flexibility of WooCommerce allows you to adapt to your restaurant's unique requirements, ensuring a smooth customer experience from ordering to delivery.
Tip: WooCommerce Dynamic Pricing allows you to create flexible discount rules based on product quantities, user roles, or cart totals to boost sales and reward loyal customers.
Step 3: Install And Configure The Food Store Plugin
Setting up online food ordering for restaurants in WordPress involves configuring the Food Store plugin. This WordPress plugin is designed to work with WooCommerce and offers features that cater specifically to restaurants, such as menu structures, pickup and delivery scheduling, and customizable food items. Here's how you can install and configure the Food Store plugin to set up online food ordering.
- Install the Food Store Plugin

To start, open your WordPress dashboard and navigate to "Plugins." Click on "Add New," then use the search bar to find "Food Store – Online Food Delivery & Pickup." When you locate the plugin, click "Install Now." After the installation is complete, click "Activate." This activates the plugin and adds new menu options to your WordPress dashboard, indicating that you're ready to configure it for your restaurant's needs.
- Configure Food Store Settings

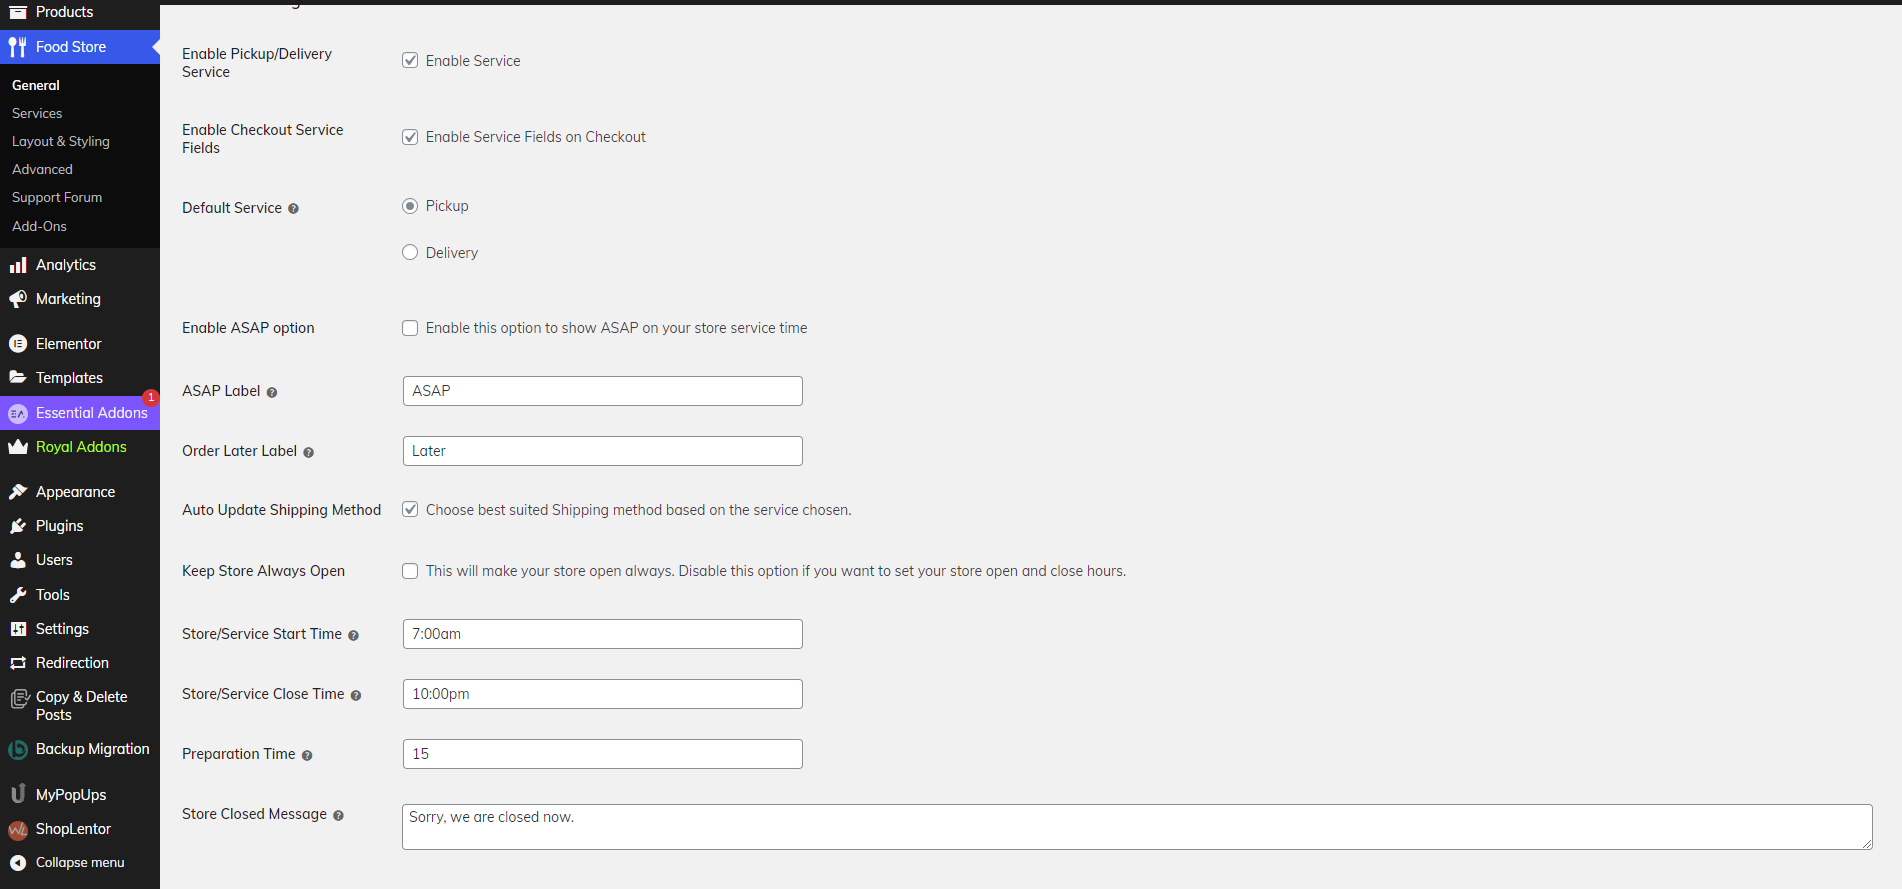
With the Food Store plugin activated, you can now configure its settings to align with your restaurant's online food ordering process. Here's a breakdown of the key settings to focus on:
- Delivery and Pickup Options: Navigate to "Food Store" > "Settings." Here, you can choose to offer delivery, pickup, or both. You can also define delivery zones and set specific fees based on location. Additionally, if you have a minimum order requirement for delivery, you can set it here to ensure profitability.
- Operating Hours: Set your restaurant's operating hours, indicating when you are open for business, and specify times for delivery and pickup. This helps ensure customers place orders only when you can fulfill them, avoiding confusion and miscommunication.
- Customization Options: This section allows you to personalize the appearance of your food ordering system. You can adjust colors, fonts, and the overall layout to match your restaurant's branding. Consider using high-quality images and a clean design to enhance the customer experience.
- Email Notifications: Finally, configure email notifications for various stages of the ordering process. This includes order confirmations, delivery updates, and any other communication you want to maintain with your customers. Setting up these notifications ensures customers are informed throughout the ordering process, contributing to a seamless experience.
By following these steps, you can effectively set up the Food Store plugin for your online food ordering system. This configuration provides a solid foundation for your restaurant's online presence, ensuring smooth operations and a positive customer experience.
Step 4: Create Your Restaurant Menu
Creating your restaurant menu is a crucial step in setting up online food ordering for your WooCommerce-based restaurant website. This process involves defining product categories, adding food items as WooCommerce products, and customizing the product pages to create a user-friendly experience for your customers.
- Create Product Categories
Start by organizing your menu into logical categories to ensure a smooth browsing experience for customers. In WooCommerce, navigate to "Products" > "Categories." Create categories that reflect your restaurant's menu structure. For example, you can have categories like appetizers, main courses, desserts, and drinks. Each category should have a clear name, a brief description, and an appealing image to make it visually attractive. This setup helps customers find their desired food items quickly and intuitively.
- Add Food Items as WooCommerce Products

Once you've created product categories, it's time to add food items to your menu. Go to "Products" > "Add New" in WooCommerce to create new products. For each food item, add a descriptive name, a detailed description, and set the price. Include high-quality images that showcase the food, making it more enticing to customers. Utilize WooCommerce's "Product Data" section to specify essential product details. If your food items have variations, such as different sizes or toppings, choose "Variable Product." This allows you to add various options for each product, giving customers flexibility in their choices. For inventory management, set stock levels and determine whether backorders are allowed. This ensures that customers know whether an item is in stock before placing an order. Configure shipping options and tax settings for each product based on your restaurant's delivery and tax policies.
- Customize Product Pages
To create visually appealing product pages, use WooCommerce's customization options. Add product images and galleries to showcase different views of your food items. Include detailed descriptions that highlight key ingredients, flavors, and other relevant information. Consider using WooCommerce's product shortcodes or blocks to display menu sections on your website's main pages. This allows you to create a seamless browsing experience for customers, where they can easily navigate through your menu and select their desired items. By following these steps, you'll create a comprehensive restaurant menu that is organized, visually appealing, and easy for customers to use, enhancing their online ordering experience. You can also use the Woocommerce related Products to show the related products on your product page.
Step 5: Test And Launch Your Online Food Ordering System
Once you've set up WooCommerce and the Food Store plugin, conducting thorough testing is critical to ensure that your online food ordering system functions seamlessly. This testing phase is crucial to identify and resolve any issues before launching your system to the public. Here are the detailed steps involved in testing and launching your online food ordering system.
- Test the Ordering Process

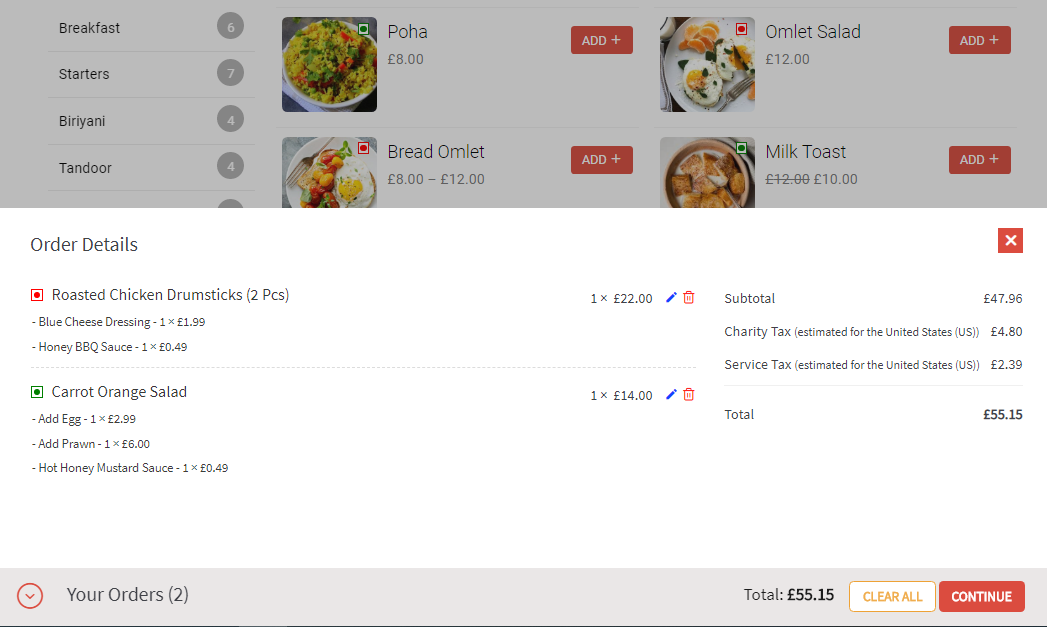
Begin by simulating a customer order to examine the entire process from start to finish. Add various items to the cart, including different product types and quantities. Proceed to checkout, ensuring the order summary accurately reflects the selected items, quantities, and prices. Complete the payment process to confirm that WooCommerce records the order correctly. Pay special attention to order details, such as item names, prices, taxes, and delivery or pickup instructions. This simulation helps you catch any discrepancies or errors in the ordering flow.
- Check Payment Gateways
Next, test the configured payment gateways to ensure they operate securely and accurately. If you have set up multiple payment gateways, test each one individually. Verify that payments are processed without errors, and that customer payment information remains secure. After processing a payment, ensure that order confirmations are sent to customers and that the payment gateway reflects the successful transaction. This step ensures that customers can complete their orders without encountering payment-related issues.
- Verify Email Notifications
Email notifications are a critical component of your online food ordering system. Confirm that customers receive order confirmation emails promptly after placing an order. These emails should contain all relevant order details, including itemized lists, total costs, and delivery or pickup information. Additionally, ensure that your restaurant receives internal notifications for new orders, enabling your team to process them efficiently. Test various scenarios, such as different order types (delivery, pickup) and modifications to orders, to ensure email notifications work properly in all cases.
- Launch Your Online Food Ordering System
Once testing is complete and you are confident that the system operates smoothly, it's time to launch your online food ordering system. Start by announcing the launch on your restaurant's website and social media channels. Use email marketing campaigns to inform your existing customers about the new online ordering feature. Consider offering promotional incentives, such as discounts or free delivery, to encourage customers to try the system.
Provide clear instructions on your website for customers to place orders online. Include details about payment options, delivery zones, and operating hours. Make it easy for customers to navigate the ordering process, ensuring a smooth and enjoyable experience. With these steps completed, your online food ordering system is ready to serve your restaurant's customers, contributing to an enhanced customer experience and increased revenue opportunities.
By following these detailed steps, you can successfully set up online food ordering for restaurants with WooCommerce and the Food Store – Online Food Delivery & Pickup plugin. This comprehensive setup process ensures a smooth and user-friendly experience for both you and your customers, contributing to the overall success of your restaurant's online presence.
Conclusion
In Conclusion, setting up online food ordering for restaurants in WordPress is an investment in the future of your business. By leveraging WooCommerce and the Food Store plugin, you can create a flexible and user-friendly system that caters to your customers' needs while streamlining your operations. As we talked above using a Premium Food Delivery WordPress Theme can make your work a lot more easier while building a website, for which the Food Delivery WordPress Theme by WP Elemento would be a great option or if your are looking for more options than you can also go for the WordPress Theme Bundle and explore more options.
This integration allows you to offer delivery and pickup options, manage inventory, and customize your menu for a unique dining experience. In this blog, we explored the benefits of adding online food ordering for restaurants, highlighting the increased revenue, enhanced customer experience, and streamlined operations it brings. We then detailed the step-by-step process for setting up WooCommerce and the Food Store plugin, from configuring basic settings to creating your restaurant's menu and testing the system.
As you implement these steps, remember to focus on customer satisfaction and ease of use. A seamless online ordering process can lead to higher customer retention and word-of-mouth referrals, driving your restaurant's success in the competitive food industry. With a well-implemented online ordering system, your restaurant can thrive in the digital age and reach new heights of success.


