
Your website is your company’s or person’s virtual front door. It’s the first place visitors go to learn about your products, services, or ideas, and it’s often their initial point of contact with you. Consequently, ensuring that your website is not just aesthetically pleasing but also functionally efficient is paramount. When it comes to user engagement and interaction, few elements are as crucial as contact forms.
Contact forms are the gateway to meaningful communication between you and your audience. Whether you’re looking to capture leads, receive feedback, or provide a means for inquiries, designing an effective contact form can be a game-changer for your website’s success. And when it comes to crafting dynamic, user-friendly forms with unparalleled flexibility and design finesse, Elementor stands out as a powerhouse.
In this blog, we’ll walk you through the 10 Essential Steps to Designing an Effective Elementor Contact Form for Your Website. Whether you’re a seasoned web designer or a complete novice, our step-by-step approach will ensure that you not only understand the fundamentals but also unlock the full potential of Elementor’s form-building capabilities.
From choosing the right form fields to perfecting the design and ensuring optimal user experience, each step is meticulously crafted to help you create contact forms that not only capture attention but also convert visitors into valuable leads or engaged users.
So, whether you’re revamping your existing website or starting a new project, let’s dive in and make your Elementor contact forms shine!
What Is The Elementor Contact Form And Its Benefits?
The Elementor Contact Form widget is a dynamic tool that simplifies the process of adding interactive and user-friendly contact forms to your website. With its drag-and-drop interface and a wide array of customization options, you can craft contact forms tailored to your specific needs, whether it’s for lead generation, customer inquiries, feedback collection, or any other form of user interaction.
Benefits of Using the Elementor Contact Form:
- Ease of Use: One of the most significant advantages of the Elementor Contact Form is its accessibility to both beginners and experienced web professionals. With a straightforward interface, you can effortlessly create and customize your contact forms without any coding knowledge. The intuitive drag-and-drop builder makes form creation a breeze.
- Visual Design Freedom: Elementor offers an extensive array of design elements and styling options. You have full control over the layout, color scheme, typography, and spacing of your contact form. This flexibility ensures that your form seamlessly integrates with your website’s overall design and branding.
- Pre-designed Templates: Elementor Contact Form comes with a collection of pre-designed templates that can be easily customized to suit your needs. These templates cover various use cases, from simple contact forms to complex multi-step forms. Starting with a template can save you significant design time.
- Responsive Design: In an era where mobile users constitute a significant portion of website visitors, ensuring that your contact form looks and functions flawlessly on all devices is paramount. Elementor’s responsive design tools ensure that your forms adapt to various screen sizes, providing an optimal user experience.
- Advanced Field Types: Beyond basic text and email fields, Elementor Contact Form offers advanced field types such as checkboxes, radio buttons, date pickers, and more. This versatility enables you to create intricate forms tailored to your specific requirements, whether it’s a survey, registration, or feedback form.
- Spam Protection: The Elementor Contact Form widget incorporates built-in spam protection mechanisms, including Google reCAPTCHA integration. This helps filter out automated spam submissions and ensures that you receive genuine inquiries and messages.
- Conditional Logic: To enhance user experience and streamline communication, Elementor Contact Form supports conditional logic. You can set specific actions to occur based on user inputs. For example, you can display different form sections or redirect users to different thank-you pages based on their selections.
- Email Notifications: Stay informed and responsive to user submissions with customizable email notifications. Configure the form to send notifications to your inbox whenever someone submits a response, allowing you to promptly address inquiries or leads.
- Integration with CRM and Marketing Tools: Elementor Contact Form can be integrated with popular Customer Relationship Management (CRM) systems and marketing tools, such as Mailchimp or HubSpot. This integration streamlines lead management and email marketing, enabling you to nurture and convert leads effectively.
- Analytics and Tracking: Gain valuable insights into the performance of your contact forms through integration with Google Analytics or other tracking tools. Monitor form submissions, conversion rates, and user behavior to make data-driven decisions and optimize your forms. You can easily track form submissions by integrating your Elementor Contact Form with GA4, providing valuable insights into user interactions on your website.
- Multi-step Forms: Elementor allows you to create multi-step forms, breaking down complex information into manageable sections. This approach improves user engagement and reduces form abandonment rates, as users are guided through the process one step at a time.
- Dynamic Content: Elementor’s dynamic content capabilities enable you to personalize your contact forms based on user data or other contextual factors. The impact of this personalization on engagement and conversion rates can be significant.
- A/B Testing: Experiment with different form designs, field placements, and messaging using A/B testing features. Test multiple variations to identify the most effective form layout and content for your audience.
- Accessibility: Ensuring that your contact forms are accessible to all users, including those with disabilities, is essential. Elementor provides tools and features to create accessible forms, including options for adding alternative text for form fields and labels.
- Fast Loading: Elementor prioritizes performance, ensuring that the contact forms you create load quickly. This is crucial for providing a smooth user experience and optimizing your website’s search engine rankings.
Overall, the Contact Form widget’s seamless integration with the Elementor page builder ensures a harmonious design process, making it a top choice for those looking to enhance their web presence.
How To Design An Effective Elementor Contact Form?
Designing an effective Elementor Contact Form is crucial for engaging your website visitors and encouraging them to get in touch. Here are 10 essential steps to create a contact form that not only looks great but also functions flawlessly.
Plan Your Form:
The initial and most crucial step in designing an effective Elementor Contact Form is meticulous planning. This step sets the foundation for a form that not only captures attention but also serves its intended purpose seamlessly. To begin, you must clearly define the purpose of your contact form. What specific goals do you aim to achieve with it? Whether it’s gathering inquiries, receiving feedback, or capturing leads, a well-defined purpose guides the entire form creation process.
Next, determine the essential pieces of information you need from users. Consider the key details necessary for fulfilling the form’s purpose. This could include fields for name, email, subject, message, or any other relevant information tailored to your objectives.
Equally important is deciding on the form’s layout and structure. Visualize how you want the form to appear on your webpage. Think about the arrangement of form fields, labels, buttons, and any additional elements you wish to include. A well-thought-out layout not only enhances user experience but also complements your website’s overall design.
Install Elementor:
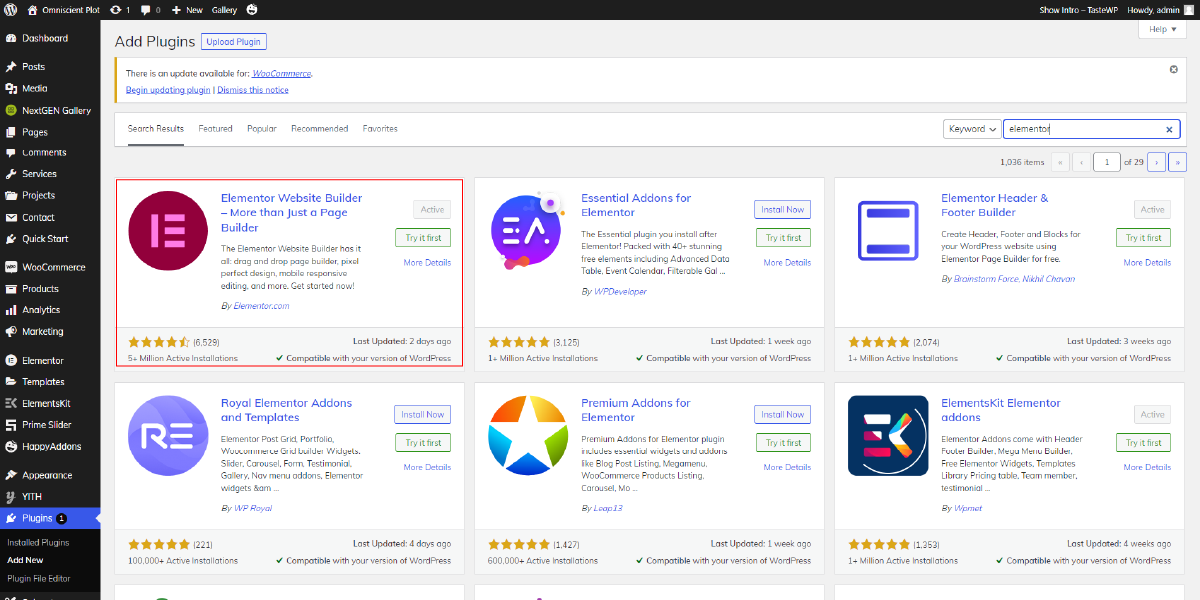
After planning your contact form, the next crucial step is to install the Elementor page builder and activate it on your WordPress website. Elementor is a highly popular and user-friendly visual page builder that empowers you to create stunning web pages and, in this case, design an effective contact form without the need for extensive coding knowledge.
In order to install Elementor, you’ll need to log into your WordPress dashboard and find the “Plugins” section. Click on “Add New” and search for “Elementor.” Once you locate the Elementor Page Builder plugin, click the “Install Now” button, and then activate it.
Upon activation, Elementor seamlessly integrates into your WordPress site, providing you with a drag-and-drop interface for effortless form creation. It grants you the flexibility to design your contact form precisely as you envisioned it during the planning phase. With Elementor, you’ll be well-equipped to craft visually appealing and functional forms that engage your audience effectively.
Create A New Page:

After installing and activating the Elementor page builder plugin, the next step to design an effective Elementor Contact Form is to create a new page or edit an existing one where you intend to place the contact form. Elementor seamlessly integrates with WordPress, giving you the creative freedom to design stunning pages with ease.
To create a new page, navigate to your WordPress dashboard and click on “Pages” in the left-hand menu. Then, click “Add New.” You can give your page a title that reflects its purpose, such as “Contact Us” or “Get in Touch.”
Alternatively, if you prefer to add the contact form to an existing page, locate the page you want to edit, and click “Edit” to access the page editor.
Once inside the page editor, you’ll notice a button labeled “Edit with Elementor.” Clicking this button will launch the Elementor editor, allowing you to start building and customizing your page, including adding the Elementor Contact Form widget.
Add The Form Widget:

In the Elementor editor, you’ll find a wide array of widgets on the left-hand panel. Scroll through or use the search bar to locate the “Form” widget. With a simple drag-and-drop action, you can position the Form widget precisely where you want it on your page.
This step essentially lays the foundation for your contact form’s layout and structure. The Form widget serves as the container for your form fields, submission button, and any additional elements you choose to include. By dragging and dropping the widget onto your page, you initiate the process of crafting a user-friendly and visually appealing contact form.
Configure Form Fields:

After adding the “Form” widget to your Elementor page, the next crucial step is to configure the form fields effectively. This is where you tailor the form to collect specific information from your website visitors. Start by adding the necessary fields like name, email, subject, message, or any other information pertinent to your purpose.
Using the widget settings, you have fine-grained control over each field. You can specify field labels to guide users on what each input is for. For instance, labeling a text field as “Name” makes it clear that users should enter their name in that space. Placeholders can be used to provide additional hints or examples to users, ensuring they input the correct information.
The “Form” widget also allows you to mark fields as required, ensuring that users don’t skip crucial information. By indicating which fields are mandatory, you prompt users to complete them before submitting the form, reducing errors and incomplete submissions. Customizing form fields through Elementor empowers you to create a user-friendly, engaging, and purpose-driven contact form that aligns perfectly with your website’s objectives.
Style The Form:

Once you’ve configured the form fields in your Elementor Contact Form, the next critical step is to style the form to enhance its visual appeal and ensure it aligns seamlessly with your website’s design and branding.
- Typography: Begin by selecting appropriate fonts for your form’s text elements, such as labels, input fields, and buttons. Choose fonts that are legible and consistent with your website’s overall typography. You can adjust font size, weight, and style to maintain visual harmony.
- Colors: Consistency in color scheme is vital. Customize the form’s colors to match your website’s branding. This includes the background color, text color, button color, and hover effects. Using your brand’s color palette helps reinforce your identity and makes the form feel like an integral part of your site.
- Spacing: Proper spacing ensures that the form elements are well-organized and user-friendly. Adjust the margins and padding around form fields and buttons to create a visually pleasing layout. Maintain a balance between elements to avoid clutter and improve readability.
By paying attention to these style details, you’ll create an Elementor Contact Form that not only functions smoothly but also seamlessly integrates into your website’s design, offering a cohesive and aesthetically pleasing user experience.
Set Form Actions:
The next crucial step in designing an effective Elementor Contact Form is to Set Form Actions. After styling the form to match your website’s aesthetics, you’ll delve into the widget settings to fine-tune its functionality.
First, you need to specify where the form submissions should be sent, typically to your designated email address. This ensures that when users submit the form, their messages are directed to the right inbox for prompt attention and response.
Customizing the confirmation message that users see after submitting the form is equally important. This message not only acknowledges their submission but can also provide additional information or set expectations regarding response times. A well-crafted confirmation message can enhance the user experience and reassure visitors that their messages have been received.
To enhance security and prevent spam submissions, you can set up spam protection with reCAPTCHA. By configuring reCAPTCHA within Elementor, you add an extra layer of verification that ensures the submissions are coming from real users rather than automated bots. This is essential for maintaining the integrity of your contact form and preventing unwanted spam in your inbox.
By taking these actions, you not only ensure that your Elementor Contact Form functions smoothly but also provide a professional and secure experience for your website visitors. This step is essential for making your form an effective tool for communication and engagement with your audience.
Add Conditional Logic (Optional):
After configuring the basic settings and actions for your Elementor Contact Form, the next step, which is optional but immensely powerful, is to add conditional logic. Elementor Pro provides this feature, allowing you to create dynamic and user-friendly forms that adapt to users’ responses.
Conditional logic enables you to show or hide specific form fields or entire sections of the form based on how users interact with it. This feature enhances the user experience by tailoring the form’s behavior to individual needs and responses. For instance, if you have a contact form with multiple inquiry options (e.g., sales, support, feedback), you can use conditional logic to display relevant fields only when a user selects a particular option.
By implementing conditional logic, you streamline the form-filling process, making it more intuitive and efficient for users. It reduces clutter, minimizes confusion, and ensures that users see only the information relevant to their specific inquiry or request. This not only enhances user satisfaction but also improves the quality of data collected through the form, as users are guided through a more personalized and focused interaction.
Mobile Optimization:
After adding conditional logic, the next crucial step in designing an effective Elementor Contact Form is mobile optimization. While Elementor does ensure responsiveness, it’s vital to thoroughly test your form’s appearance and functionality on various mobile devices.
Mobile optimization ensures that your contact form adapts seamlessly to smaller screens, providing an excellent user experience regardless of the device visitors are using. Start by previewing your form in mobile view within the Elementor editor. This will give you an initial impression of how the form looks on mobile devices.
Next, perform real-world testing on actual smartphones and tablets to ensure that the form fields display correctly, the text is legible, and the buttons are easy to tap. Pay attention to spacing and alignment to avoid any visual or functional issues.
Testing on mobile devices helps you identify and address any potential usability issues that may arise due to differences in screen sizes and touch-based interactions. By thoroughly optimizing your Elementor Contact Form for mobile users, you’ll ensure that all visitors, regardless of their preferred device, can effortlessly engage with your website and submit inquiries or feedback.
Preview And Publish:

After completing the crucial step of mobile optimization, the next pivotal phase in designing an effective Elementor Contact Form is to preview and publish your work. This phase is essential to guarantee that your contact form functions seamlessly and delivers the intended user experience.
Before hitting the “Publish” button, it’s imperative to conduct thorough testing. Submit test entries through the form to simulate user interactions. This step ensures that the form accurately captures user data and that you receive email notifications promptly. Testing also verifies that the form behaves as expected, with all form fields functioning correctly, validation messages displaying when necessary, and reCAPTCHA spam protection effectively preventing unwanted submissions.
Elementor provides a convenient preview mode that allows you to see exactly how your contact form will appear to visitors. This feature enables you to fine-tune any design or functionality issues before making your form live. Once you’re confident that everything is working flawlessly, you can confidently publish your page, knowing that your Elementor Contact Form is primed and ready to engage with your website’s audience effectively.
Remember that an effective contact form not only looks good but also provides a seamless user experience. It should be easy to use, accessible on all devices, and secure against spam submissions. By following these 10 essential steps, you’ll be well on your way to designing an Elementor Contact Form that serves its purpose and enhances user engagement on your website.
Conclusion
In conclusion, we’ve explored the power of the Elementor Contact Form and its benefits in enhancing user engagement and communication on your website. By following our 10 essential steps, you can create a dynamic and visually appealing contact form that not only captures attention but also converts visitors into valuable leads or engaged users.
From planning and customization to mobile optimization and testing, these steps ensure a seamless user experience. Now, armed with this knowledge, you’re ready to design an effective Elementor Contact Form within your WordPress Elementor themes, ensuring it serves as a valuable tool for connecting with your audience and achieving your website’s goals.
The WordPress theme bundle, bundled with premium Elementor themes, seamlessly integrates with Elementor Contact Form. This combination allows for a stunning website design with an interactive, customizable contact form. It’s a powerful duo for enhancing user engagement and creating a polished online presence.

