When it comes to website design, user experience is one of the most important considerations. A site that is difficult to navigate or difficult to use can quickly turn visitors away. One way to improve user experience is by using the Elementor sticky header feature.
A sticky header is a header that remains fixed at the top of the page even as the user scrolls down. This means that important navigation links and other site features are always easily accessible. Sticky headers are a popular design choice because they always keep the most important information in front of the user.
Elementor is a popular website builder that offers a range of tools and features to help you create a professional-looking website quickly and easily. One of those features is the ability to create a sticky header. With Elementor, you can customize your header to fit your brand and design style and make it sticky so that it always stays visible.
In this blog post, we’ll take a closer look at how to use the Elementor sticky header feature to make your site more user-friendly. We’ll cover everything from creating your header to making it sticky, and provide tips and best practices to help you create a header that works well for your site.
Whether you’re building a new website or looking to improve an existing one, using a sticky header can be a great way to enhance the user experience. By keeping important information and navigation links in front of your visitors at all times, you can make it easier for them to find what they’re looking for and encourage them to stay on your site longer. So, let’s get started and learn how to create an effective sticky header using Elementor.
What Is An Elementor Sticky Header?
Elementor is a popular Best WordPress website builder that provides a range of tools and features to help users create professional-looking websites easily and quickly. One of the standout features of Elementor is its sticky header functionality, which allows users to create a header as we know that it remains fixed at the top of the page even as the user scrolls down.
A sticky header is a design feature that has become increasingly popular in recent years. A sticky header keeps important information and navigation links in front of the user at all times, making it easier for them to navigate the site and find what they are looking for.
The Elementor sticky header feature allows users to create a customized header. Users can choose from a variety of header templates or create their own from scratch, using Elementor’s drag-and-drop interface. They can add text, images, logos, and other design elements, and customize their header’s font, color, and size to fit their brand and design style.
In addition to customizing the design of their header, users can also customize the behavior of their sticky header. For example, they can choose to have the header shrink or change color as the user scrolls down the page. They can also choose which navigation links and other site features are included in the Elementor sticky header, ensuring that the most important information is always easily accessible.
Benefits Of Elementor Sticky Header
The Elementor Sticky Header feature provides several benefits for website design and user experience. Here are some of the advantages of using a sticky header with Elementor:
- Improved Navigation: A sticky header ensures that the main navigation menu is always accessible to users, regardless of their scroll position on the page. This makes it easier for visitors to navigate through your website, find important links, and access different sections or pages quickly.
- Persistent Branding: The sticky header typically includes your logo and branding elements, such as your brand colors or tagline. By keeping your logo visible at all times, you reinforce your brand identity and enhance brand recognition, even as users scroll down the page.
- Enhanced User Engagement: With a sticky header, key interactive elements like the search bar, social media icons, or the shopping cart can remain in view, encouraging users to interact with them. This can lead to increased user engagement, improved conversions, and higher overall website usability.
- Mobile-Friendly Experience: As more users browse websites on mobile devices, having a sticky header becomes particularly beneficial. It ensures that crucial navigation options and important information remain easily accessible, even on smaller screens where vertical space is limited.
- Smooth Transition: The Elementor sticky header feature often includes a smooth transition effect when the header changes from a static position to a fixed position upon scrolling. This transition adds a touch of elegance and improves the overall user experience by making the header’s movement feel seamless.
- Design Flexibility: Elementor allows you to customize the appearance and behavior of your sticky header according to your design preferences. You can choose from various styling options, such as adjusting the header’s height, changing colors, modifying typography, and adding effects, ensuring it complements your website’s overall aesthetic.
- Increased Content Visibility: By reducing the amount of screen space occupied by the header as users scroll, a sticky header helps maximize the visibility of the main content on your web pages. This is especially useful for long-form content, blog posts, or pages that require users to scroll extensively.
Easy Setup: Elementor makes it straightforward to create and customize a sticky header without requiring coding knowledge. The Elementor editor provides a dedicated section for configuring the sticky header settings, allowing you to easily enable or disable the feature, adjust its position, and customize its appearance.
How To Create An Elementor Sticky Header?
There are various plugins like Elementor kit by which you can create header and footer, but you will find lots of limitations in terms of customization as it is free. On the other hand, Elementor offers a Theme builder by which you can create and customize your header that suits your brand. But Elementor Theme Builder is the Pro feature so if you want to use it, you need to upgrade to Elementor Pro. Here are the steps to create a sticky header using the Elementor Theme Builder feature from scratch.
Step 1: Install And Activate Elemento Pro
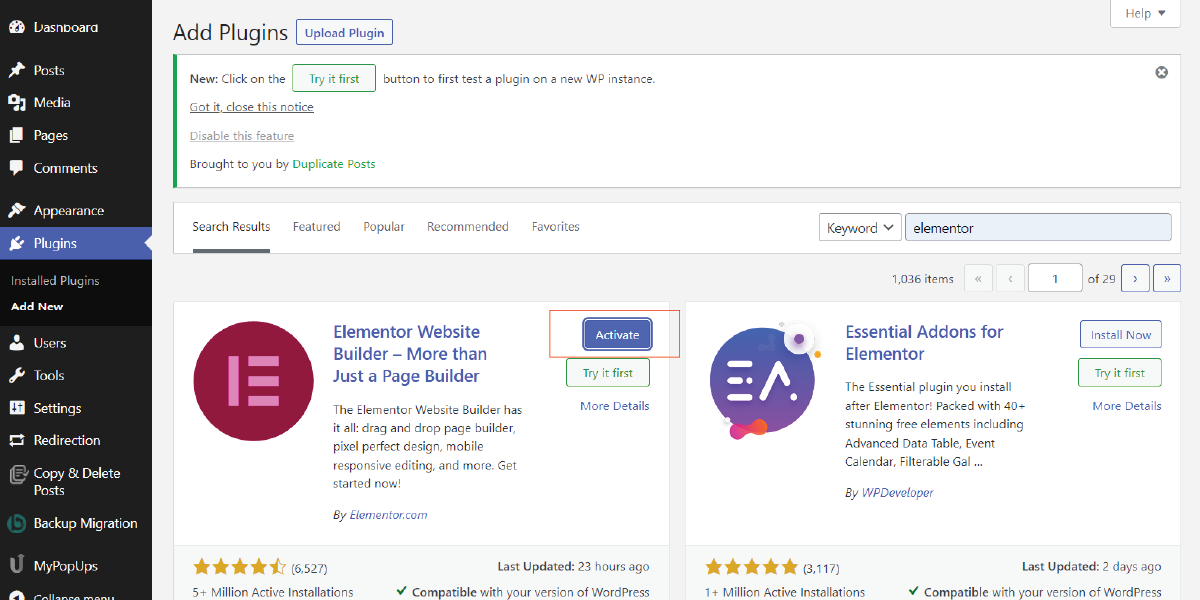
To create an Elementor Sticky Header, the first step is to install and activate the Elementor plugin on your WordPress website and upgrade it to the Pro version. Elementor is a powerful page builder plugin that allows you to design and customize your website’s layout with ease.
To get started, log in to your WordPress admin dashboard and navigate to the “Plugins” section Click “Add New” to access the page for installing the plugin. Enter the search term “Elementor” in the search bar. Look for the official Elementor Page Builder plugin, developed by Elementor.com, and click on the “Install Now” button next to it.
Once the installation is complete, click on the “Activate” button to activate the plugin. Now you have successfully installed Elementor on your WordPress site, you can start using its basic features to design your website.
However, to unlock the full potential of Elementor and access advanced features like creating a sticky header, you need to upgrade to Elementor Pro. Elementor Pro offers additional functionality, including the ability to design custom headers, footers, and other dynamic templates.
To upgrade to Elementor Pro, you can visit the official Elementor website (elementor.com) and navigate to the pricing page. Choose a plan that suits your needs and budget, and click on the “Get Started” or “Upgrade” button associated with the desired plan.
Follow the instructions to complete the purchase and provide the necessary details. Once you have successfully upgraded to Elementor Pro, you will receive a license key.
Now, go back to your WordPress dashboard and navigate to “Elementor” in the left-hand menu. Click on “License” and enter the license key you received after the purchase. Click on the “Activate” button to validate your license and unlock all the Pro features of Elementor.
Step 2: Choose Or Create A New Template For The Header
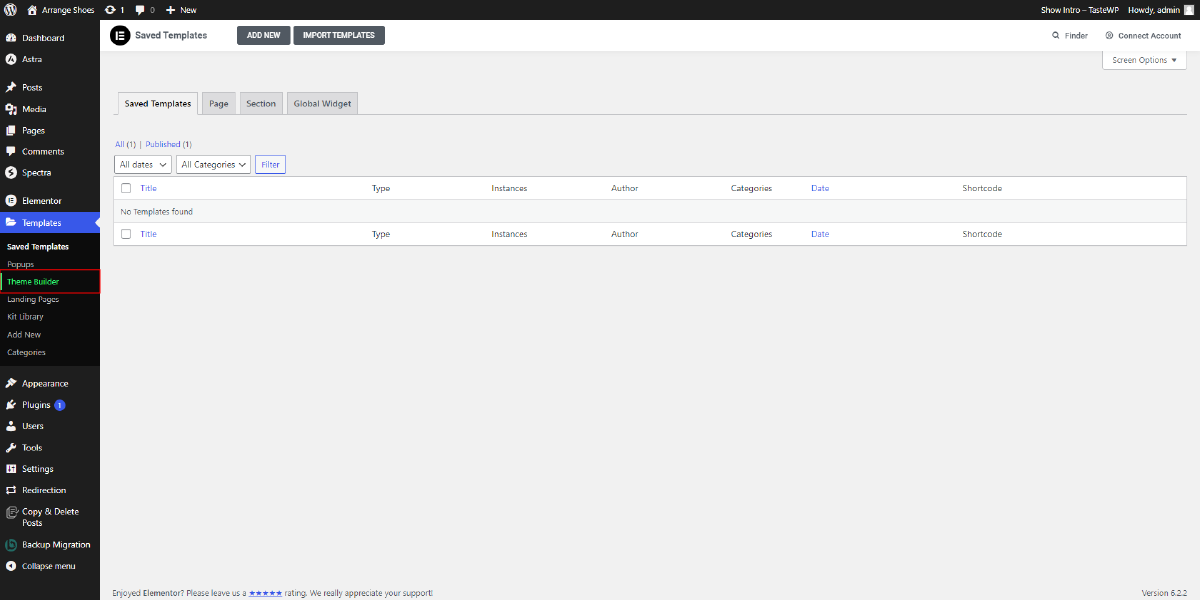
After successfully installing and activating Elementor Pro, the second step in creating an Elementor Sticky Header is to access the Elementor Theme Builder. The Elementor Theme Builder is a powerful tool that allows you to design and customize different parts of your website, including headers, footers, and other dynamic templates.
To access the Elementor Theme Builder, log in to your WordPress admin dashboard and navigate to the “Templates” option under the Elementor tab in the left-hand menu. Clicking on “Templates” will reveal a dropdown menu, from which you need to select “Theme Builder.”
Once you select “Theme Builder,” you will be redirected to the Elementor Theme Builder interface. This is where you can create and manage templates for various sections of your website, including the header.
The Elementor Theme Builder provides a user-friendly and intuitive interface, making it easy to customize your website’s design. It offers a wide range of pre-designed templates and blocks that you can use as a starting point or inspiration for your own header design. You can also create a header template from scratch if you prefer a fully customized design.
In the Elementor Theme Builder interface, you will find options to create new templates, edit existing templates, and manage the display conditions for each template. Display conditions allow you to specify where and when your header template should be applied. You can choose to display the sticky header on the entire site or specific pages, posts, templates, or taxonomies based on your preferences.
Once you have accessed the Elementor Theme Builder, you are ready to move on to the next steps in creating your sticky header.
Step 3: Create A New Header Template
The third step is to create a new header template after accessing the Elementor Theme Builder. Once you are in the Elementor Theme Builder interface, you will see an “Add New” button. Click on this button to begin creating your new header template.
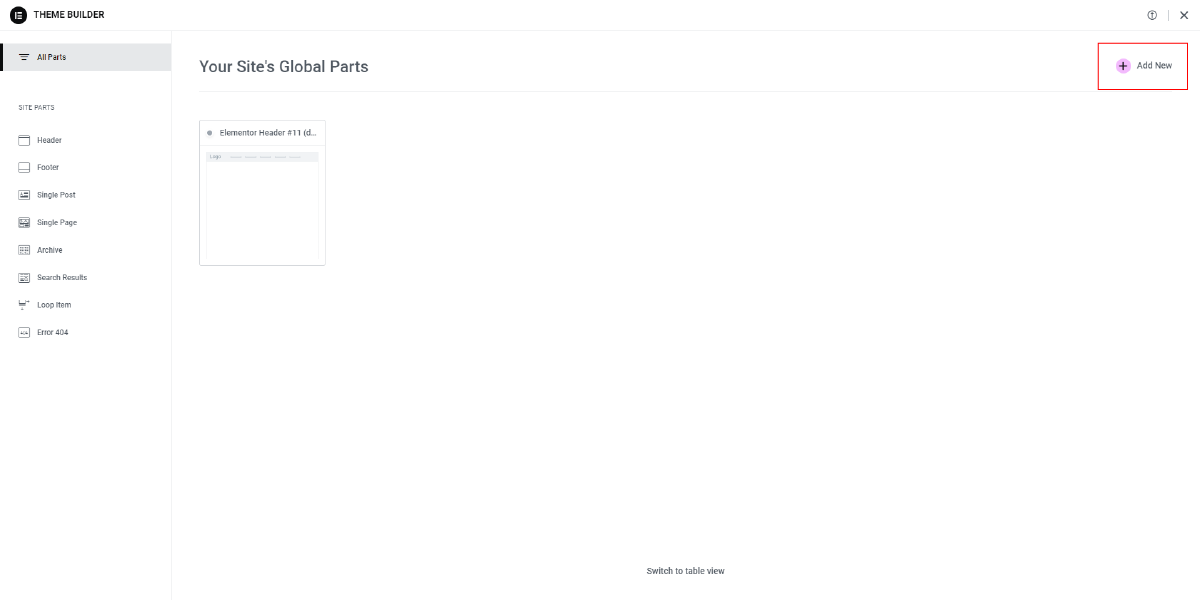
After clicking the “Add New” button, you will be prompted to select the type of template you want to create. In this case, since we are focusing on creating a sticky header, choose the “Header” template type. Give your header template a name that helps you identify its purpose or style. You can then proceed by clicking the “Create Template” button.
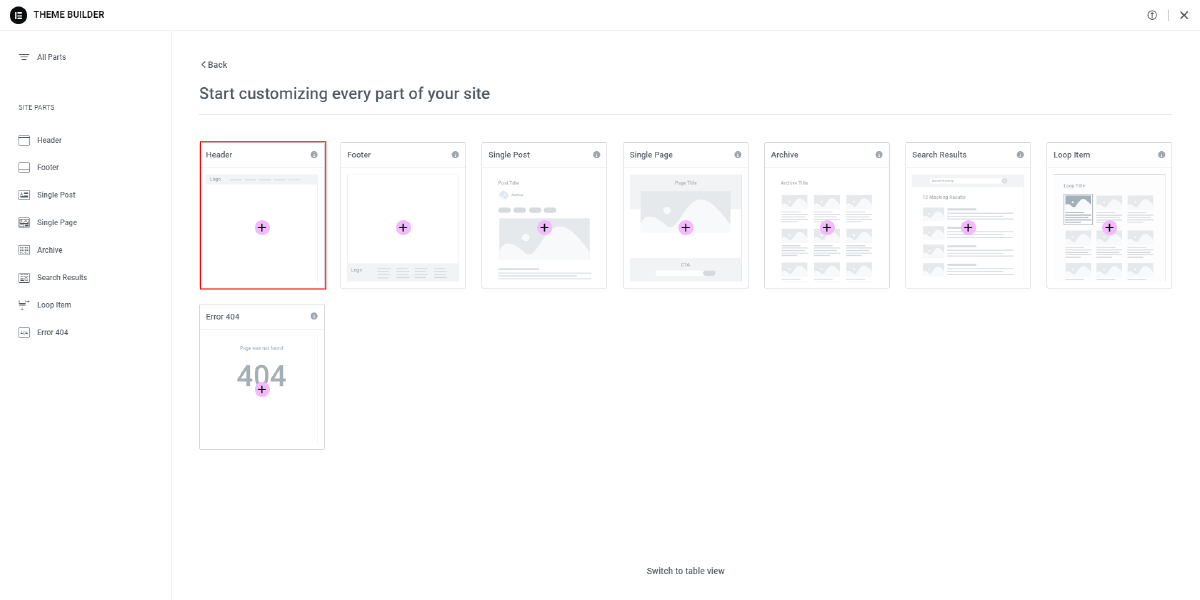
Once you have clicked on the “Create Template” button, you will be redirected to the Elementor Header Library. Here, you will find a variety of pre-designed header templates to choose from. You can explore the available options and select a template that matches your website’s style and branding.
To use a particular template, simply click on the “Insert” button associated with that template. At this stage, Elementor might prompt you to create an Elementor account or log in to your existing account. Creating an Elementor account allows you to access additional features, templates, and support.
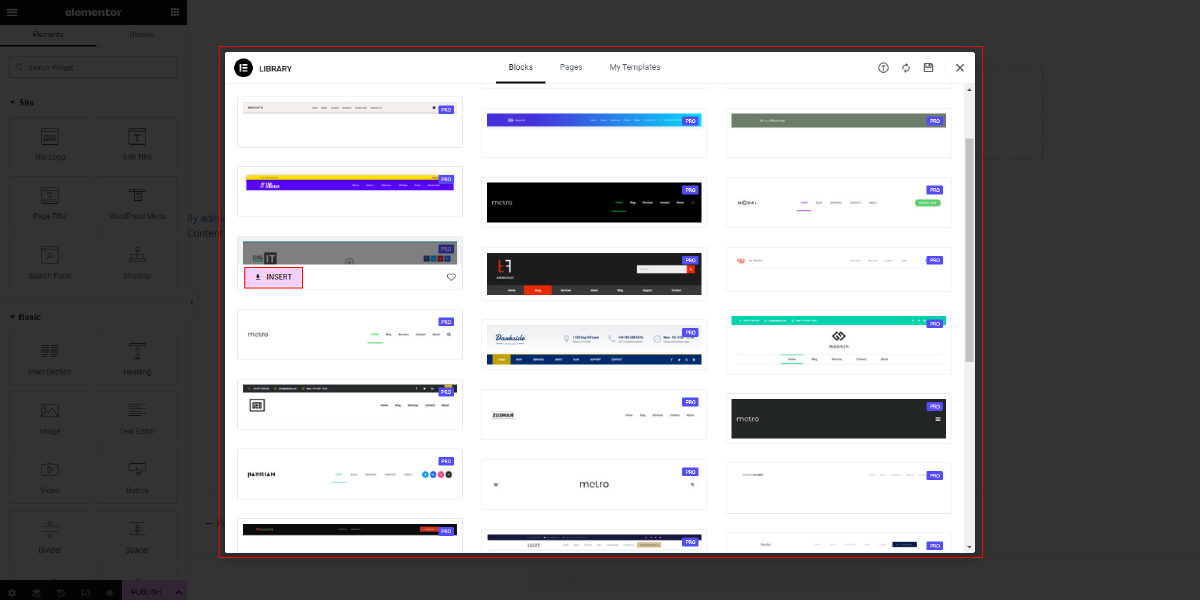
After creating an account or logging in, you will be redirected to the Elementor customization window. This is where you can start designing and customizing your sticky header according to your preferences.
Step 4: Design Your Sticky Header
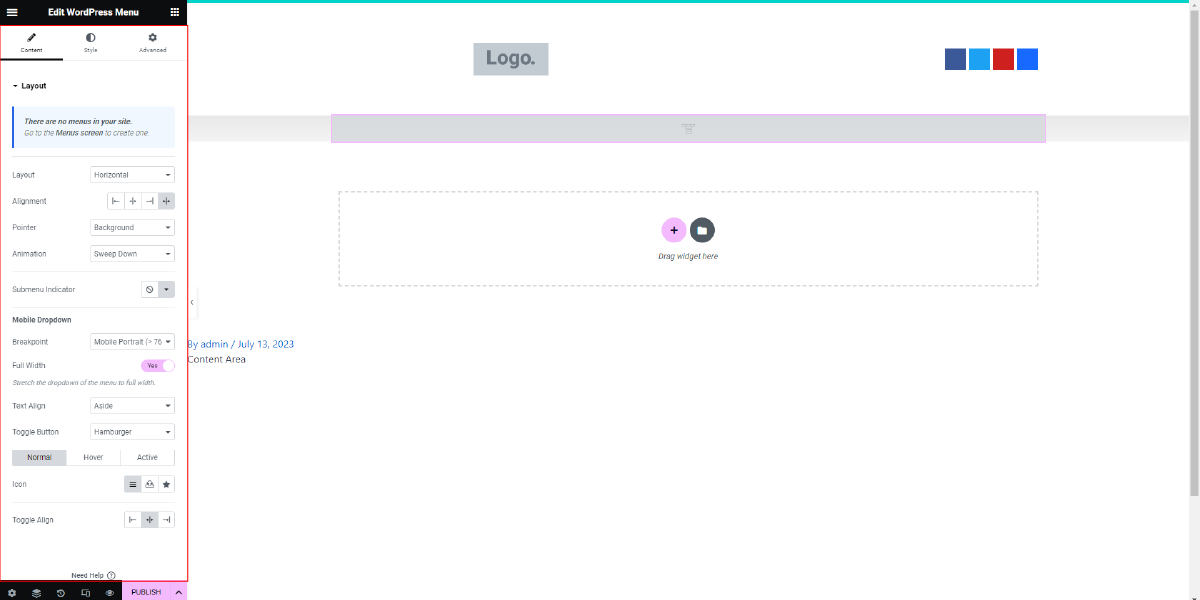
After creating a new header template in Elementor Theme Builder, the next step is to design your sticky header. Elementor provides an intuitive drag-and-drop interface that makes it easy to create and customize your header layout. This gives you the flexibility to add various widgets, modify their appearance, and arrange them according to your preferences.
To begin designing your sticky header, you can click on the “Edit with Elementor” button. This will open up the Elementor editor, where you’ll find a wide range of widgets available in the left panel. You can explore the widgets library and choose the ones that best suit your needs for the header.
You can add widgets such as a site logo or site title, navigation menu, search bar, social media icons, contact information, or any other elements you want to include in your sticky header. Simply drag the desired widget from the panel and drop it onto the header section in the editor.
Once you’ve added a widget, you can customize its appearance and settings using the options available in the left panel. You can modify the widget’s size, typography, colors, background, alignment, and other properties to match your website’s branding and design.
In addition to customizing individual widgets, you can also arrange them within the header section to achieve your desired layout. Elementor allows you to easily reposition the widgets by dragging and dropping them within the header section.
Step 5: Set Sticky Behavior
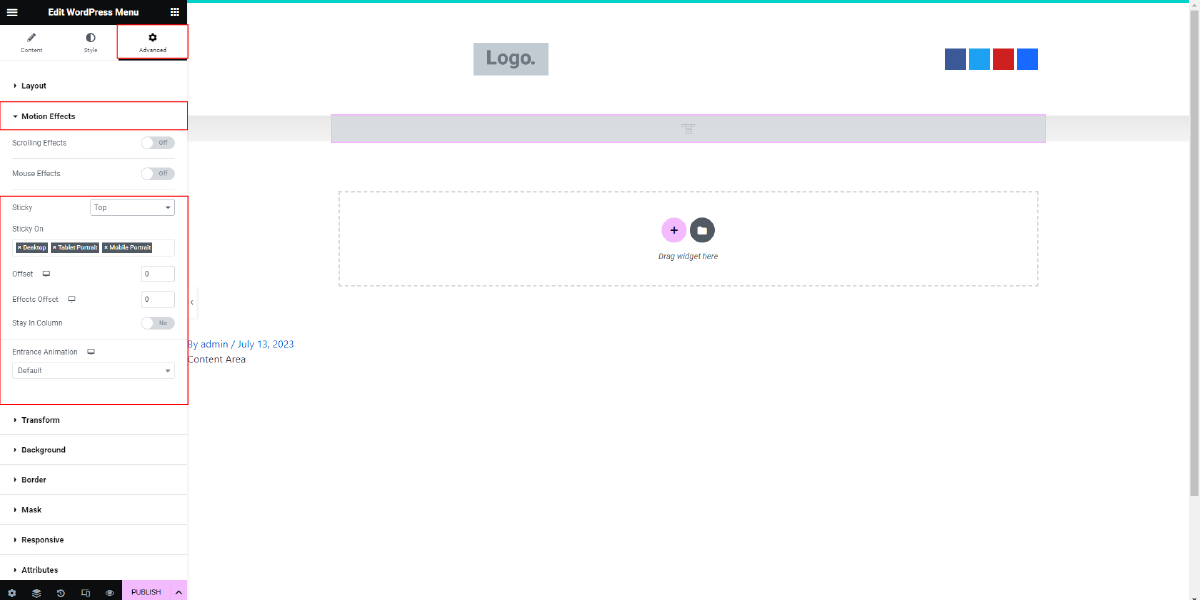
Once you have designed your sticky header using Elementor, it’s time to set the sticky behavior to make the header stick to the top of the page when users scroll down. To do this, locate the header widget or section that you want to make sticky.
In the Elementor editor, click on the header widget or section you wish to make sticky. This will bring up the editing options in the left panel. Look for the “Advanced” tab among the available options and click on it.
Within the “Advanced” tab, scroll down until you find the “Motion Effects” section. This section allows you to add dynamic effects to your header, including the ability to make it sticky. Look for the option labeled “Sticky” and enable it by toggling the switch or checkbox.
Enabling the “Sticky” option will instruct Elementor to make the header stick to the top of the page as users scroll down. This means that no matter how far users scroll, the sticky header will remain fixed at the top, ensuring it is always visible and accessible.
Once you have enabled the “Sticky” option, you may have additional settings available to customize the sticky behavior. These settings can include options like the offset, which determines how far the user needs to scroll before the header becomes sticky, and the scroll behavior, which determines how the sticky header transitions when scrolling.
Make sure to adjust these additional settings according to your preferences and website design requirements. Experiment with different values and preview the changes to ensure the sticky behavior is as desired.
By setting the sticky behavior for the header widget or section, you have successfully configured Elementor to make the header stick to the top of the page when users scroll down. This feature enhances user experience by providing easy access to the header navigation and maintaining consistent branding and functionality throughout the website.
Step 6: Assign The Sticky Header To The Entire Site Or Specific Pages
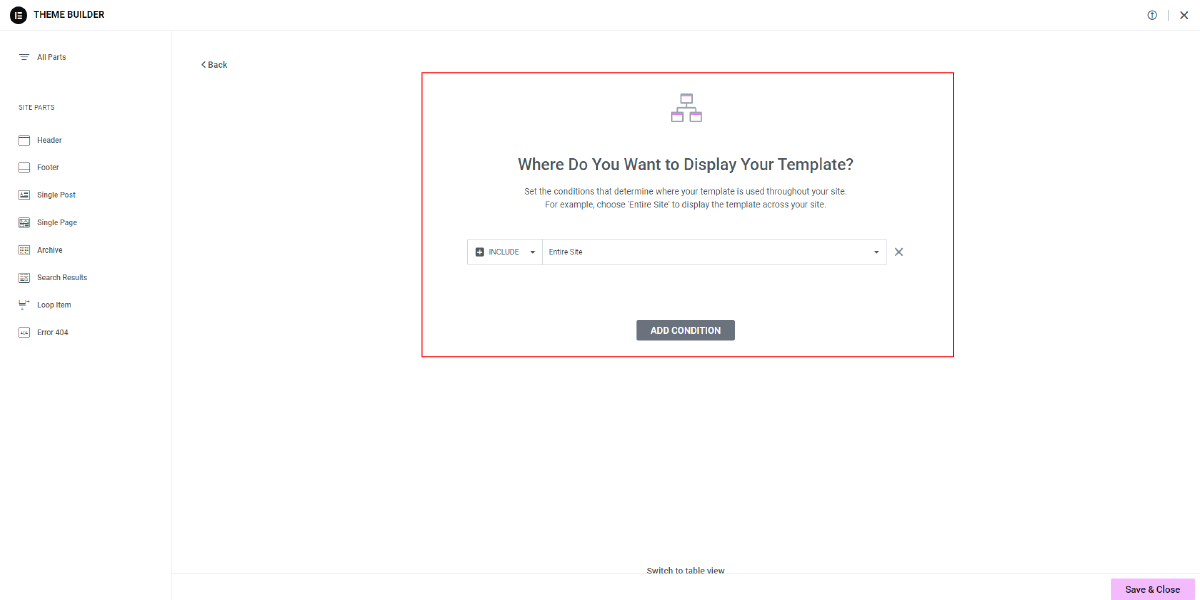
After setting the desired sticky behavior for your Elementor header, the next step is to assign it to either the entire site or specific pages. This flexibility allows you to have more control over where the sticky header appears. To accomplish this, you will need to navigate to the Elementor Theme Builder interface.
Within the Theme Builder interface, you will find a button labeled “Display Conditions.” Clicking on this button will open up a range of options for defining where the sticky header should be displayed. This feature empowers you to selectively include or exclude certain pages, posts, templates, or taxonomies based on your specific requirements.
By clicking on the “Include” option, you can specify the pages, posts, templates, or taxonomies where you want the sticky header to be visible. This means that whenever a visitor lands on any of the designated pages, the sticky header will be activated and remain fixed at the top of the screen as they scroll.
On the other hand, if you choose the “Exclude” option, you can specify the pages, posts, templates, or taxonomies where you don’t want the sticky header to be displayed. This allows you to define exceptions and ensure that the sticky header doesn’t interfere with the user experience on those specific pages.
By utilizing these display conditions, you have the flexibility to tailor the appearance of your sticky header to suit your website’s unique structure and content.
Step 7: Save And Publish The Sticky Header
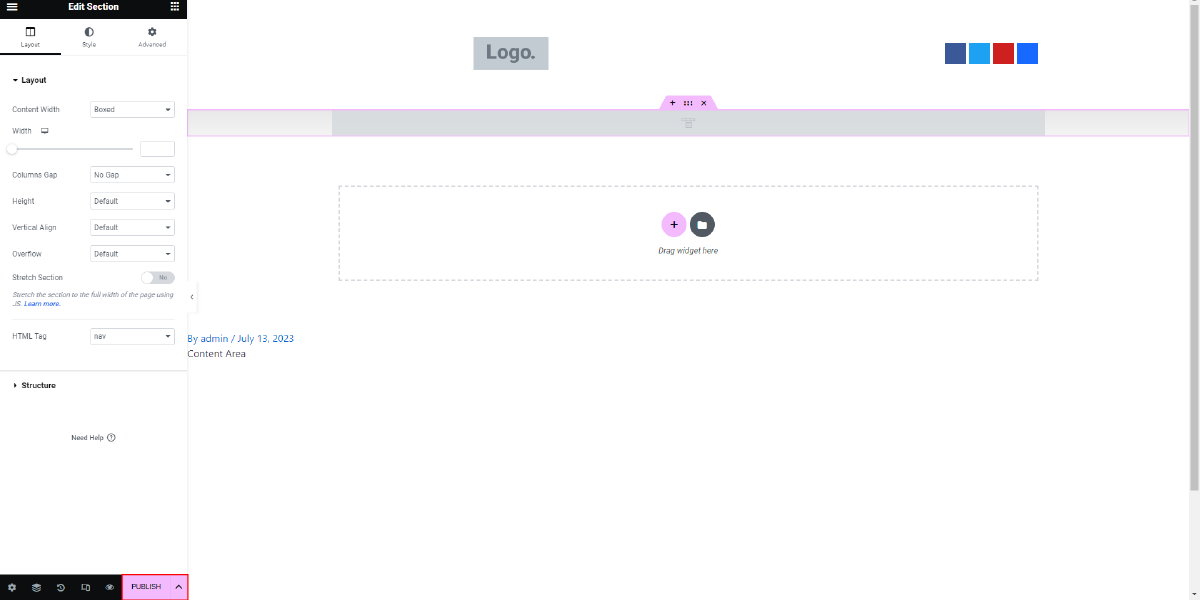
After designing and configuring your Elementor sticky header, the final step is to save and publish it. Once you are satisfied with your changes, click on the “Save” button. This action ensures that all your modifications are stored and can be accessed later.
After saving your sticky header, it is crucial to preview it before making it live on your website. Previewing allows you to see how your header template appears and ensures that it aligns with your desired design. Take the time to carefully review all the elements and make any necessary adjustments if something doesn’t look as expected.
Once you have confirmed that your sticky header looks as desired during the preview, you can proceed to make it live by clicking on the “Publish” button. This action will implement the sticky header across your entire website or on specific pages, depending on how you have assigned it. From this point forward, visitors to your website will be able to see and interact with the sticky header as intended.
Conclusion
In conclusion, incorporating the Elementor Sticky Header feature into your website can greatly enhance its user-friendliness and overall user experience. We have explored the concept of Elementor Sticky Header, understanding its purpose and benefits. From increased visibility and navigation convenience to creating a professional and polished look, the advantages are undeniable.
Additionally, we have gone through a comprehensive step-by-step guide on how to create a sticky header using Elementor. Starting from activating Elementor Pro, we covered everything from designing and customizing your header to assigning it to specific pages or the entire site. By following these 7 steps, you can effortlessly implement a sticky header that perfectly aligns with your website’s branding and functionality.
By utilizing the Elementor Sticky Header feature and leveraging WordPress Elementor themes, you can provide your visitors with a seamless browsing experience. Users will appreciate the convenience of having important navigation elements constantly accessible as they scroll through your content. This feature not only enhances usability but also adds a touch of professionalism to your website’s design.


