
Image carousels are a popular and effective way to showcase multiple images or visual content in a visually engaging manner on your website. These dynamic slideshows capture visitors’ attention, provide an interactive experience, and allow you to display a variety of images within a limited space. If you’re looking to create eye-catching image carousels for your website, you’re in the right place.
In this blog post, we will explore the art of creating captivating image carousels and provide you with practical tips and techniques to make your carousels stand out. While there are various tools and plugins available, we’ll focus on the versatile and widely-used WordPress Page Builder, Elementor.
Elementor’s Media Carousel Widget offers a seamless and user-friendly solution for designing and implementing stunning image carousels. Whether you’re a beginner or an experienced web designer, Elementor’s intuitive drag-and-drop interface and powerful customization options make it accessible to all skill levels.
We’ll dive into the details of how to utilize Elementor’s Media Carousel Widget to its full potential. From choosing the right images and creating compelling transitions to selecting suitable effects and optimizing for different devices, we’ll cover everything you need to know to create captivating image carousels which leave a strong impression on your website visitors.
Additionally, we’ll explore best practices for carousel design, such as selecting an appropriate carousel size, optimizing image file sizes for faster loading times, and ensuring the carousel seamlessly integrates with your overall website design and branding.
So, let’s dive in and discover the secrets to creating eye-catching image carousels with Elementor’s Media Carousel Widget. Get ready to captivate your audience and take your website design to the next level!
What Is A Media Carousel Widget?
The Media Carousel Widget is a powerful tool offered by Elementor, a popular WordPress page builder. This widget allows you to create dynamic and visually appealing image carousels on your website. With the Elementor Pro version, you gain access to this advanced widget, which offers enhanced customization options and flexibility.
The Media Carousel Widget enables you to showcase multiple images or media content in a carousel format, where the images slide horizontally or vertically. This widget is particularly useful when you want to display a collection of images, such as a portfolio gallery, product showcase, or a visual story.
Using the Media Carousel Widget, you can easily add images or media from your WordPress media library or external sources. The widget supports various media types, including images, videos, and even embedded content from platforms like YouTube or Vimeo. This versatility allows you to create engaging carousels with a combination of visuals and multimedia elements.
With the Elementor Pro version, you have access to a wide range of customization options for the Media Carousel Widget. You can control the layout, transition effects, navigation arrows, and pagination dots. This means you can choose the number of slides to display at once, determine the speed and style of transitions between slides, and style the navigation elements to match your website’s design.
Furthermore, the Media Carousel Widget allows you to customize each slide individually. You can adjust the image size, alignment, and position within the carousel. Elementor’s intuitive interface makes it easy to rearrange the order of slides, delete or duplicate slides, and add captions or titles to provide additional context or information.
Another notable feature of the Media Carousel Widget is its responsiveness. Your image carousel will automatically adapt to different screen sizes, ensuring a consistent and optimized experience for users on various devices, including desktops, tablets, and mobile phones.
By leveraging the Media Carousel Widget, you can create eye-catching and interactive image carousels that capture the attention of your website visitors. Whether you’re showcasing your portfolio, promoting products, or sharing visual stories, this widget offers the flexibility and customization options to create stunning and engaging carousels that align with your brand and website design.
How To Create Image/Video Carousels With Elementor's Media Carousel Widget?
Creating image/video carousels with Elementor’s Media Carousel Widget is a straightforward process. Follow these steps to utilize the widget and design captivating carousels on your website.
Step 1: Access The Elementor Editor

To begin creating image/video carousels with Elementor’s Media Carousel Widget, the first step is to access the Elementor Editor. To do this, you’ll need to log in to your WordPress dashboard with your administrator credentials. Once logged in, navigate to the page where you want to add the image/video carousel.
Once you are on the desired page, look for the “Edit with Elementor” button, usually located at the top or bottom of the page, depending on your WordPress theme or the WordPress editor layout. Clicking on this button will launch the Elementor editor, giving you full access to its powerful features and functionalities.
When you click the “Edit with Elementor” button, the page will transition to a new screen, displaying the Elementor interface. The editor is divided into two main sections: the live preview of your page on the right side, and the Elementor panel on the left side.
The live preview section allows you to see your page’s content in real-time as you make changes, making it easier to visualize how the image/video carousel will look once it’s added. On the left side, the Elementor panel houses all the available widgets, including the Media Carousel Widget, along with various other design and styling options.
Step 2: Add The Media Carousel Widget

The next step is to add the widget after accessing the Elementor editor. Once you have accessed the Elementor editor for your desired page, you will find a widget panel on the left-hand side. This panel contains a wide range of widgets that you can add to your page. To add the Media Carousel Widget, you can either search for it using the search bar at the top of the widget panel or manually locate it by scrolling through the available options.
If you choose to search, simply type “Media Carousel” in the search bar, and the widget should appear in the search results. Click on the Media Carousel widget to select it.
Alternatively, you can manually find the Media Carousel Widget by scrolling through the widget panel. Look for the section or category that contains carousel-related widgets, such as “Media” or “Image & Video.” Within that section, you will find the Media Carousel Widget.
Once you have located the Media Carousel Widget, drag and drop it onto the desired section of your page. Elementor’s intuitive drag-and-drop functionality allows you to easily position the widget where you want it to appear on your page.
Step 3: Add Images Or Videos To The Carousel And Customize The Carousel Settings
Once you have added the Media Carousel Widget to your Elementor-powered website, you can unleash your creativity and customize it to create captivating images or video carousels. The left sidebar of the Elementor editor provides all the settings you need to make the carousel truly unique and tailored to your specific needs.
1. Content Setting:

The first section you will encounter is the Content Setting, where you can fine-tune the elements and appearance of your carousel slides. Within this setting, you’ll find two main options: “Slides” and “Additional Options.”
1. Slides: Under the “Slides” setting, you can customize various aspects of the carousel’s appearance and behavior.
-
Skins: Elementor offers three different skins to choose from, each offering a distinct visual presentation for your carousel.
- Carousel: It displays a customizable number of images or video slides per view with the rotating carousel skin.
- Slideshow: This is a slider skin that showcases one primary slide and small image thumbnails below it.
- Coverflow: This slider skin displays a central slide in the front and two side slides in the back, providing a visually engaging 3D effect.
- Slide to Add images/videos: In this section, you can effortlessly upload images or videos to your carousel. Additionally, you can assign media or custom links to each slide. With the latest version of Elementor (3.14), you can even leverage AI (Artificial Intelligence) to create images automatically. This feature simplifies the process of adding and managing slides, allowing you to include an unlimited number of slides to cater to your requirements.
- Effects: You have the freedom to choose between slide, fade, and cube effects for your carousel slides. Each effect offers a different animation style, allowing you to select the one that best compliments your website’s overall design and branding.
- Slides per view: This option lets you specify the number of slides that will be visible on the screen at any given time. You can adjust this value according to your preferred display layout and the number of slides you want to showcase simultaneously.
- Slides to scroll: With this setting, you can determine the number of slides that will be scrolled at a time when users interact with the carousel navigation. This allows you to control the user experience and the smoothness of navigation within the carousel.
- Height and Width: The “Height” and “Width” settings enable you to adjust the dimensions of the carousel slides. This flexibility allows you to optimize the carousel to fit perfectly within your website’s layout and ensure a visually pleasing appearance.
Additional Options: In the “Additional Options” section, you can further enhance the functionality and aesthetics of your carousel with various customizable options.
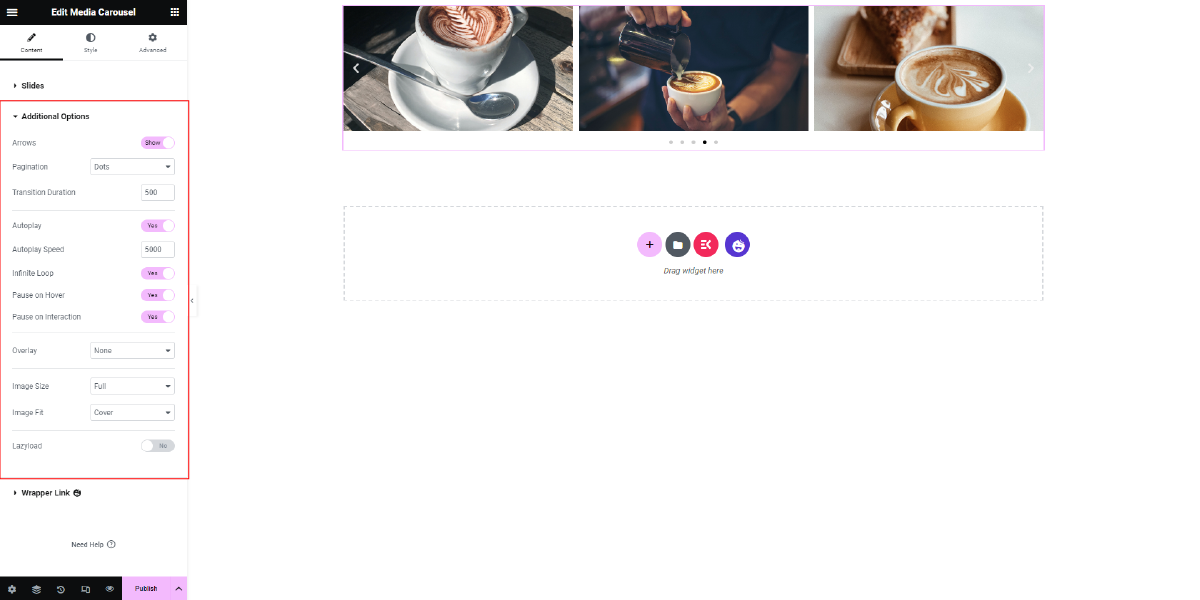
- Arrows: This setting enables you to customize the navigation arrows (toggles) used to navigate between slides. You can control their size, color, and position on the carousel.
- Pagination: Here, you can decide whether to include pagination dots, which indicate the number of slides and the user’s current position within the carousel.
- Transition Duration: This option allows you to set the duration of slide transitions, determining the speed at which slides change.
- Autoplay: You can choose to enable or disable autoplay, which automatically progresses the carousel slides at a specified interval.
- Autoplay Speed: When autoplay is enabled, this setting allows you to control the speed at which the carousel progresses between slides.
- Infinite Loop: Enabling the infinite loop ensures that the carousel continuously cycles through slides, providing a seamless and continuous user experience.
- Pause on Hover: By toggling this option on, the carousel will pause its autoplay function when users hover their mouse over it, allowing for easy interaction and exploration of the content.
- Pause on Interaction: Similar to “Pause on Hover,” this option allows you to pause the autoplay function when users interact with the carousel, ensuring a smoother browsing experience.
- Overlay: With this feature, you can choose to overlay text or other elements on top of the carousel slides, further enhancing the visual impact and conveying additional information.
- Image Size: This setting allows you to specify the size of the images or videos within the carousel, ensuring a consistent and visually appealing display.
- Image Fit: The “Image Fit” option determines how the images or videos will be adjusted to fit within the carousel slide. You can choose between “Cover,” which crops the media to fit, or “Contain,” which ensures the entire media is visible within the slide.
- Lazyload: Enabling lazyload optimizes the loading of images or videos in the carousel, ensuring faster initial page load times and improved performance.
2. Style Setting:
The next section is the Style Setting, which allows you to fine-tune the visual appearance of various elements within the carousel.

- Slides: In this subsection, you can adjust the spacing between slides, set the slide border width, control the border-radius (roundness) of the slides, choose the border color, and apply padding to enhance the visual separation between slides.
- Navigation: Here, you can customize the size, color, and position of the navigation arrows, pagination dots, and play icon. This enables you to align these elements with your website’s overall design aesthetic and create a cohesive look.
- Lightbox: The lightbox setting provides options to customize the color scheme, UI color, UI hover color, and video width when viewing the media in a lightbox mode. This feature enhances the user experience when interacting with the carousel and viewing media content in a larger format.
3. Advance Setting:
In the Advance Setting section, you’ll find familiar options similar to other Elementor widgets. These settings allow you to further refine and tailor the appearance and behavior of the carousel.

- Layout: Here, you can choose the layout type, including full-width or boxed layout, ensuring that the carousel seamlessly integrates with your website’s overall design.
- Motion Effects: The motion effects settings enable you to add parallax or other animation effects to the carousel, enhancing the visual appeal and interactivity of the carousel.
- Transform: With the transform setting, you can apply custom transformations, such as scaling or rotating, to the carousel slides, offering a unique and dynamic display.
- Background: This option allows you to set a background color or image behind the carousel, providing additional context or visual impact.
- Border: You can add a border around the carousel, customize its width, choose the border color, and adjust the border radius, providing further control over the carousel’s appearance.
- Mask: The mask feature enables you to apply custom mask shapes to the carousel slides, allowing for creative and eye-catching designs.
- Responsive: In the responsive settings, you can specify how the carousel behaves on different devices, ensuring optimal display and functionality across various screen sizes.
- Attributes: Here, you can assign custom CSS classes or IDs to the carousel for further styling or integration purposes.
- Custom CSS: The Elementor Custom CSS option provides advanced users with the ability to add their own CSS code to customize the carousel even further, allowing for complete control over the design and appearance.
By leveraging the comprehensive customization options provided by Elementor’s Media Carousel Widget, you can create visually stunning image or video carousels that captivate your audience and enhance the user experience. From adjusting slide settings to fine-tuning the style and applying advanced configurations, Elementor offers a versatile and intuitive platform to bring your creative vision to life. So go ahead and let your imagination soar as you create unique and eye-catching carousels with Elementor’s Media Carousel Widget.
Step 4: Preview And Publish

Once you’ve added and customized the media carousel using Elementor’s Media Carousel Widget, the next step is to publish your changes and make the carousel live on your website. After you have added your desired images or videos to the carousel and adjusted the carousel settings to your liking, take a moment to review the final result. Ensure that the order, layout, transitions, and other customization options align with your intentions and overall website design.
If you’re satisfied with the carousel’s appearance and functionality, it’s time to save and publish your changes. Look for the “Update” or “Publish” button within the Elementor editor and click on it. This action will save your modifications and update your website with the new media carousel. Publishing the changes will make the media carousel accessible to your website visitors.
Conclusion
In conclusion, creating eye-catching image carousels with Elementor’s Media Carousel Widget and integrating them seamlessly into WordPress Elementor themes is a straightforward and powerful way to enhance your website’s visual appeal and engage your audience. We explored the features and customization options of the Media Carousel Widget, allowing you to display multiple images or videos in a dynamic and interactive format.
By following the step-by-step guide, you can easily add and customize your carousels, ensuring they align with your branding and design preferences. With Elementor’s intuitive interface and responsive design, you can create stunning image carousels that captivate your visitors and showcase your content in a visually appealing manner.

