Elementor’s Dynamic Content is a game-changer in the world of web design, offering a dynamic and responsive approach to creating engaging websites. In an era where user experience and personalized content are paramount, this feature empowers web designers and developers to maximize their website’s potential like never before.
Why is Dynamic Content for Elementor essential, you may ask? The answer lies in the shifting sands of the online landscape. Today’s users crave more than static, unchanging web pages. They seek dynamic, interactive, and personalized experiences that cater to their unique needs and preferences.
Dynamic Content for Elementor is the key to meeting these expectations. It allows you to create websites that adapt and respond to user interactions, delivering content that’s not just relevant but also captivating. Whether it’s displaying personalized product recommendations, real-time updates, or user-specific messages, this feature takes web design to the next level.
In this blog, we’ll delve deep into the world of Dynamic Content for Elementor, exploring its numerous benefits and providing actionable insights on how to harness its power effectively. Whether you’re a seasoned web designer or just starting your digital journey, you’ll discover how this dynamic approach can breathe new life into your website, engage your audience, and help you make a lasting impact in the digital realm. Get ready to unlock the full potential of your website with Elementor website builder for WordPress
What Is Dynamic Content For Elementor Website?
Dynamic Content for Elementor is a feature within the popular Elementor page builder plugin for WordPress. It’s a dynamic and responsive approach to web design that allows website creators to deliver personalized content to visitors based on a variety of factors. This feature is a game-changer for web designers and marketers seeking to enhance user experiences and increase engagement.
At its core, Dynamic Content for Elementor provides the ability to change content elements dynamically based on specific conditions or user behavior. This means that you can create web pages where various elements, such as text, images, buttons, or entire sections, adapt in real-time to cater to each visitor’s needs, preferences, or demographics.
Here’s a breakdown of how Dynamic Content works with Elementor:
- Dynamic Widgets: Elementor’s integration of Dynamic Content allows you to insert media carousal widget. These widgets pull data from various sources, such as posts, custom fields, user information, or external APIs, and display it on your web page.
- Dynamic Tags: Dynamic Content introduces dynamic tags that you can use within widgets or text elements. These tags fetch and display dynamic information, such as a user’s name or the current date, offering a personalized experience to your visitors.
- Conditions and Rules: Elementor’s Dynamic Content feature lets you set conditions and rules for when and how dynamic content is displayed. For instance, you can display different content to logged-in users and anonymous visitors or show personalized content based on a user’s location.
- Integration with Dynamic Data Sources: Elementor can pull data from a wide range of dynamic sources, including WordPress databases, e-commerce platforms, CRM systems, social media feeds, and more. This data can then be used to populate your website’s content in real time.
- Dynamic Content Templates: You can create dynamic templates within Elementor, allowing you to apply consistent styling to dynamic content. This ensures that the dynamically generated content seamlessly blends with the rest of your web page’s design.
Benefits Of Using Dynamic Content For Elementor:
Dynamic Content for Elementor offers a multitude of benefits, making it a valuable tool for web designers and developers looking to elevate their websites. Here are ten compelling advantages of incorporating Dynamic Content into your Elementor-powered website:
- Enhanced User Engagement: Dynamic content captivates users by providing personalized and relevant information. This increased engagement can lead to longer session durations and lower bounce rates.
- Personalization: Tailoring content to individual users’ preferences, behaviors, and demographics allows for a highly personalized user experience. Personalization can result in higher conversion rates and customer satisfaction.
- Improved SEO: Dynamic content often involves regular updates and fresh data, which can boost your website’s search engine rankings. Search engines favor regularly updated content, making dynamic content a powerful SEO tool.
- Efficient Content Management: Managing and updating content becomes more efficient with Dynamic Content for Elementor. Instead of manually editing each piece of content, you can set rules and conditions for automated updates.
- Dynamic Landing Pages: For digital marketers, dynamic landing pages can be a game-changer. You can create a single landing page with dynamic elements that change based on the user’s referral source, search query, or past interactions.
- Real-time Data Display: Dynamic Content enables the display of real-time data, such as livestock prices, weather updates, or social media feeds. This feature is particularly useful for news websites, e-commerce stores, and information hubs.
- Geotargeting: You can target users based on their location, displaying location-specific content, offers, or events. Geotargeting is valuable for businesses with a global or local presence.
- Content A/B Testing: Dynamic Content allows you to conduct A/B testing with ease. You can test different content variations and track user interactions to determine which performs better.
- Streamlined User Journeys: Dynamic content can guide users through specific journeys or funnels, ensuring they receive relevant information at each step of their interaction with your website.
- E-commerce Personalization: For online stores, Dynamic Content can showcase personalized product recommendations, related items, or recently viewed products. This enhances the shopping experience and can boost sales.
Incorporating Dynamic Content for Elementor into your web design toolkit unlocks a world of possibilities, enabling you to create websites that adapt, engage, and resonate with users. Whether you’re a blogger, e-commerce entrepreneur, or corporate entity, the advantages of dynamic content are far-reaching, offering a competitive edge in today’s digital landscape.
How To Add Dynamic Content With Elementor?
Adding dynamic content with Elementor involves harnessing the power of dynamic widgets, custom fields, and the theme builder. These features allow you to create a consistent, content-driven website that adapts to user interactions and displays relevant, up-to-date information. Let’s explore each aspect in detail.
Dynamic Widgets:
Adding dynamic content with Elementor’s dynamic widgets is a straightforward process that empowers you to create engaging, personalized, and responsive web pages. These dynamic widgets allow you to seamlessly integrate dynamic data into your designs, maintaining design and content consistency while adapting to user interactions. Here’s a step-by-step guide on how to add dynamic content with Elementor’s dynamic widgets:
Step 1: Access Your Website’s Dashboard and Open Elementor Editor
To get started, log in to your WordPress website’s dashboard. Go to the page or post you wish to edit and click “Edit with Elementor”. This action launches the Elementor editor, providing you with a blank canvas to work with.

Step 2: Choose a Dynamic Widget
Within the Elementor editor, you’ll discover a diverse range of dynamic widgets to choose from, including headings, images, videos, buttons, and more. These widgets are designed to pull data dynamically from various sources and display it on your web page. To identify dynamic widgets, look for the “Dynamic tags” option located below or adjacent to data source boxes within the widget settings.

Step 3: Configure Widget Settings
Once you’ve selected a dynamic widget, it’s time to configure its settings to specify how the dynamic content should be displayed. The key setting to configure is the “Data Source,” where you decide where the widget should fetch its content. By clicking on the dynamic tags icon (resembling a magic wand), you can access additional settings and customization options.
Within the dynamic tags settings, you have several options to fine-tune how the dynamic content is presented:
- Excerpt Length: Define the maximum length for content excerpts, ensuring that the displayed text fits your design seamlessly.
- Apply to Post Content: Choose whether you want the dynamic content to replace or supplement the existing content within the widget.
- Advanced Settings: Delve deeper into customization with advanced settings. You can specify where the dynamic content should appear within the widget, using options like “Before,” “After,” and “Fallback” to control its placement.
Step 4: Preview Your Page
Before publishing your web page, it’s crucial to preview it to ensure that the dynamic content is displayed correctly. This step allows you to see how the dynamic widget interacts with your design and whether the data source is functioning as intended.
To preview your page, simply click the “Preview” button within the Elementor editor. This action opens a preview window that allows you to review the entire page, including the dynamic widget you’ve added.
Step 5: Save Your Changes
Once you’ve verified that the dynamic content is displayed correctly and aligns with your design objectives, it’s time to save your changes. Click the “Save” button in the Elementor editor, and your dynamic content will become live on your website.
By following these five simple steps, you can effortlessly add dynamic content to your Elementor-powered web pages, enhancing user engagement, personalization, and responsiveness. These dynamic widgets are powerful tools that enable you to maintain design and content consistency across your website while integrating dynamic data from various sources. Whether you’re looking to display dynamic headlines, images, videos, buttons, or other elements, Elementor’s dynamic widgets provide you with the flexibility and ease of use to create captivating and interactive web experiences for your audience.
Custom Fields:
Adding dynamic content to your Elementor-powered website through custom fields is an essential skill that enhances your site’s functionality and personalization. This step-by-step guide will walk you through the process of integrating plugin data and custom fields into your Elementor pages or posts, ensuring your content is always accurate, up-to-date, and engaging.
Step 1: Install and Configure Plugins
Before you can start incorporating custom fields into your Elementor designs, you need to ensure you have the necessary plugins installed and configured. These plugins, such as Advanced Custom Fields (ACF), PODS, Meta Box, or TOOLSET, enable you to create and manage custom fields effortlessly. Here’s how to get started:

- Access Your WordPress Dashboard: Log in to your WordPress admin panel, and navigate to the “Plugins” section.
- Search and Install the Relevant Plugin: Using the search bar, look for the custom fields plugin of your choice (e.g., ACF). Once you’ve found it, click the “Install Now” button to add the plugin to your WordPress site.
- Activate the Plugin: After installation, click the “Activate” button to activate the plugin on your website.
- Configure Plugin Settings: Depending on the custom fields plugin you’ve chosen, you may need to configure its settings to align with your specific requirements. This often involves setting up custom field groups and defining the fields themselves.
- Populate Custom Fields: Populate the custom fields with data as needed. For example, if you’re managing product data, you might create custom fields for product names, prices, descriptions, and images. Populate these fields with the relevant information for each product.
Step 2: Open the Elementor Editor
Once you’ve installed and configured the custom fields plugin, it’s time to integrate this data into your Elementor pages or posts. Log in to your WordPress dashboard, and navigate to the page or post where you want to add dynamic content using custom fields.
Click the “Edit with Elementor” button to launch the Elementor pro page builder. This intuitive interface allows you to design and customize your content easily.
Step 3: Choose a Widget Supporting Custom Fields
Elementor offers a wide range of widgets that support custom fields, making it simple to incorporate dynamic content into your designs. Select a widget that aligns with your design goals and supports custom fields. For instance, you can choose a text widget or a dynamic text widget to display custom field data.
Within the Elementor editor, you can add a widget to your page by dragging and dropping it from the left panel onto the desired section of your page.
Step 4: Insert Custom Field Data
Now comes the exciting part – inserting custom field data into your selected widget. You can achieve this by using shortcodes or tokens provided by the custom fields plugin. These placeholders dynamically fetch and display the relevant data from your custom fields. Here’s how:
- Access Widget Settings: Click on the widget you added to your page to access its settings panel on the left.
- Locate Dynamic Data Option: Within the widget settings, you’ll typically find an option for adding dynamic content. Look for this option, which might be labeled “Dynamic” or “Dynamic Tags.”
- Insert Custom Field Data: Click on the dynamic content option to reveal a dropdown menu or a list of available dynamic data sources. Find and select the custom field data source that corresponds to the specific custom field you want to display. For example, if you’ve created a custom field for “product price,” select that field.
Step 5: Customize Appearance and Styling
To ensure that the custom field data is presented in a visually appealing way that aligns with your website’s design, take some time to customize the appearance and styling of the widget. You can control aspects like font size, color, alignment, and spacing to create a cohesive and attractive design.
Step 6: Preview and Save Your Changes
Before publishing your changes, it’s essential to preview your page to verify that the custom field data is displayed correctly and matches your design intent. Click the “Preview” button within the Elementor editor to see how your page will look to visitors.
Once you’re satisfied with the display of the dynamic content, save your changes. The dynamic content from your custom fields is now integrated and ready for your website visitors to see. When users access the page or post, they will see the custom field data dynamically displayed, providing them with relevant and up-to-date information.
Incorporating dynamic content through custom fields with Elementor not only enhances the user experience but also streamlines content management by allowing you to update and display data efficiently. Whether you’re creating product pages, blog posts, or any other type of content, this approach offers flexibility and personalization that can set your website apart and engage your audience effectively.
Theme Builder:
Adding dynamic content with Elementor’s theme builder is a powerful way to customize your website’s appearance and populate it with dynamic data. This step-by-step guide will walk you through the process of using the theme builder to create dynamic theme templates and enhance your website’s user experience.
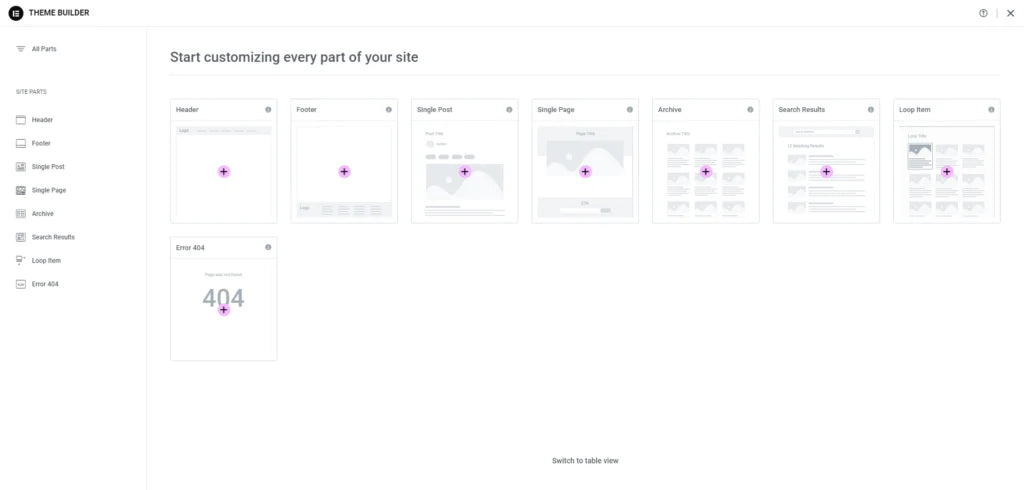
Step 1: Access the Theme Builder
To begin, open your WordPress dashboard and navigate to the Elementor editor. Ensure that you have the Elementor Pro plugin installed and activated, as the theme builder feature is available exclusively in the Pro version.
In the Elementor editor, locate and click on the “Theme Builder” section. This is where you’ll create and customize your theme templates.

Step 2: Create a New Theme Template
In the theme builder, you’ll have the opportunity to create theme templates for various parts of your website, including the home page, single post pages, product pages, archive pages, category pages, and more. To get started, click on the “Add New” button to create a new theme template.
Choose the type of template you want to create from the available options. For instance, if you’re looking to design a single post template, select “Single” as the template type.
Step 3: Design Your Template
Once you’ve selected the template type, you’ll be directed to Elementor’s intuitive drag-and-drop editor. This is where you’ll design the appearance of your template. You have full creative control over the layout, style, and content of your theme template.
To make your design dynamic, consider using dynamic widgets, dynamic colors, and custom fields. Dynamic widgets, such as “Post Title” and “Author Box,” allow you to insert dynamic content that will change based on the specific content being displayed.
Step 4: Insert Dynamic Content
To insert dynamic content into your theme template with WordPress content editor, simply drag and drop dynamic widgets onto your design canvas. These widgets are designed to pull data from various sources and display it dynamically. For example, if you’re creating a single post template, you can add a “Post Title” widget to dynamically display the title of each individual post.
In addition to dynamic widgets, you can also leverage custom fields to further enhance the dynamic nature of your content. Custom fields, which can be created and populated using plugins like Advanced Custom Fields (ACF), allow you to add specific data fields to your posts or pages. You can then insert this data into your theme template using Elementor’s dynamic content capabilities.
Step 5: Preview Your Theme Template
Before finalizing your theme template, it’s essential to preview it to ensure that the dynamic content displays correctly. Click the “Preview” button to see how your template will appear on the front end of your website.
During the preview, pay close attention to how the dynamic elements behave. Check if the post titles, author information, featured images, or any other dynamic content is correctly displayed based on the specific content being viewed.
Step 6: Save Your Template
Once you’re satisfied with the design and functionality of your theme template, click the “Save” button to save your work. Your dynamic theme template is now ready to be applied to the relevant parts of your website.
Step 7: Apply Your Theme Template
After saving your theme template, you can apply it to specific sections of your website. For example, if you created a single post template, you can apply it to all single post pages on your site. To do this, specify the conditions under which the template should be used.
Conditions may include post types, categories, tags, or any other criteria that determine when the template should be applied. Once you’ve set the conditions, save your changes, and your dynamic theme template will automatically populate the designated parts of your website with dynamic content.
By following these steps, you can harness the full potential of Elementor’s theme builder to create dynamic and engaging WordPress Elementor themes. Whether you’re designing a blog, e-commerce site, or any other type of website, this powerful feature allows you to provide visitors with personalized and up-to-date content, enhancing their overall user experience.
Conclusion
In conclusion, we’ve delved into the transformative world of Dynamic Content for Elementor, witnessing how this feature can take your website to new heights. From its inception to its seamless integration with Elementor’s dynamic widgets, custom fields, and theme builder, we’ve explored the ins and outs of creating a dynamic, engaging, and personalized online experience.
Dynamic Content empowers you to captivate your audience, boost SEO rankings, and streamline content management. It ensures that your website remains responsive to user interactions, always displaying the most relevant and up-to-date information.
So, as you embark on your web design journey, remember that Dynamic Content for Elementor is not just a tool; it’s your gateway to maximizing your website’s potential and leaving a lasting impact on your visitors. Whether you’re a blogger, e-commerce entrepreneur, or corporate entity, the dynamic future of web design awaits – embrace it and watch your online presence thrive. Also with the WordPress Theme Bundle by WP Elemento can make your website more engaging and efficient.