Elementor has emerged as one of the most popular WordPress page builders, empowering website owners to create stunning and interactive designs without any coding knowledge. However, tracking user interactions, such as form submissions, is crucial to understanding how visitors engage with your website and optimizing its performance accordingly. In this blog, we will walk you through the process of setting up Elementor contact form with GA4 to effectively track Elementor contact forms. By implementing this tracking solution, you will gain valuable insights into user behavior, measure form submissions, and evaluate the effectiveness of your contact page.
The transition from Universal Analytics to Google Analytics 4 brings a host of new features and reporting capabilities, offering a more comprehensive understanding of user journeys across devices and platforms. Utilizing GA4 with Elementor contact forms ensures that you stay ahead in the game, keeping pace with the latest advancements in website analytics.
Whether you are a business owner, marketer, or web developer, mastering this tracking integration will provide you with invaluable data for making informed decisions, optimizing your website’s user experience, and enhancing your overall online strategy.
So, if you’re ready to delve into the world of advanced website tracking and unleash the full potential of Elementor contact form insights with GA4, let’s get started on this exciting journey together!
What Is The Elementor Contact Form With GA4?
Elementor is a popular WordPress page builder that allows users to create and customize websites with a drag-and-drop interface. One of the key features it offers is the Elementor Pro plugin, which includes a built-in Contact Form widget.
The Elementor Contact Form widget allows you to easily create custom contact forms for your website without any coding knowledge. You can add various form fields such as name, email, phone number, message, etc., and customize the appearance and layout to match your website’s design. Additionally, you can set up email notifications to receive messages submitted through the form directly to your inbox.
Here’s how to use the Elementor Contact Form with GA4 widget:
- Install Elementor Pro: To use the Contact Form widget, you need to have the Elementor Pro plugin installed on your WordPress website.
- Edit Your Page: Go to the page where you want to add the contact form and open it in Elementor’s page editor.
- Add the Contact Form Widget: In the Elementor editor, search for the “Form” widget or find it in the “Widgets” panel. Drag and drop the Contact Form widget onto your page.
- Customize the Form: Once the widget is added, you can customize it by adding and arranging form fields, changing labels, and adjusting the styling to match your site’s design.
- Set Up Email Notifications: To receive form submissions, configure the email notification settings by entering the recipient’s email address and customizing the email content.
- Save and Publish: After setting up the form to your liking, save your changes and publish the page to make the contact form live on your website.
Importance of Tracking Elementor Contact Form Submissions with GA4:
Google Analytics 4 (GA4) is the latest version of Google Analytics, designed to provide more comprehensive insights into user behavior across different platforms and devices. Tracking Elementor contact form submissions with GA4 can provide valuable data and help you measure the effectiveness of your contact form and overall website performance. Here’s why it’s essential:
- Conversion Tracking: By tracking form submissions as conversions in GA4, you can monitor the number of users who successfully submit the form. This allows you to measure the form’s performance and optimize it for better conversion rates.
- Behavior Analysis: GA4 can provide insights into user behavior before and after form submissions. You can analyze the pages users visited before submitting the form, the time spent on the form page, and other interactions. Understanding user behavior can help you identify any friction points or opportunities for improvement.
- Goal Tracking: Setting up contact form submissions as goals in GA4 allows you to track specific actions that align with your business objectives. You can monitor the completion of these goals and assess how well your website is meeting its objectives.
- User Journey Mapping: GA4’s enhanced cross-platform tracking helps you understand how users interact with your website on different devices. You can track a user’s journey from the initial visit to form submission, even if they switch from a mobile device to a desktop, giving you a more holistic view of user engagement.
- Funnel Analysis: GA4 allows you to create funnels to visualize the step-by-step process users follow before completing the contact form. This helps you identify potential drop-off points and optimize the form’s flow for a higher conversion rate.
- Data-Driven Decision Making: By combining data from Elementor form submissions and GA4 analytics, you can make informed decisions about your website’s design, content, and marketing strategies to improve overall user experience and achieve your business goals.
Overall, tracking Elementor contact form submissions with GA4 provides valuable insights that can help you optimize your contact form, understand user behavior, and make data-driven decisions to improve your website’s performance and user experience.
How To Track Elementor Contact Form With GA4?
To track an Elementor contact form with GA4, you’ll need to follow a series of steps involving the creation of a Google Analytics 4 account, setting up Google Tag Manager, and configuring Google Analytics with Tag Manager. Here are the steps in detail:
Step 1: Create A Google Analytics 4 Account And Set Up GA Tag

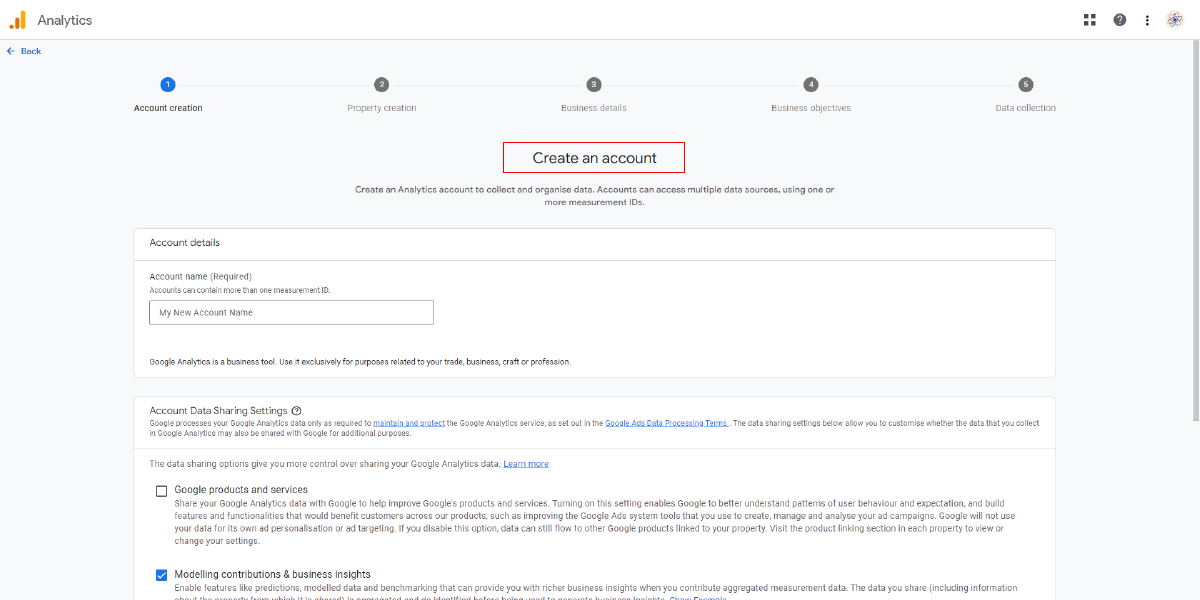
To begin tracking the Elementor contact form with GA4, the first crucial step is creating a Google Analytics 4 account dedicated to your website. Setting up this account enables you to collect valuable data and insights about user behavior on your website. To achieve this, you must sign up for a GA4 account through the Google Analytics platform.
Once you have successfully created the GA4 account, the next task is to install the GA Tag on your website. This tracking tag is a small piece of code that allows Google Analytics to gather data about user interactions on your site. It is crucial for capturing essential information such as page views, form submissions, clicks, and other user engagements.
The installation of the GA Tag can be accomplished using various methods, each suited to different website setups. Popular methods include using Google Tag Manager, integrating GA4 directly with WordPress or WooCommerce platforms, or manually adding the HTML tag to your website’s header section. Among these methods, this guide will focus on using Google Tag Manager, which offers a user-friendly and centralized platform for managing various tracking tags on your website.
Step 2: Create And Set Up Google Tag Manager

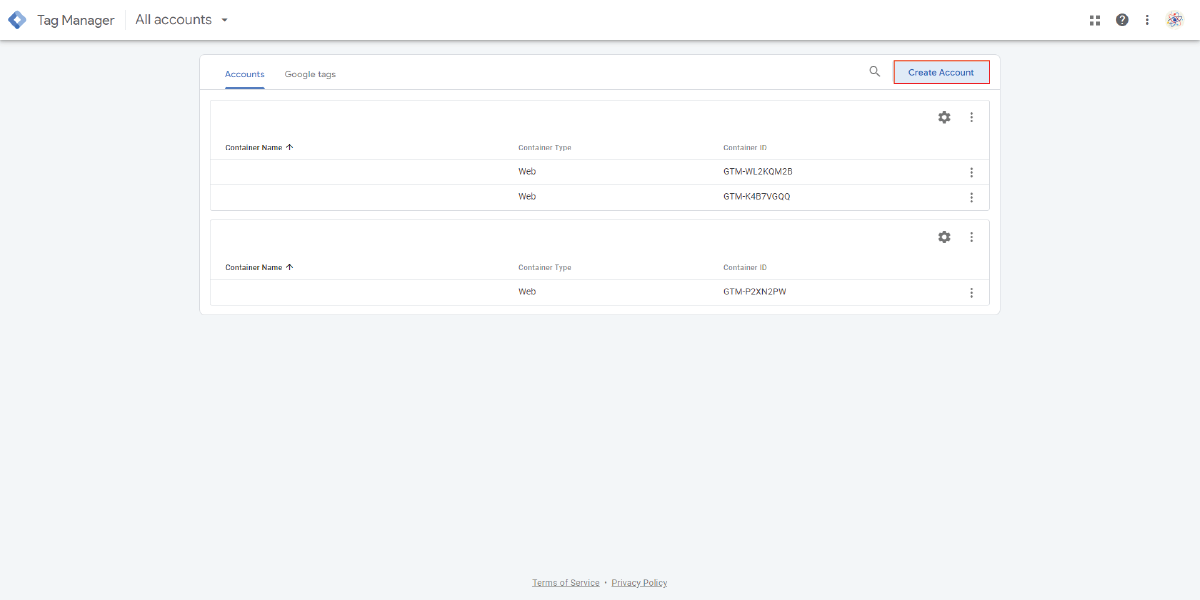
After creating a Google Analytics 4 account and setting up the GA tag, the next step is to set up Google Tag Manager for your website. To begin, sign in to your Google Tag Manager account, or if you don’t have one yet, create a new account. Once you’re logged in, you’ll need to create a new container specifically for your website within Google Tag Manager. The container acts as a holding space for all the tags and triggers you’ll set up for your website.
When you create the container, Google Tag Manager will provide you with a container snippet, which is a piece of JavaScript code. This snippet needs to be added to the header section of your website’s code. This is where Elementor, a popular page builder plugin, comes into play, as it allows you to easily insert the Google Tag Manager container snippet into your website’s header.
By using Elementor, you can manage and customize your website’s design and content while also incorporating essential tracking functionalities. This seamless integration of Google Tag Manager with Elementor allows you to enhance site tracking and gain valuable insights into user interactions.
For more detailed instructions on how to set up Google Tag Manager with Elementor for enhanced site tracking, you can refer to the blog post dedicated to this topic. Following this step will pave the way for efficient data tracking and analysis, empowering you to make informed decisions to improve your website’s performance and user experience.
Step 3: Configure Google Analytics With Google Tag Manager

After creating and setting up Google Tag Manager, the next step to track the Elementor contact form with GA4 is to configure Google Analytics with Google Tag Manager. To accomplish this, you will need to create a new Tag in Google Tag Manager. Make sure you select “Google Analytics: GA4 Configuration” as the Tag Type. In this configuration, you will need to enter your Google Measurement ID, which uniquely identifies your GA4 property.
The Google Measurement ID is a combination of letters and numbers and can be found in your Google Analytics 4 account settings. Once you’ve entered the Measurement ID, you can proceed with setting up the triggering for the Tag. The trigger determines when the Tag should fire and collect data. For a more comprehensive understanding of how to install GA4 with Tag Manager, you can refer to the previous blog on the topic, which provides additional insights and guidance.
Step 4: Track Elementor Form Submission
After configuring Google Analytics with Google Tag Manager, the next step to track the Elementor contact form with GA4 submission is to understand how the form behaves for the end-user. This step is crucial in determining the appropriate form-tracking method.
When testing the form submission yourself, observe the following:
- Redirect or “Thank You” Page: Check if the form redirects to a “Thank you” page or another destination after submission.
- “Thank You” Message: See if the form displays a thank you message without any other action, such as page reload or redirection.
- iFrame: Identify whether the form is embedded within an iFrame, which may require specific tracking considerations.
As far as Elementor is concerned, the form doesn’t reload the page or redirect the visitor after submission. Rather, it displays a “Thank you” message that states “The form was sent successfully”
Based on this behavior, it is clear that the form uses AJAX, a technique that allows data to be submitted and received in the background without requiring a page reload. For such forms that only display a success message, the appropriate form tracking method is the “AJAX Listener” method. However, in some cases, the AJAX Listener method might not work as expected.
In this particular case with Elementor, the AJAX Listener method did not work, and therefore, an alternative tracking method was chosen: the “Element Visibility Trigger.” This method tracks the appearance of the “Thank you” message by using CSS selectors, specifically the “elementor-message” and “elementor-message-success” classes.
Step 5: Set Up Element Visibility Trigger

The next step is to set up the “Element Visibility” trigger in Google Tag Manager. Since the Elementor form displays a “Thank you” message without reloading or redirecting, this trigger is ideal for tracking such interactions. To begin, create a new trigger in Google Tag Manager and select “Element Visibility” as the trigger type.
To track the appearance of the success message, you first need to identify the HTML element that contains the message. To do this, simply right-click on the “Thank you” message displayed after submitting the form on your website and select “Inspect” to view the underlying HTML code.
Upon inspecting the code, you’ll determine whether the success message has an ID or a CSS selector associated with it. In this specific case, you discover that the success message lacks an ID, making it necessary to use the CSS selector method for tracking.
Next, copy the appropriate CSS classes that pertain to the success message, which, in this case, are “elementor-message” and “elementor-message-success.” These classes will be used in the Element Visibility Trigger settings alongside the CSS selector method.
To ensure that the trigger accurately tracks the appearance of the success message, it is important to enable “Observe DOM Changes” in the trigger settings. This setting allows the trigger to detect changes in the Document Object Model (DOM) and react accordingly.
After setting up the trigger, save the changes and proceed to refresh the Preview and Debug mode in Google Tag Manager. Once done, refresh the page that contains the Elementor form and submit the form to test the trigger’s functionality. If everything works as expected, you should observe the Element Visibility event appearing in the GTM debug console, indicating that the trigger is functioning correctly.
Step 6: Set Up An Event On Google Analytics
Once you have set up the Element Visibility Trigger to track the appearance of the “thank you” message on the screen after submitting the Elementor contact form with GA4, the next step is to configure Google Tag Manager (GTM) to send an event to Google Analytics whenever the message is displayed. This event will allow you to track and analyze form submissions as interactions in GA4.
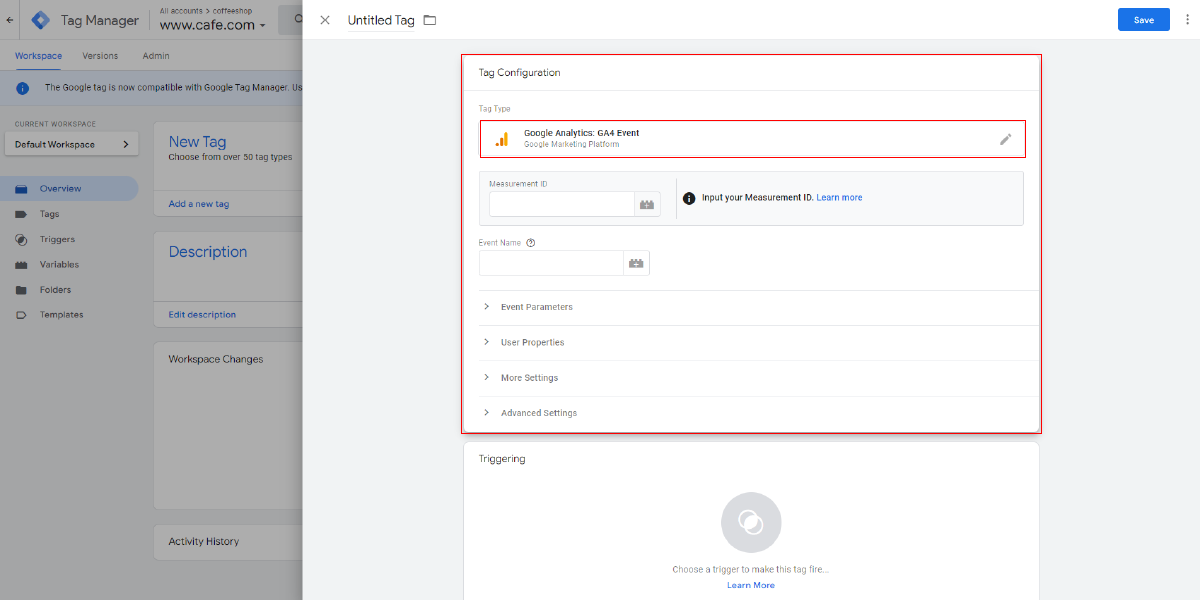
To achieve this, you’ll need to create a new Tag in Google Tag Manager. Choose ” Google Analytics: GA4 Event” as the Tag type. In the Tag configuration, you must set up the event parameters: Category, Action, and Label. The Category is a way to group similar events, such as “Form Submissions.” The Action describes the type of interaction, in this case, it could be “Form Submitted.” The Label provides additional information or context, like the specific page where the form was submitted or any custom data you want to track. Ensure that these parameters align with your event-tracking naming convention for consistency and ease of analysis.
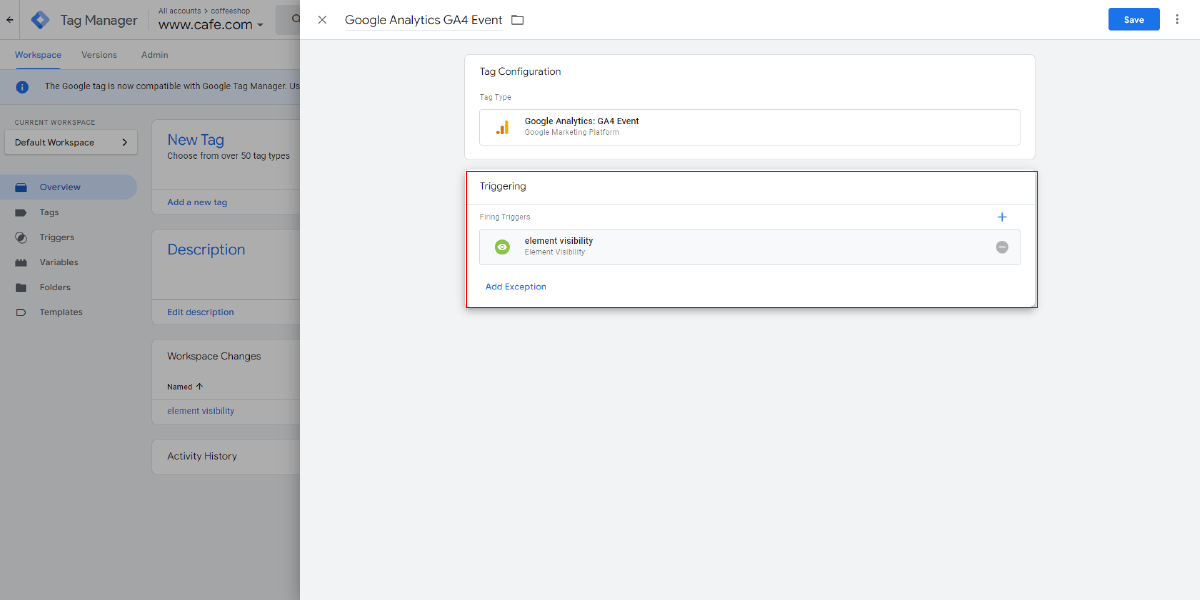
After configuring the event parameters, go to the Tag’s triggering section. Here, you’ll need to choose the Element Visibility Trigger that you created in the previous step. By associating the trigger with the Tag, you tell GTM to fire the Tag whenever the “thank you” message appears on the screen.
Once you’ve made these changes, save them in Google Tag Manager. Next, refresh the Preview and Debug mode to apply the changes to your current session. Now, submit the Elementor form with test data. In the Preview and Debug mode, you should observe the Element Visibility event triggering, and clicking on it should display the GA Event tag firing as well.
By following these steps, you should be able to successfully track the Elementor contact form submissions in Google Analytics 4 using Google Tag Manager.
Conclusion
In conclusion, integrating WordPress Elementor themes and tracking the Elementor contact form with GA4 is an essential aspect of effective data-driven marketing. By implementing the steps outlined in this guide, you can gain valuable insights into user interactions and conversions on your website, empowering you to make informed marketing decisions.
The Elementor contact form serves as a crucial tool for engaging with website visitors and capturing leads. Understanding its functionality and how to use the Elementor Contact Form widget provides a solid foundation for building effective forms that drive user engagement.
The Importance of Tracking Elementor Contact Form with GA4 cannot be overstated. GA4 offers advanced event-tracking capabilities that allow you to measure and analyze user behavior more accurately. By setting up the Element Visibility Trigger and sending events to GA4, you can monitor form submissions and gather crucial data on user engagement, conversion rates, and the effectiveness of your marketing efforts.
Tracking Elementor contact form submissions is a multi-step process, involving the creation of a Google Analytics 4 account, setting up Google Tag Manager, and configuring GTM to send events to GA4. This process may seem complex, but it ultimately unlocks valuable data that can shape your marketing strategies for better performance and higher returns.
So, take the initiative to implement these tracking methods and watch your marketing strategies reach new heights of effectiveness and success.
The WordPress theme bundle, bundled with premium Elementor themes, offers a comprehensive solution for website design and functionality. These themes seamlessly integrate with Elementor, a popular page builder plugin, allowing users to create stunning websites with ease. In the context of Elementor Contact contact form with GA4 (Google Analytics 4), this bundle provides a powerful combination. Users can effortlessly build and customize contact forms using Elementor and then integrate them with GA4 for advanced tracking and analytics. This integration empowers website owners to gather valuable data on user interactions with their contact forms, enabling them to make data-driven decisions and optimize their online presence effectively.


