Navigating a website is a seamless experience until users encounter the infamous “404 Page Not Found” error. While this error indicates that the requested page couldn’t be located, it doesn’t mean the end of the road for user engagement. It presents a unique opportunity for website owners to leave a lasting impression. This blog unlocks the potential of turning a stumbling block into a stepping stone – “How to Create a Custom 404 Page in WordPress with Ease.”
A custom 404 page goes beyond the standard error message, offering a chance to inject creativity, branding, and user-friendly navigation into the unexpected detour. We will see the step-by-step process of crafting a bespoke 404 page in WordPress that not only guides lost visitors back on track but also reinforces your website’s identity. From choosing engaging visuals to integrating helpful links, we’ll empower you to transform a potentially frustrating encounter into an opportunity to showcase your website’s personality and provide value. Get ready to enhance the user experience and leave an indelible mark on those who take an unexpected turn on your WordPress journey.
Importance Of Having Custom 404 Page In WordPress
The 404 page, often humorously referred to as the “Page Not Found” error, is a standard HTTP response code indicating that the server could not locate the requested page on the website. This error can occur for various reasons, such as broken links, deleted pages, or mistyped URLs. When users encounter a 404 error, it disrupts their seamless navigation, potentially leading to frustration and a negative user experience.
Typically, the default 404 page is a generic message from the server, providing little information and lacking any connection to the website’s branding or design. This default display does little to engage users or guide them back on track. Recognizing the common occurrence of 404 errors, website owners can leverage the opportunity to create a custom 404 page that not only serves as a helpful navigator but also reflects the personality and branding of the site.
Creating a Custom Pages in WordPress website is not just about addressing errors; it’s an opportunity to turn an inconvenience into a positive user experience. Here’s why having a custom 404 page is crucial:
- Enhances User Experience: A well-designed custom 404 page can turn what might be a frustrating experience into a positive one. By incorporating engaging visuals, friendly messages, and helpful navigation links, you provide users with a more pleasant encounter in the face of a setback. This, in turn, contributes to an overall positive perception of your website.
- Retains Visitors on Your Site: Instead of encountering a dead end, a custom 404 page directs users to relevant content, encouraging them to explore other parts of your website. Including links to popular pages, categories, or a site map keeps visitors engaged and prevents them from immediately leaving in frustration.
- Showcases Brand Personality: The 404 page is an often-overlooked canvas for expressing your brand’s personality. By incorporating consistent branding elements, such as logos, color schemes, and messaging tone, you maintain a cohesive user experience even in the face of errors. This reinforces brand identity and helps users feel more connected to your website.
- Reduces Bounce Rate: When users encounter a standard, unhelpful 404 page, they are more likely to bounce away from the site. A custom 404 page with clear instructions and enticing links encourages users to stay and explore further, reducing bounce rates and increasing the chances of retaining a potential audience.
- Provides Guidance and Information: A custom 404 page serves as a helpful guide by providing information on why the error occurred and offering suggestions for the next steps. Including a search bar or links to key sections helps users find the information they were originally seeking, minimizing the frustration associated with a broken link.
- Improves SEO and Site Crawlability: Search engines regularly crawl websites to index content. When a 404 error is encountered, it can negatively impact SEO. A custom 404 page that is well-structured and includes relevant links helps search engine bots navigate your site more effectively, contributing to improved SEO performance.
- Monitors and Addresses Broken Links: A custom 404 page can integrate analytics tools to monitor the URLs that lead users to the 404 error. This information allows website owners to identify and address broken links promptly, ensuring a smoother browsing experience for users and preventing the negative consequences of unresolved errors.
- Encourages User Feedback: Utilizing the 404 page as an avenue for user feedback can turn a negative experience into an opportunity for improvement. Including a feedback form or contact information invites users to report issues, fostering a sense of transparency and responsiveness on the part of the website owner.
Overall, a custom 404 page in WordPress is not just a technical necessity; it’s a chance to reinforce your brand, guide users effectively, and showcase your commitment to providing a positive online experience. Embracing this opportunity can turn an error into an opportunity to leave a lasting impression on your website visitors.
Methods To Create A Custom 404 Page in WordPress?
Creating a custom 404 page in WordPress is a thoughtful process that involves enhancing user experience, maintaining brand consistency, and providing helpful navigation options. There are various methods to achieve this customization, each offering a different level of complexity and flexibility.
Method 1: Utilizing WordPress Theme Customizer
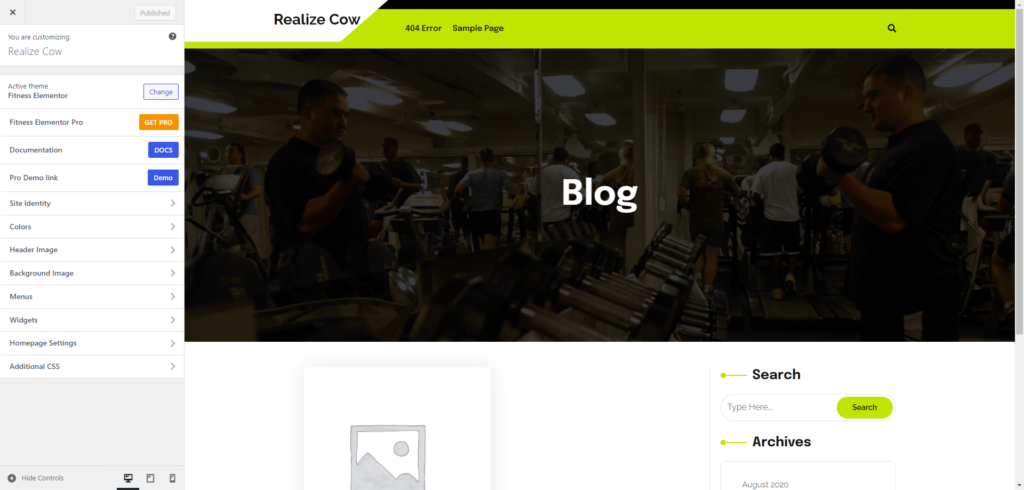
One of the most straightforward and user-friendly methods to create a custom 404 page in WordPress is by leveraging the built-in Theme Customizer. This versatile tool allows users to make real-time adjustments to various elements of their website’s appearance, offering a seamless and intuitive experience. Below, we’ll walk through the steps to create a custom 404 page in WordPress using the Theme Customizer, emphasizing its simplicity and effectiveness.
Step 1: Accessing the Theme Customizer
The first step is to log into your WordPress dashboard and select “Appearance”. Once there, click on “Customize” to enter the Theme Customizer interface. This centralized hub is where you can make adjustments to your theme’s settings and visualize the changes in real time.
Step 2: Locating the 404 Page Settings
Inside the Theme Customizer, explore the available options related to your theme’s settings. Depending on the theme you’re using, there may be a dedicated section specifically designed for customizing the 404 error page. Some themes might label this section as “Error Pages,” “404 Page,” or something similar. If your theme supports this feature, you’ll find a set of settings tailored for customizing the content and layout of your 404 page.
For users exploring premium WordPress Elementor themes, options like those provided by themes from WP Elemento can offer an extensive array of customization features, including dedicated sections for 404 pages. These premium themes often go beyond the basics, providing a comprehensive set of tools to personalize every aspect of your website.
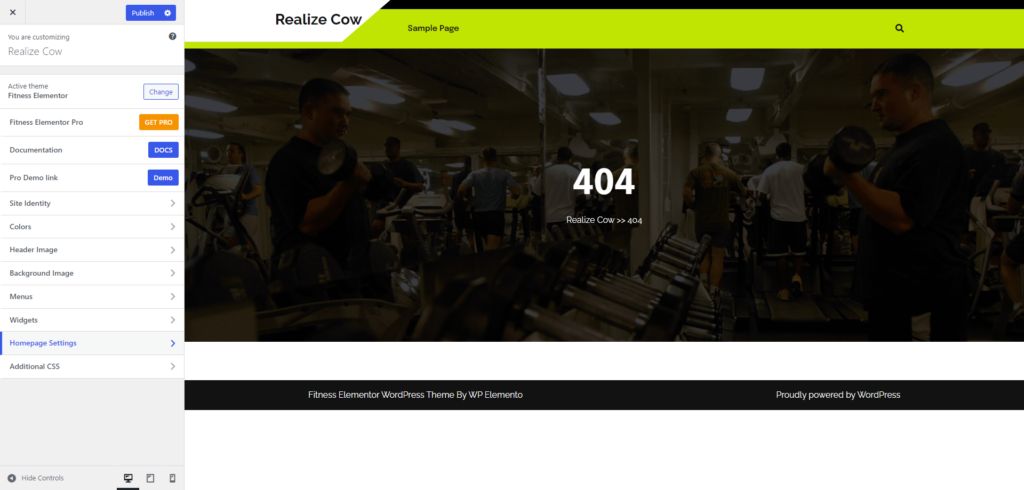
Step 3: Customizing the 404 Page
Once you’ve located the relevant settings for the 404 page, you can start customizing its content. The Theme Customizer typically provides a user-friendly interface with options to add text, images, and links to your custom 404 page. Some themes go the extra mile by offering specific settings for adding a custom message, a search bar, or suggested links that guide users back to valuable content.
This step is where creativity comes into play. You have the flexibility to align the 404 page with your brand’s identity, maintaining consistency in design elements and messaging. Incorporate a friendly message, humorous imagery, or helpful links to redirect users who may have landed on the 404 page. The goal is to transform what could be a frustrating encounter into an opportunity to engage visitors and keep them exploring your site.
Step 4: Preview and Save
Before finalizing your custom 404 page, always utilize the “Preview” feature available in the Theme Customizer. This allows you to see how your modifications will look in the actual environment of your website. By previewing the changes, you can catch any potential issues or adjustments needed to ensure a seamless user experience.
Once satisfied with the appearance and functionality of your custom 404 page, click the “Save” button. This action makes the modifications live on your website, and visitors who encounter a 404 error will now be greeted by your personalized and user-friendly 404 page.
By leveraging the Theme Customizer, users can seamlessly integrate a custom 404 page without delving into complex coding or relying on additional plugins. This method streamlines the process, offering a visually intuitive interface where users can control the appearance and messaging of their error page. Ultimately, creating a custom 404 page through the Theme Customizer enhances the user experience, adds a touch of personality to the website, and ensures that even in moments of error, visitors feel guided and engaged.
Method 2: Creating A Custom 404 Page Template
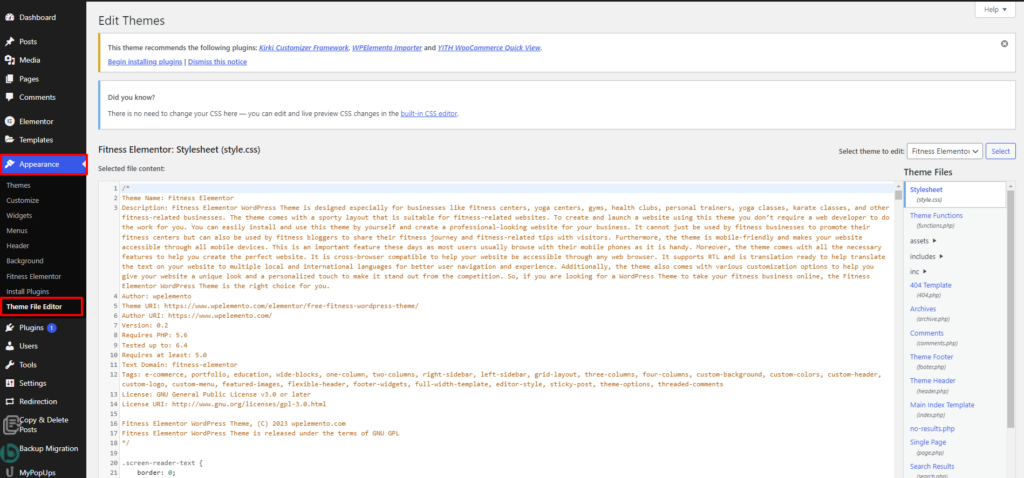
For users comfortable with a bit of coding, crafting a custom 404 page template is a powerful and flexible option to enhance the user experience on their WordPress website. This method involves directly modifying the theme’s files, providing complete control over the design and content of the 404 error page.
Step 1: Accessing Theme Files
The journey begins with accessing the theme files of your WordPress installation. This can be achieved using an FTP client or a file manager provided by your hosting service. Navigate to the “wp-content/themes/” directory, where you’ll find the folders corresponding to your installed themes.
Locating the theme folder is crucial, as it is within this directory that you will be creating and modifying files to implement your custom 404 page.
Step 2: Creating a New Template File
Once inside the theme folder, the next step involves creating a new file that WordPress will recognize as the dedicated template for handling 404 errors. Create a file and name it “404.php.” The use of this specific filename is essential for WordPress to identify and apply this file when a user encounters a 404 error on the website.
By creating a distinct template file, you ensure that your customizations for the 404 page won’t affect the overall theme structure or interfere with other templates.
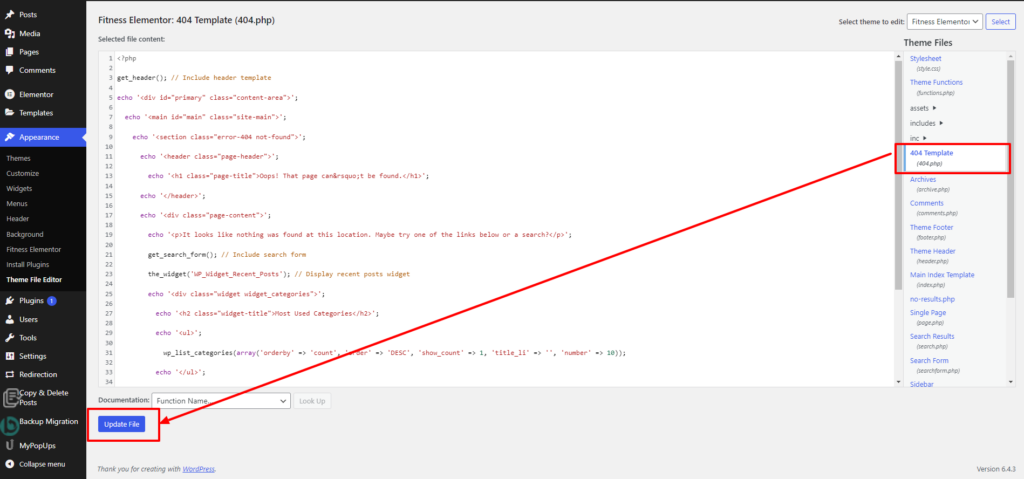
Step 3: Editing the Template
With the “404.php” file in place, the real customization begins. Open the newly created file using a text editor, and you’ll be faced with a blank canvas to unleash your creativity. This is where you can incorporate HTML, CSS, and PHP code to design the 404 page according to your preferences.
Consider adding a friendly and informative message, perhaps apologizing for the inconvenience and guiding users on how to navigate back to relevant sections. You can include links to key pages, a site map, or any other elements that provide value to users who have encountered a dead end.
For instance:
<?php
get_header(); // Include header template
echo ‘<div id=”primary” class=”content-area”>’;
echo ‘<main id=”main” class=”site-main”>’;
echo ‘<section class=”error-404 not-found”>’;
echo ‘<header class=”page-header”>’;
echo ‘<h1 class=”page-title”>Oops! That page can’t be found.</h1>’;
echo ‘</header>’;
echo ‘<div class=”page-content”>’;
echo ‘<p>It looks like nothing was found at this location. Maybe try one of the links below or a search?</p>’;
get_search_form(); // Include search form
the_widget(‘WP_Widget_Recent_Posts’); // Display recent posts widget
echo ‘<div class=”widget widget_categories”>’;
echo ‘<h2 class=”widget-title”>Most Used Categories</h2>’;
echo ‘<ul>’;
wp_list_categories(array(‘orderby’ => ‘count’, ‘order’ => ‘DESC’, ‘show_count’ => 1, ‘title_li’ => ”, ‘number’ => 10));
echo ‘</ul>’;
echo ‘</div>’;
echo ‘</div>’;
echo ‘</section>’;
echo ‘</main>’;
echo ‘</div>’;
get_footer(); // Include footer template
?>
This example code creates a simple and informative 404 page with a search form, recent posts, and a list of most used categories.
Step 4: Uploading and Testing
Once you’ve fine-tuned your custom 404 page, save the changes to the “404.php” file and upload the modified theme folder back to your server using the FTP client or file manager. Ensure that you overwrite the existing theme files with the updated versions.
To confirm that your custom 404 page is working correctly, visit a non-existent page on your website. If implemented correctly, your users should now encounter a thoughtfully crafted 404 page that guides them back into the heart of your website.
Creating a custom 404 page template through coding allows for unlimited creativity and personalization. It ensures that every aspect of the error page aligns with your website’s branding and user experience goals. This method is particularly advantageous for those who want complete control over the design and functionality of their 404 pages and are comfortable working with HTML, CSS, and PHP code.
Method 3: Using A Custom 404 Page Plugin

Creating a custom 404 page in WordPress is essential for providing a user-friendly experience when visitors encounter a page not found error. While there are various methods to achieve this, one popular and user-friendly approach involves using the Elementor Pro Page Builder Plugin. Elementor is a powerful and intuitive visual page builder that simplifies the process of designing and customizing WordPress pages, including 404 error pages.
To start, ensure that you have the Elementor Page Builder Plugin installed and activated on your WordPress website. Once activated, follow these detailed steps to create a custom 404 page in WordPress using Elementor:
Step 1: Accessing the 404 Page
Begin by logging into your WordPress dashboard. In the left-hand menu, navigate to “Pages” and then select “All Pages.” Look for the existing 404 page or create a new one by clicking on “Add New.”
Step 2: Create a New Page
Click on “Add New” to create a new page dedicated to the 404 error. Give your page a title, such as “404 Page” or “Page Not Found,” to make it easily identifiable. Remember that the title is visible to users, so you might want to keep it concise and informative.
Step 3: Edit with Elementor
Once you’ve created or located the 404 page, click on the “Edit with Elementor” button. This action opens the Elementor page builder, allowing you to customize the page visually.
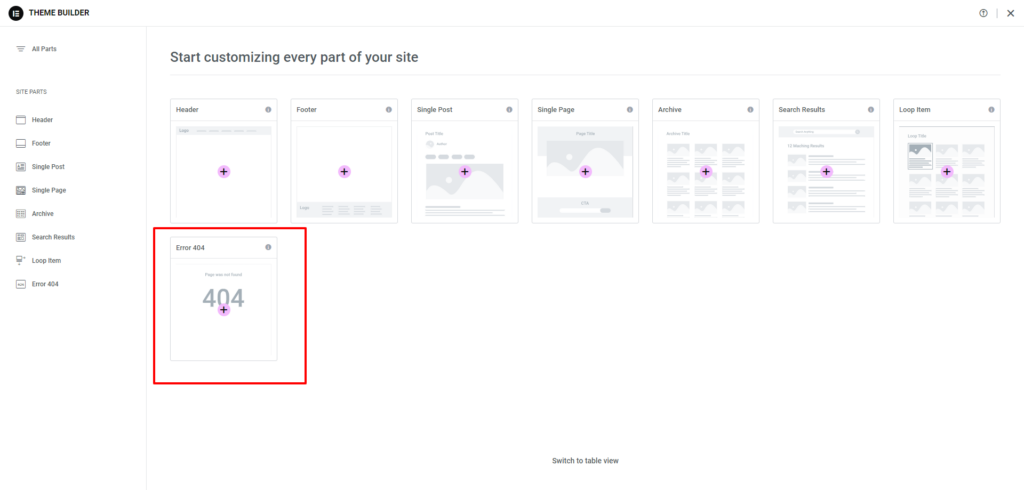
Step 4: Choose a Template (Optional)
Elementor provides a range of pre-designed templates that you can use as a starting point for your 404 page. Click on the folder icon at the bottom of the Elementor editor to access the template library. Search for “404” or browse through the available options to find a template that suits your website’s design and tone.
Step 5: Customize the Layout
Elementor provides a drag-and-drop interface, making it easy to customize the layout of your 404 page. You can add sections, columns, and widgets to create a visually appealing and informative page. Consider including elements like a brief apology, a search bar, links to popular content, or even a contact form to enhance user engagement.
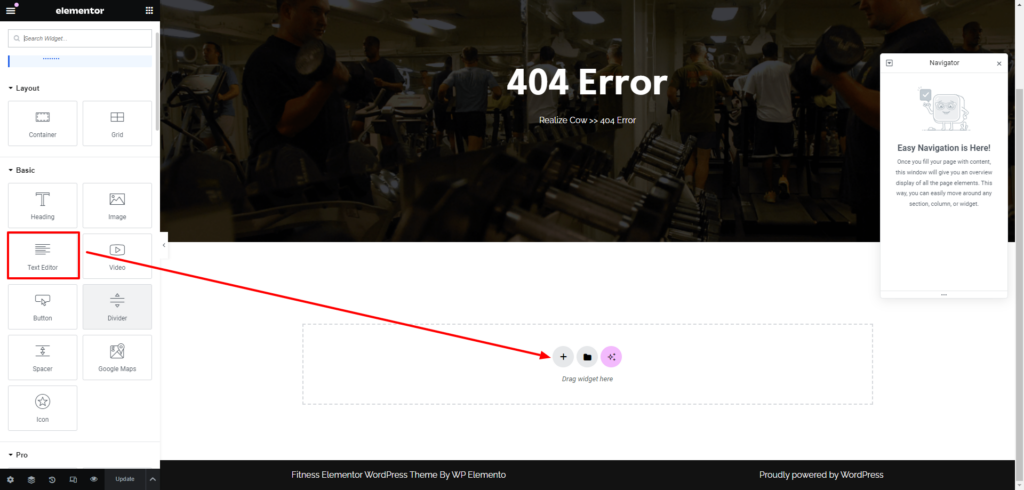
Step 6: Add Content and Messages
To make your custom 404 page informative and helpful, add content that guides users back to your website’s main content. Craft a friendly and concise message explaining that the page they were looking for doesn’t exist and provide options for navigation. Include links to the homepage, popular posts, or relevant categories to help users find what they’re looking for.
Step 7: Implement Dynamic Content
Make your 404 page dynamic by incorporating dynamic content for elementor such as recent posts, popular articles, or featured products. Elementor allows you to use dynamic widgets, ensuring that the content remains relevant and engaging for users even when they encounter an error.
Step 8: Design and Styling
Customize the design and styling of your 404 page to match your website’s overall aesthetic. Elementor offers a wide range of styling options, including font styles, colors, spacing, and more. Ensure that the design is consistent with your brand identity to maintain a seamless user experience.
Step 9: Mobile Responsiveness
With Elementor, you can preview and optimize your 404 page for different devices, ensuring a responsive design. Click on the mobile icon at the bottom of the Elementor editor to toggle between desktop, tablet, and mobile views. Adjust the layout and styling as needed to provide a consistent and user-friendly experience across all devices.
Step 10: Preview and Save
Before publishing your custom 404 page, use the preview button to see how it looks. Check for any formatting issues or adjustments needed. Once you’re satisfied with the design and content, click the “Save” button to save your changes.
Step 11: Set the 404 Page as the Default
To make your custom 404 page the default error page, go to “Settings” in your WordPress dashboard and select “Reading.” In the “Error 404 Page” section, choose the newly created 404 page from the drop-down menu. Save your changes to ensure that visitors are directed to your custom 404 page when they encounter a page not found error.
Step 12: Test the 404 Page
After setting the custom 404 page as the default, test its functionality by intentionally entering a non-existent URL on your website. Ensure that the page displays correctly and that the navigation links and other elements are working as intended. This step helps identify any issues that need addressing before the custom 404 page goes live for all users.
Creating a custom 404 page in WordPress with Elementor not only enhances the user experience on your website but also allows you to showcase your brand personality and creativity. The visual and intuitive nature of Elementor makes the process accessible to users with varying levels of technical expertise, making it a popular choice for WordPress website owners seeking an effective and visually appealing solution to handle 404 errors.
Conclusion
In conclusion, crafting a Custom 404 Page in WordPress website is a crucial step in enhancing user experience and maintaining a professional online presence. Throughout this guide, we explored the significance of having a personalized 404 page and delved into three effective methods to create one.
From leveraging the WordPress Theme Customizer to crafting a custom 404 page template and utilizing dedicated plugins, we’ve provided comprehensive insights into each approach. However, for a user-friendly and visually appealing solution, the use of a plugin like Elementor stands out. Its intuitive drag-and-drop interface empowers users to design a unique 404 page seamlessly. For pre made customizable 404 page templates you can choose WP Elemento as your well-wisher, the WordPress theme bundle itself contains 40+ Premium WordPress themes that are packed with custom build 404 page templates. You just need to go for the one-click demo importer and in no time you will have your website with all of the important pages including 404 page Premade.
Remember, a well-designed 404 page not only navigates users back to your site’s core content but also presents an opportunity to showcase your brand personality. By investing time in this often-overlooked aspect, you ensure that even error pages contribute positively to your website’s overall user experience.


